-
SYSTEM SEARCH
System Scanners Online:
Username: Guest
>> System Scan?
>> The Universe >
Incoming Message:
Due to system limitations searching with words of 3 or less characters will not return results. For instance; Doctor Who. This will not return results as the system is trying to search for both Doctor AND Who in which Who will not be found as it's a 3 character word. To find Doctor Who; you'd search for either Doctor or "Doctor Who".
Search Tips:
For specific searches; enclose your search with quotes. Example: "Doctor Who" or "Addams Family".
Search the Community
Showing results for tags 'serum'.
-
Version 1.0.0
920 downloads
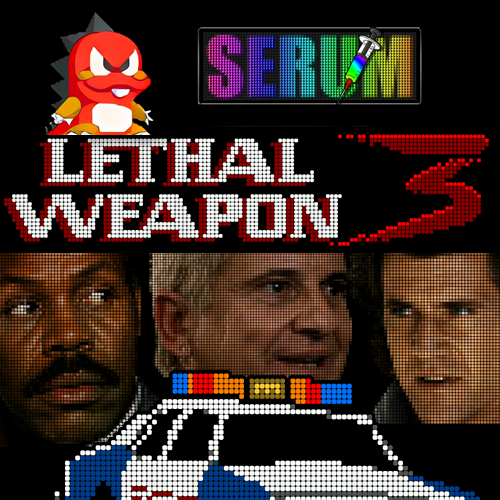
OK OK OK! I'm happy to share my Serum colorization of Lethal Weapon 3 (Data East, 1992). I spent a little over 100 hours on this project and truly enjoyed discovering this fast-paced and very fun table! Works with both the official Data East ROM v2.0.8 and PinballCode.com's unofficial ROM v3.0.1. To enable the HD headshots, make sure to add the following to your DmdDevice.ini: [lw3_208] scalermode = Doubler [lw3_301] scalermode = Scale2x You may specify Doubler or Scale2X depending on your up-scaling preferences. Requires DMDEXT v2.5.0 or more recent. (Serum64.dll 2.6.0 is built-in) Hope you enjoy! KRΛKΞN 🍻- 21 comments
- 18 reviews
-
- 107
-

-
- 1433
- lethal weapon
- (and 4 more)
-

Version 2.0
8758 downloads
**** Ladies and gentlemens !! **** The day has arrived! more than 600 hours of work over a year to present you a colorized version of the Big Bang Bar! Mosh a gogo ; Bar Tour; Cosmic Dartz; all in COLOR ! So, there is still work to be done, this ROM will never be 100% colorized (at least not by me lol) There are far too many technical constraints today. On the other hand, I hope that you will enjoy this version, which I will update from time to time. Currently, there is the Lunapalooza rainbow which will not display correctly and random appearances of the waitress and her friend to the right or left of the DMD. I think that doesn't stop you from playing, I would do my best to fill in little by little to minimize "orange" appearances or freezes. I could have waited a few more months, but in the end there would always have been points that posed a problem. With BBB colorization, when you resolve one problem, there are two others that are triggered (...) So I chose to share it with you now! I would like to warmly thank the entire SERUM team for their support throughout this year working on BBB. I assure you that they showed patience and calm in the face of the thousands of questions that I was able to ask them at several stages of the coloring! A big thank you in particular to: @Zedrummer, obviously, for its fantastic colorization software! @Kraken, for his patience and his explanations on everything! and in particular on the use of the software! @Pastor, same, thank you for getting me out of unresolved technical problems more than once... @ebor, for his support and explanations! @Primetime5k, @Boroka, @Kraken, @ebor, @Pastor, for testing There you go, I'll let you discover BBB in a new light, the day of color! Good game everyone! Davadruix *** Attention *** There are 2 versions available for download, the first is with color rotation on certain frames and the other without color rotations. The Pin2DMD of our pincab does not take into account (for the moment) the display of color rotations. Pin2DMD user You must use the version without the rotations. Rom to use with this colorization: bbb109.zip Version VPinmame: V.3.6.0.1122 (oct 22 2024) DMDExt: dmdext-2.3.0 Pin2DMD: 4.52 VPX: VPinballX-10.8.0-2015-6f63503-RC5 Table: BBB VPW Backglass: Personal, non-commercial use only. Please contact me if you would like to use it in another way. All Logos, Copyrights and Trademarks are property of their respective owners. PROVIDED STRICTLY FOR PERSONAL / HOME USE AND NOT FOR COMMERCIAL SALE / RE-SALE OR DISTRIBUTION! Mesdames et messieurs, le jour est arrivé ! plus de 600 heures de travail sur un an pour vous présenter une version colorisée du Big Bang Bar ! Mosh à gogo; Tour de bar; Cosmic Dartz; tout en couleur ! Alors, il reste tout de même à faire, cette ROM ne sera jamais colorisée à 100% (en tout cas pas par moi lol) Il y a beaucoup trop de contraintes techniques au jour d'aujourd'hui. J'espère par contre que vous apprécierez cette version, que je mettrai à jour de temps à autre. Actuellement, il y a l'arc en ciel du Lunapalooza qui ne s'affichera pas correctement et des apparitions aléatoires de la serveuse et de son copain à droite ou a gauche du DMD. Je pense que ça n'empêche pas de jouer, je ferais au mieux pour combler petit à petit afin de minimiser les apparitions "orange" ou les freeze. J'aurais pu encore attendre quelques mois, mais au bout du compte il y aurait toujours eu des points qui posent problème. Avec la colorisation de BBB, lorsque vous résolvez un problème, il y en a deux autres qui se déclenchent (...) J'ai donc fait le choix de vous la partager dès maintenant ! Je tiens à remercier vivement toute la team SERUM pour leur soutiens tout au long de cette année à travailler sur BBB. Je vous assure qu'ils ont fait preuve de patience et de calme face aux milliers de questions que j'ai pu leur poser à plusieurs étapes de la colorisation ! Un grand merci en particulier à : @Zedrummer, évidement, pour son logiciel de colorisation formidable ! @Kraken, pour sa patience et ses explications sur tout ! et en particulier sur l'utilisation du logiciel ! @Pastor , idem, merci de m'avoir sorti plus d'une fois des problèmes techniques sans solution... @ebor , pour son soutient et ses explications ! @Primetime5k, @Boroka, @Kraken, @ebor, @Pastor, pour les tests Voila, je vous laisse découvrir BBB sous un nouveau jour, le jour de la couleur ! Bon jeu à tous ! Davadruix *** Attention *** Il y a 2 versions en téléchargement, la première est avec rotation de couleurs sur certaines frames et l'autre sans les rotations de couleurs. Le Pin2DMD de nos pincab ne prend pas en compte (pour l'instant) l'affichage des rotations de couleurs. Utilisateur de Pin2DMD Il faut utiliser la version sans les rotations. Rom à utiliser avec cette colorisation: bbb109.zip Table: BBB VPW https://vpuniverse.com/files/file/13634-big-bang-bar-capcom-1996-vpw/ Le Backglass: https://vpuniverse.com/files/file/13633-big-bang-bar-capcom-1996-b2s-with-full-dmd/ Version VPinmame: V.3.6.0.1122 (oct 22 2024) DMDExt: dmdext-2.3.0 Pin2DMD: 4.52 VPX: VPinballX-10.8.0-2015-6f63503-RC5 Personal, non-commercial use only. Please contact me if you would like to use it in another way. All Logos, Copyrights and Trademarks are property of their respective owners. PROVIDED STRICTLY FOR PERSONAL / HOME USE AND NOT FOR COMMERCIAL SALE / RE-SALE OR DISTRIBUTION! -

Version 2.1.0
6521 downloads
Please note: This Serum colorization was developed and tested on both virtual and real tables to ensure accurate color depth and optimal performance. However, for real tables, this applies exclusively to ZeDMD <> PPUC/DMD displays. Use with any other hardware solution is strongly discouraged. Videos and user reports have shown reduced frame rates and poor color output specifically on PIN2DMD. Please be aware that these issues are not caused by Serum itself, but by the hardware/software limitations of PIN2DMD. Hi, Here is my first participation in the vpinball world. I made the colorizing for this great pinball game because I couldn't find a good colourized version of this ROM and I wanted to have a small contribution to this beautiful hobby. I hope you like it. I'm newcomer to colorizing, don't hesitate to comment anything Greetings Note: This serum colorization has being upgrade with the new and highly optimized cROMc format, the successor to cRZ, with up to a 90% reduction in memory footprint - You MUST use the newest 2.4.0 dmdext release HERE by freezy and delete old SerumXX dll's -

Version 1.0.0
681 downloads
Hi all, I'm happy to share a new SERUM color file... Street Fighter 2 !! This one is special for me as I started, years ago, training on colorization with @malenko project files of Street fighter 2... ! Time as passed, and I'm proud to share a more modern colorization with backgrounds, thousands of colors, full screens.. But I kept some of Malenko original animations that I enjoyed ! Thanks to him to allow me to reuse them. I hope you will enjoy this relaease, and if you happen to find bugs, erros or missing frames (I'm sure there are), don't hesitate to share your feedback ! Tested on libserum 2.6 vPINMAME 3.7.0-222 - ensure using latest C++ distr. : https://aka.ms/vc14/vc_redist.x64.exe Dtatane -

Version 2.03
8968 downloads
Please note: This Serum colorization was developed and tested on both virtual and real tables to ensure accurate color depth and optimal performance. However, for real tables, this applies exclusively to ZeDMD <> PPUC/DMD displays. Use with any other hardware solution is strongly discouraged. Videos and user reports have shown reduced frame rates and poor color output specifically on PIN2DMD. Please be aware that these issues are not caused by Serum itself, but by the hardware/software limitations of PIN2DMD. This one has been touched from the ground up. Every movie scene has been reimported according to Stern's official resolution and frame interval. Besides this getting the most attention, there has also been a lot of clean up to ensure consistency within the colorization. Feel free to leave a comment or a review, it really does help motivate me to create/update content! If I release any updates you will be the first to hear in the Serum discord. If you feel the need to donate you could do so here❤️ Special thanks to @ebor for sharing his project with me! And thanks to the Serum team for making amazing colorizations like this possible, you know who you are! 🔝 To utilize the HD frames, add the following into your dmddevice.ini: [trn_174h] scalermode = doubler IMPORTANT: you need DMDExt version 2.5.0 to make use of this rom! Download can be found here Also, delete ALL of your serum.dll files in your vpinmame folder! DMDExt now has Serum integrated from the get go. IMPORTANT 2: Unsure how to install the newer version? Please follow this guide by the creator of Serum:- 89 comments
- 45 reviews
-
- 336
-
-
- tron
- tron legacy
- (and 2 more)
-
Starting a playboy serum Colorization.. Currently in dump process as I finish up Elvis colorization, but wanted the dump(s) ready soon as it is complete to roll right into the next colorization. More to come soon.. -B
-
Version 1.0.1
1959 downloads
The truth is out there... apparently. After ~80 hours of work, I am happy to share my X-Files Serum colorization. The colors I used work well with Siggi and Ejse83's table mods. To enable HD content, make sure to add the following to your DMDDevice.ini file: [xfiles] scalermode = Doubler or [xfiles] scalermode = Scale2x Hope you enjoy! Kraken 🍻 -
Version 1.0.2
2108 downloads
May the Force be with you! I'm happy to share my Star Wars Trilogy colorization in Serum format. This is the OG/Purist version where every frame has been hand colored (the digitized movie sequences were NOT FUN! 🥵). This project took me ~150 hours. At a minimum, you will need the Serum DLL file version 2.2.0 (released June 10th 2025) for this colorization as it uses dynamic sprites. Simply download and drop it in your vPinMame folder. Github link: Serum DLL latest release Cheers! 🍻 Kraken Coming soon to a galaxy near you: HD Theatrical Edition!- 58 comments
- 36 reviews
-
- 213
-
-
- 4054
- star wars trilogy
- (and 3 more)
-


Version 1.0.1
4756 downloads
Hi, I'm very pleased to share with you this remaster of Champion Pub DMD 64 colors. I worked on the original project 2 years ago, and I felt like it was needing a shot of SERUM ! ** INSTRUCTIONS ** : ROM version 1.6 (cp_16.zip) with the language set in ENGLISH SERUM colorization format support - check the tutorial here, if you don't have it yet : Demo : Change log : - new character design for fighters - new graphics on ball lock, door prize animation - new backgrounf on spitting gallery - completed cast of opponents with all stances - completed screens - removed blurry transitions - multiplayer support - gradiant effects on text For PAL/VNI authors : It was also a test project for PAL/VNI conversion to SERUM. If you are an author and want to convert your project, have a look here : -
Version 2.0
9629 downloads
Attack! I'm happy to share my Attack From Mars Serum colorization. ROM: afm_113b English NOTE: A few people have reported VPX crashing with this colorization but installing DMDEXT v2.2.2 (or higher, when available) apparently solves the issue. Backup your DMDDEVICE.INI before updating! Enjoy!- 169 comments
- 70 reviews
-
- 355
-
-
- attack from mars
- afm_113b
- (and 4 more)
-
Version 1.01
3708 downloads
Bodacious! I'm pleased to share my colorization of Capcom's Breakshot in Serum (.CRZ) format. I hope you will enjoy. In the zip file, you will find two versions: - The Purist Edition is faithful to the original ROM, where black backgrounds remain black for higher contrast. - The Gradient Edition that has extra color gradients added in the background. Thanks to the awesome people sharing the adventure on the Serum Discord and to the beta testers for your precious feedback. ROM: BSV103 (English) Kraken 😘 -
Version 1.0.1
1823 downloads
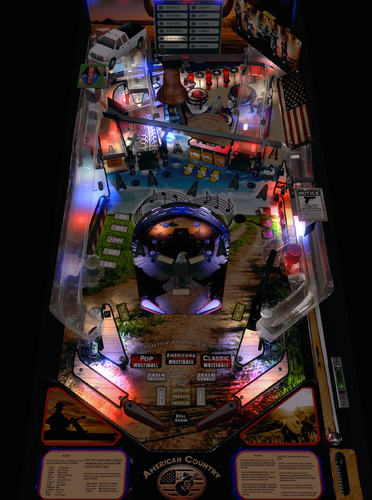
This American Country Pinball table is a re-skin of AC/DC LUCI (Stern 2013) VPinWorkshop version 1.1. Original table by Stern Pinball. I chose the AC/DC table for my Country Music mod for many reasons. I love the gameplay but sometimes I’m not in the mood for hard AC/DC music. Overall, I've tried to relax the game with country music and related sound effects while keeping the intense gameplay dynamics. I replaced the comical “abusive” AC/DC voice prompts with AI generated Johnny Cash voices. The toys map well to country music themes: Hells Bells to Liberty Bell, train to pickup truck, cannon to gun and so on. In the minigame the metaphor is you fight for freedom instead of against the devil. Instead of a Jukebox, there’s a Playlist with selected songs arranged as twelve different tags that span the themes found in Country Music. As a bonus I provide instructions to replace the Playlist with your own favorite songs. FOR PERSONAL USE ONLY AND NOT FOR COMMERCIAL SALE OR DISTRIBUTION. I extend many thanks to all who have worked on the precursors and components built into this table, including: ninuzzu, Sixtoe, hauntfreaks, Fluffhead35, nfuzzy, Apophis, Tomate, Retro27, Schlabber34, javier, DJRobX, dark, tom tower, knorr, rysr, Peter J, RustyCardores, the VPDevTeam, and more! See the included README file for more credits and attributions. Download Includes: American Country.vpx (VPX 10.7+) American Country full dmd.directb2s acd_170.zip - custom ROM acd_170.cRZ - altcolor Serum colorization file American Country Wheel.png - Frontend wheel image file American Country README.pdf - see for more details Custom ROM NOTE, you must use my custom version of acd_170.zip ROM Beta Users: If you installed a preview version of this table that used acd_170hc rom, note that i changed it to acd_170, to avoid conflicts with people’s existing installations of AC/DC. The American Country VPX pinball game requires a custom version of the acd_170h ROM named to acd_170.zip. This is NOT the same as the acd_170 rom you might find elsewhere, I’m just repurposing the file name. The custom ROM includes sound effects, voices, and music clips. Legally you should get the original Stern ROM and modify it yourself, although I’ve provided a pre-made one (for your reference only 😉) in the downloads. See the CUSTOM ROM readme file for details and instructions. Why a Custom ROM? Typically, VPinMAME lets you replace ROM sounds using altsound. I was not able to get this to work with this Stern ROM (and from my research it may not be possible with the current version of VPinMAME), so instead I have written my sounds directly into the ROM file. (If I am wrong and you know a way to use altsound with this ROM please reach out to me and I’ll redo this!). Thus, I’m using the acd_170 ROM name. Enjoy! -

Version 1.1.3
8720 downloads
Hi all ! I'm very excited and pleased to share with you the first release of a serum colorization project ! As you might know, it's a new open source format for DMD colors than will be able to run on Virtual DMD and devices. I would like to thank @zedrummer who develop the file format and the tools to use it, @ebor @peskopat @KRAKEN who are the early birds like me working on the format and spending hours debugging and improving the tools with zedrummer ! SPECIAL THANKS to @PastorLUL and @KRAKEN who worked on the last update correcting many glitches and enhancing the quality of this colorization ! To use serum files, you can have a look here : A discord channel is also here to help you get started, so do not hesitate to join us or look for help there : https://discord.gg/aK2dNaB6xR ROM version : ss_15 Language : ENGLISH Here's a preview of what you see : And a more complete in-game demonstration :- 115 comments
- 40 reviews
-
- 336
-
-
- ipdb3915
- scared stiff
- (and 10 more)
-
![More information about "[ZEN] Sorcerer's Lair Colorization - Serum v2"](https://vpuniverse.com/screenshots/monthly_2024_12/sorc.thumb.jpg.d2ef9e80d43523c642d44b6b3837eb30.jpg)
Version 1.0.0
579 downloads
Sorcerer's Lair colorization for Pinball FX. I'm a huge fan of Zen studios and their original tables and wanted to attempt to give some color love to some of them.. I present Sorcerer's Lair.. To use: Set Pinball FX to cabinet mode and set use external DMD device. Language English. Colorization Installation location: Sorcerer's Lair "33.CRZ" goes in "vpinmame\altcolor\33" folder Requires: DMDextensions v2.3.0 + and setting system environment variable if Visual PinMAME not installed: see https://github.com/freezy/dmd-extensions?tab=readme-ov-file#pinball-fx for detailed instructions getting dmdext to work with PinballFX ** While I used frame dumps from both FX and FX3 to create the crz and have created unique sprites to handle both game engines.. It currently appears that dmdext command line (used for FX3 mirroring/memory grabbing to display) DOES NOT support Serum2 colorizations yet (Serum2 crz's just result in a black screen in FX3, but Serum1 and other color formats do appear to work in FX3/2.3.0).. Hopefully we can get a fix/patch for dmdext command line / Serum2 use in FX3 in the future ** IF/When dmdext supports Serum2/FX3 - the file can be copied/renamed "citadel.crz" and placed in a "vpinmame\altcolor\citadel" folder Once running, you should be able to drag the virtual DMDext window to your desired location, right click save position for 33 ( or manually add/edit an entry [33] to your table list in the dmddevice.ini You can then set scaletohd=true to enable the HD version for the virtual Example: (use your own values) [33] ;citadel virtualdmd left = 0 virtualdmd top = 0 virtualdmd width = 1024 virtualdmd height = 256 scaletohd = true If you have a zedmdHD configured, it should detect/use the HD frames.. *** It likely will need an S3 (esp32) version of zedmdHD *** the non-S3 zedmdHD while it works ( I do need to update my test non-S3 zedmdHD version so it may be better now), but what i tested could not handle the animated fullscreen backgrounds very well. That said, If non-S3 zedmdHD, I recommend setting the scaletohd value to false under [33] in the dmddevice.ini Donation/Beer me: (if you feel like it) https://www.paypal.com/paypalme/Boroka1 -

Version 1.06
3187 downloads
Please note: This Serum colorization was developed and tested on both virtual and real tables to ensure accurate color depth and optimal performance. However, for real tables, this applies exclusively to ZeDMD <> PPUC/DMD displays. Use with any other hardware solution is strongly discouraged. Videos and user reports have shown reduced frame rates and poor color output specifically on PIN2DMD. Please be aware that these issues are not caused by Serum itself, but by the hardware/software limitations of PIN2DMD. Sir what you had there was what we refer to as a focused, non-terminal repeating phantasm, or a class-five full-roaming vapor. Real nasty one too. This is a big update based on @Flabs Ghostbusters that was uploaded quite a while ago now. Since I'm fully committed to making Serum for real pins a reality together with @mk47 — and with him having a Ghostbusters pin in real life — it was a no-brainer to build on the work Flarben had already done. That said, when @mk47 first tried the Serum v1 file by Flarben on his machine, we quickly noticed there was still a lot of work to be done. So I decided to dive in and go through everything from top to bottom. I made sure to respect the original color choices, so you won’t see too much change there. But there are lots of improvements in terms of legibility, missing frames, and overall polish. Quick stat: ~150 hours of work has been added on top of the original work. Funnily enough, with the vpin version only having access to the 1.15 ROM, you actually miss out on a lot of the newer stuff that's included in update 1.17. So for people with real pins, this will definitely come as a big surprise. But... of course, the vpin crew hasn't been forgotten. Enjoy and expect a few minor updates to come, this ROM is absolutely huge. I won't be surprised if new stuff pops up. And before I forget, thanks a lot to @Flab for willing to share the project files and letting me upload it to VPU! ~ Pastor EDIT : Place the colorization file wherever your vpinspa is located, for me that is: C:\Visual Pinball\Tables\VPinSPA\altcolor\spagb_100 <-- folder This will depend on setups!- 124 comments
- 25 reviews
-
- 195
-
-
- gb
- ghostbusters
- (and 4 more)
-


Version 1.0.0
2308 downloads
We go together.. A completely custom colorization /re-theme of the "Elvis" rom to go with the Grease 2023 table from @judremy Colorization Installation: The grease.crz will go into your "/altcolor/grease" folder within VpinMame You would also want the alias "grease,elvis" in VPMalias.txt Requires: DMDExtensions V 2.2.1 [and] Libserum >= 1.6.1 https://github.com/zesinger/libserum/releases (for the backgrounds and extra sprite capabilities I've implemented) If you are receiving a blank DMD screen.. you will need updates to use this colorization. Donation/Beer me: (if you feel like it) https://www.paypal.com/paypalme/Boroka1 While it should work with any "grease"/elvis table... It is designed to go with the above table.. Judremy and I worked for about a year passing ideas back and forth for the modes and what the display will be showing. I put in some extra effort to try to sync display timing events with the music/soundtrack from the PUP (to the best of my ability) For example: rnr.mp4 -
Version 1.0.1
2530 downloads
"Those who want respect, give respect." - Tony Soprano I am pleased to share my Serum colorization of The Sopranos (Stern 2005). Took me 150 hours for this one and I hope you will enjoy it. Requires DMDEXT 2.4.0 or newer. Also use the latest Serum DLL that supports .cROMc and it's advanced features: Serum DLL latest release Cheers! 🍻 -

Version 1.0.0
1360 downloads
Please note: This Serum colorization was developed and tested on both virtual and real tables to ensure accurate color depth and optimal performance. However, for real tables, this applies exclusively to ZeDMD <-> PPUC/DMD displays. Use with any other hardware solution is strongly discouraged. Videos and user reports have shown reduced frame rates and poor color output specifically on PIN2DMD on real pinball machines. Please be aware that these issues are not caused by Serum itself, but by the hardware/software limitations of PIN2DMD. “WHY…. SO…. SERIOUS….?!?!?” With great pleasure I offer to the community this serum colorization of Batman Dark Knight (Stern 2008). IMHO the late Heath Ledger was/is the best portrayal of the Joker on the big screen. Uses the bdk_294 rom I made some effort to use colors from the movies and the table Special thanks to the serum authors, @freezy , and ppuc/dmd <--> Zedmd / libserum project contributors for helping me test and providing priceless feedback. You are amazing. Highlights: - Imported HD movie clips from Batman Begins and Batman Dark Knight - Scale2x upscaled regular frames for static content For HD resolution frames, put this entry in your dmddevice.ini file: [bdk_294] scalermode=doubler System Requirements: - This serum colorization is being released with the new and highly optimized cROMc format, the successor to cRZ, with up to a 90% reduction in memory footprint - You MUST use the newest 2.4.0 dmdext release HERE by freezy Now go be a “freak… like me!” and play some Dark Knight in color! -

Version 1.0.0
1346 downloads
Please note: This Serum colorization was developed and tested on both virtual and real tables to ensure accurate color depth and optimal performance. However, for real tables, this applies exclusively to ZeDMD <> PPUC/DMD displays. Use with any other hardware solution is strongly discouraged. Videos and user reports have shown reduced frame rates and poor color output specifically on PIN2DMD. Please be aware that these issues are not caused by Serum itself, but by the hardware/software limitations of PIN2DMD. Hello friends, for my third colorization I've chosen other of my Top 20 pinball tables. It's a simple colorization, without excessive additions, because the theme itself is already colorful enough without needing more. As for the ROM, for someone not very skilled at the game, I thought it would be easy, but it turned out to be a very interesting game with many minigames and quite complex if you want to unlock all its secrets (that darn frog...). That's why it took me almost a year to complete (more than 550 hours of editing). I hope you like it. Note: This serum colorization has being upgrade with the new and highly optimized cROMc format, the successor to cRZ, with up to a 90% reduction in memory footprint - You MUST use the newest 2.4.0 or later Dmdext release by freezy HERE and delete old SerumXX dll's- 18 comments
- 19 reviews
-
- 150
-
-
- ipd no. 4917
- serum
- (and 1 more)
-


Version 1.05
5596 downloads
Please note: This Serum colorization was developed and tested on both virtual and real tables to ensure accurate color depth and optimal performance. However, for real tables, this applies exclusively to ZeDMD <> PPUC/DMD displays. Use with any other hardware solution is strongly discouraged. Videos and user reports have shown reduced frame rates and poor color output specifically on PIN2DMD. Please be aware that these issues are not caused by Serum itself, but by the hardware/software limitations of PIN2DMD. Thank you, Mr. Data! I present to you the Serumized™ version of Star Trek: The Next Generation I hope you all will enjoy this one. It was a long long road... Special thanks to the great developers involved in the Serum ecosystem and the continuous support of trying to make it better and better. You know who you are! For the people interested in becoming a Serum author: I open sourced this colorization, so have a look! It can be found here IMPORTANT: you need DMDExt version 2.4.0 to make use of this rom! Download can be found here Also, delete ALL of your serum.dll files in your vpinmame folder! DMDExt now has Serum integrated from the get go. IMPORTANT 2: Unsure how to install the newer version? Please follow this guide by the creator of Serum: -
Version 1.0.1
1670 downloads
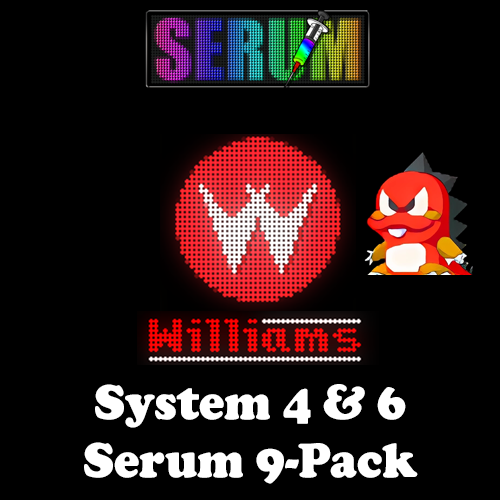
Alright, time for something a bit different. Here is an 8-pack 9-pack of Williams System 4 & 6 colorizations in Serum format. I'm releasing this as a pack because they are very small and all follow the same original DMD layout. List of tables: - Blackout - Flash - Gorgar - Laser Ball (added in v1.01) - Phoenix - Scorpion - Stellar Wars - Timewarp - Tri Zone This will change your standard DMD from this: into something like this: Each colorization features a different AI generated image per ball and is meant to be used in HD resolution (256x64), although it will work in SD (128x32) but without the pretty pictures. Once again, this is Serum 2.0 so you need DMDEXT 2.3.0 or newer and will need to add the following at the bottom of your DmdDevice.ini to enable HD for each table (not required if you have HD on for all tables globally). ;Blackout [blkou_l1] scalermode = Doubler ;Flash [flash_l1] scalermode = Doubler ;Gorgar [grgar_l1] scalermode = Doubler ;Laser Ball [lzbal_l2] scalermode = Doubler ;Phoenix [phnix_l1] scalermode = Doubler ;Scorpion [scrpn_l1] scalermode = Doubler ;Stellar Wars [stlwr_l2] scalermode = Doubler ;Timewarp [tmwrp_l2] scalermode = Doubler ;Trizone [trizn_l1] scalermode = Doubler Enjoy! Kraken 🍻 -
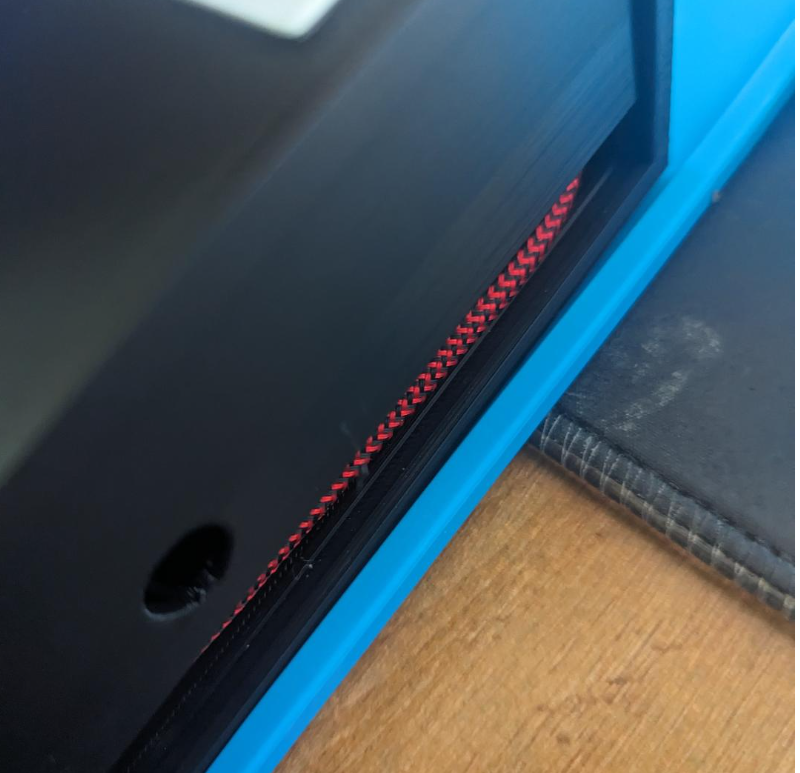
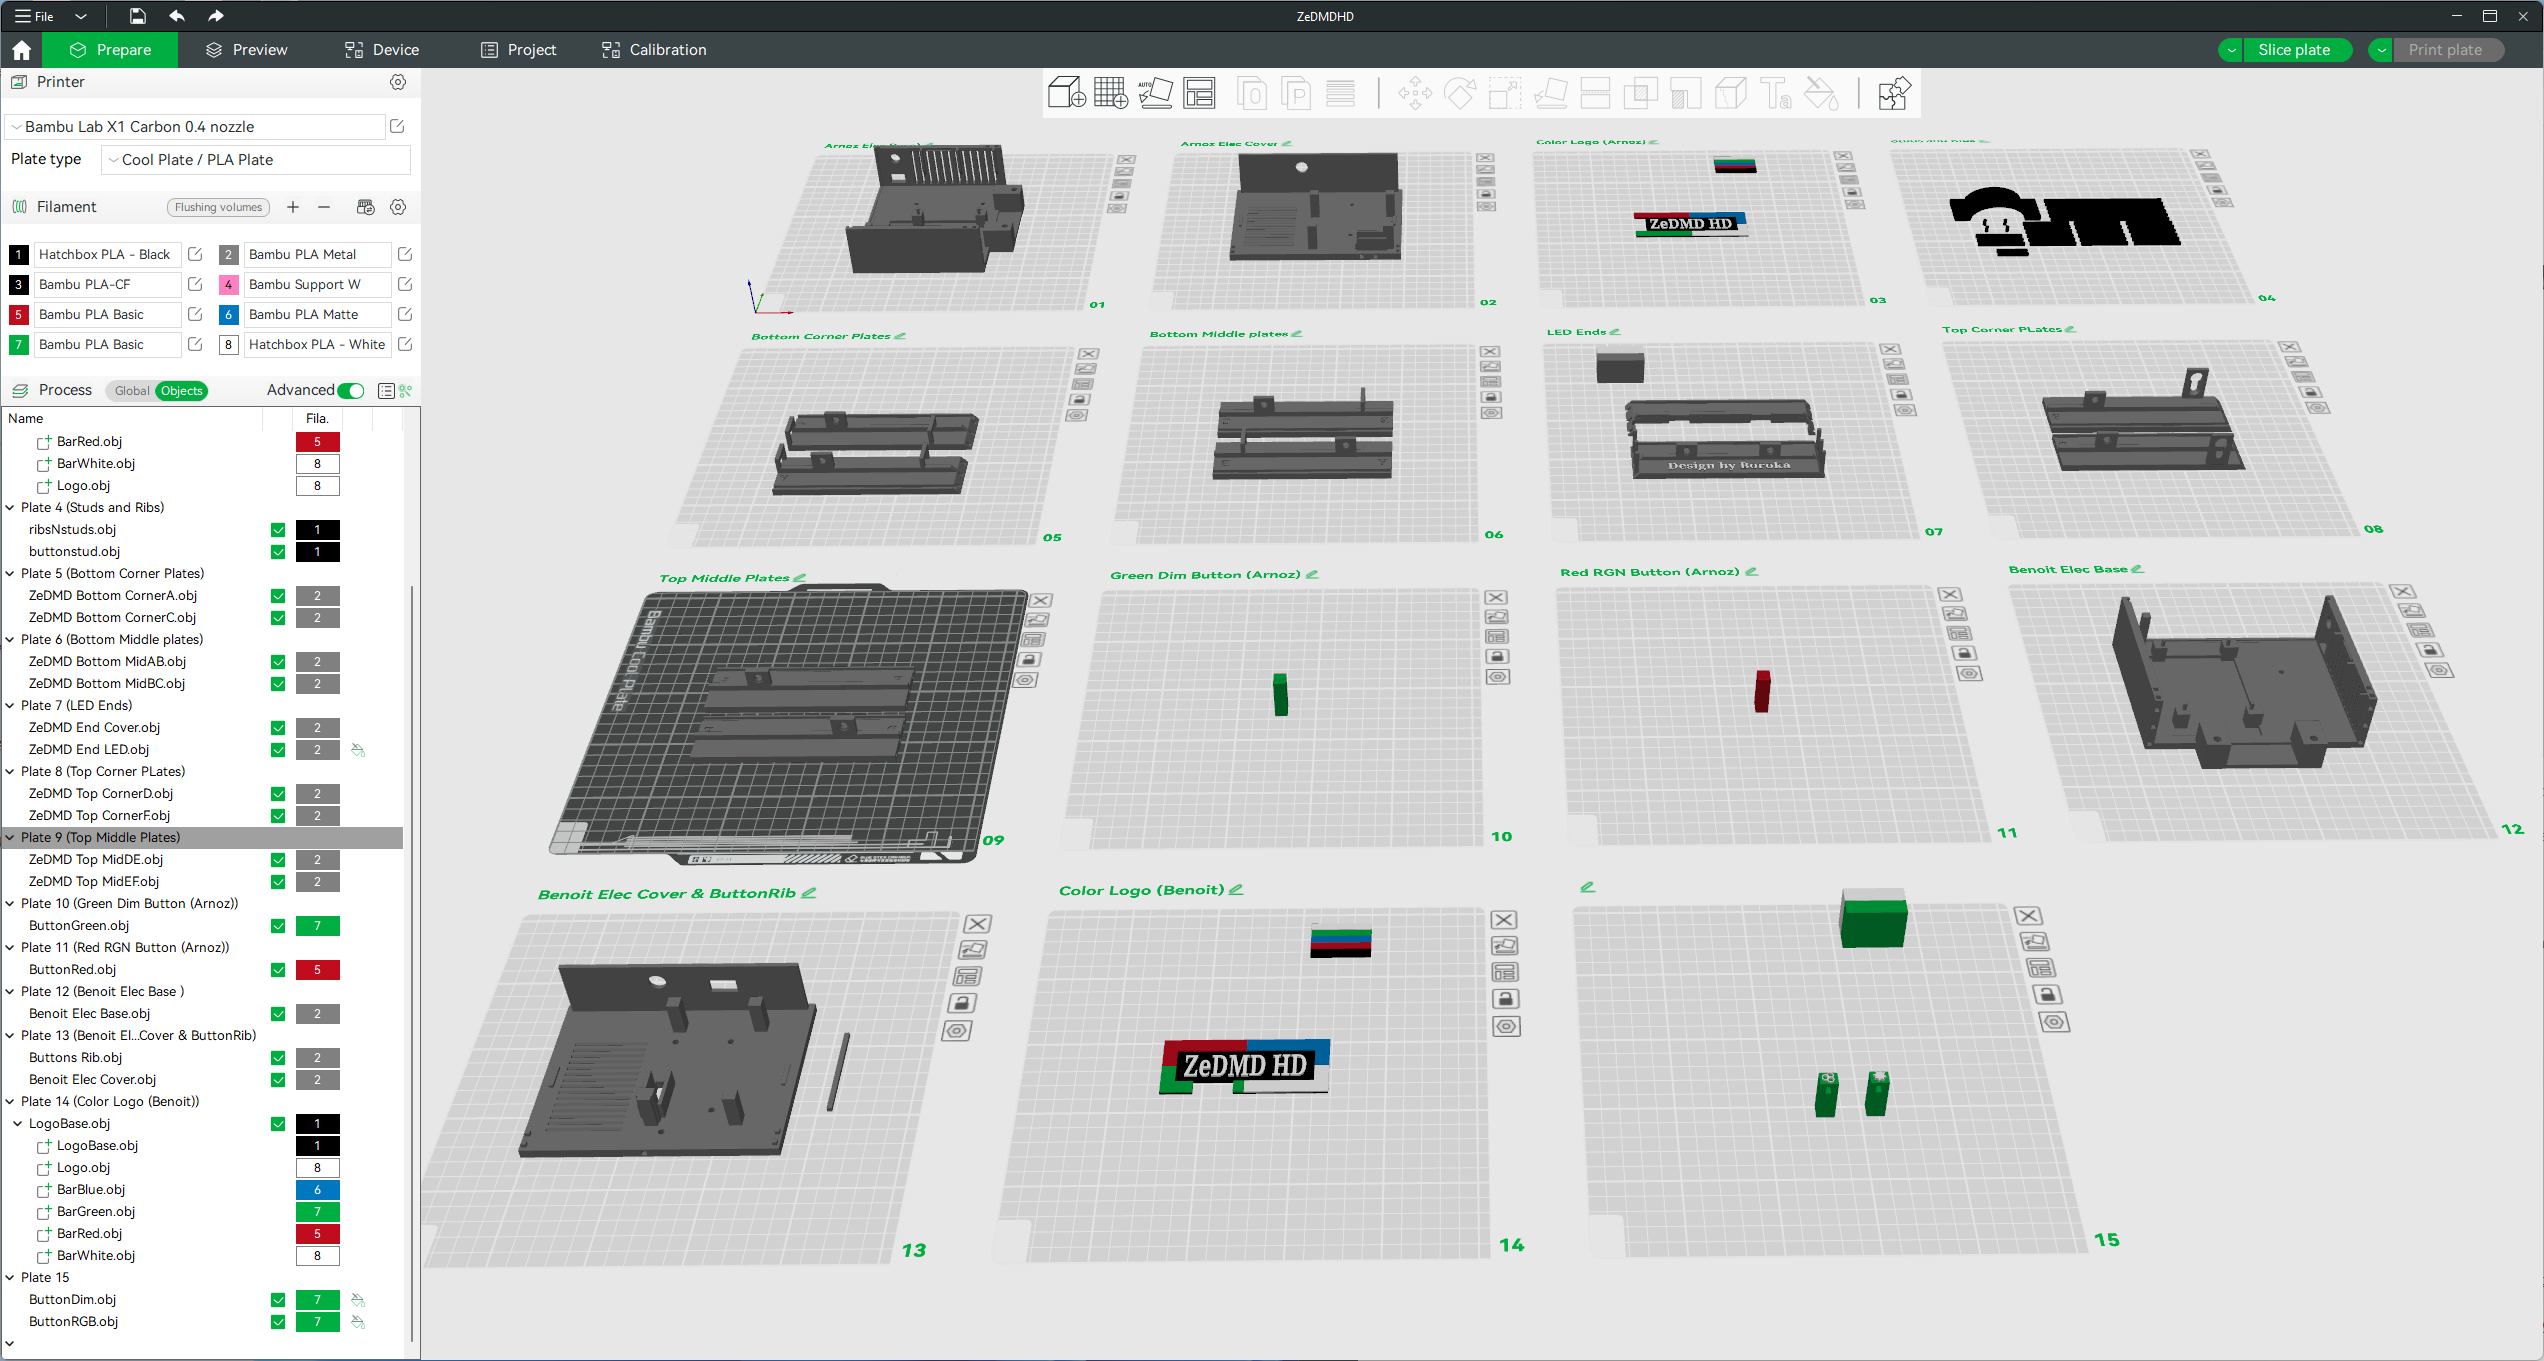
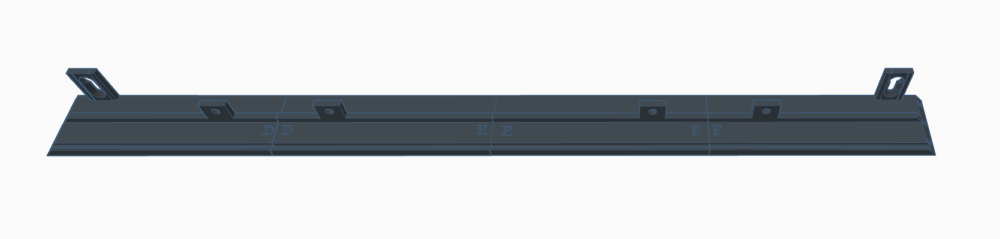
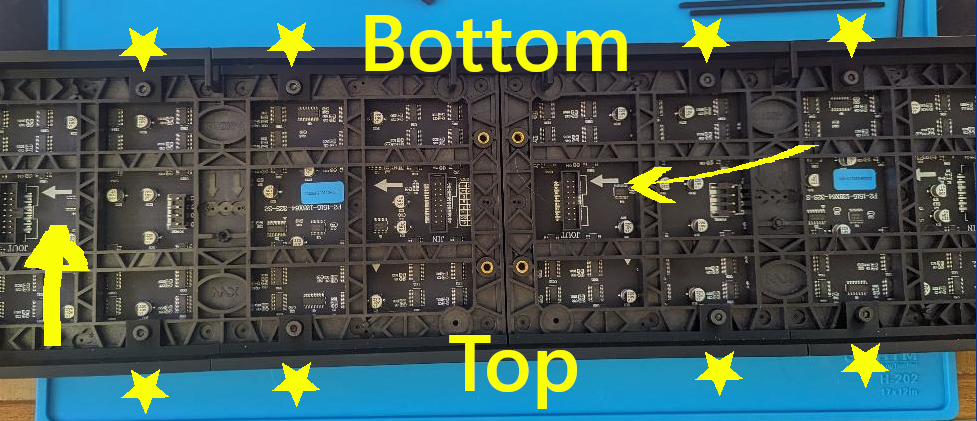
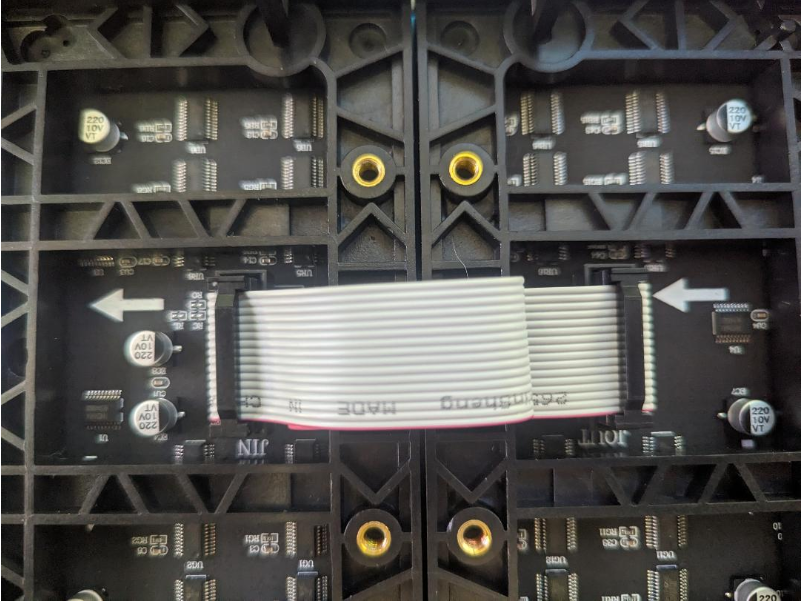
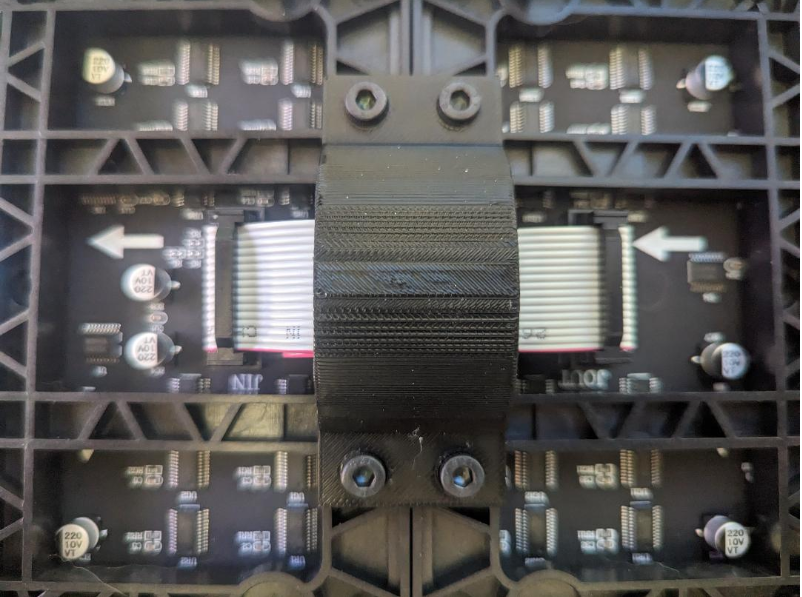
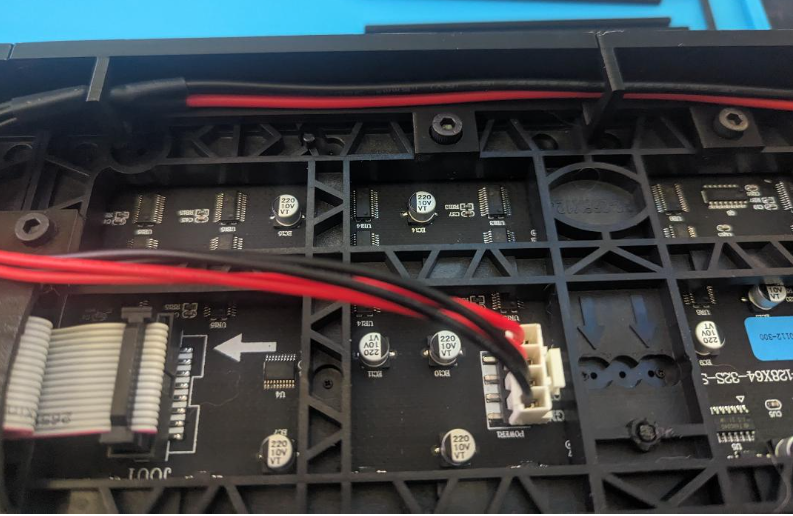
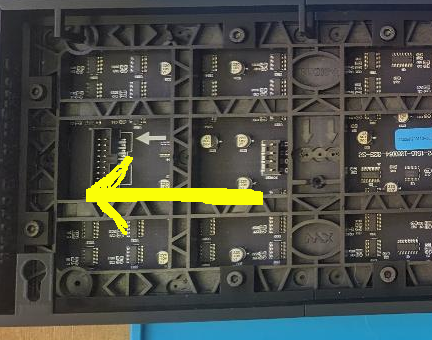
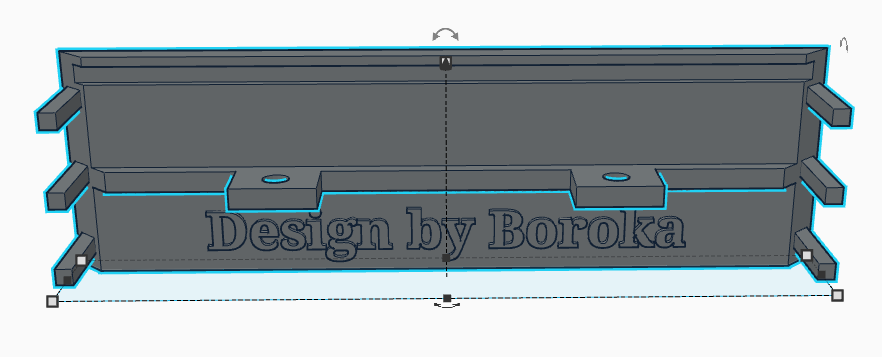
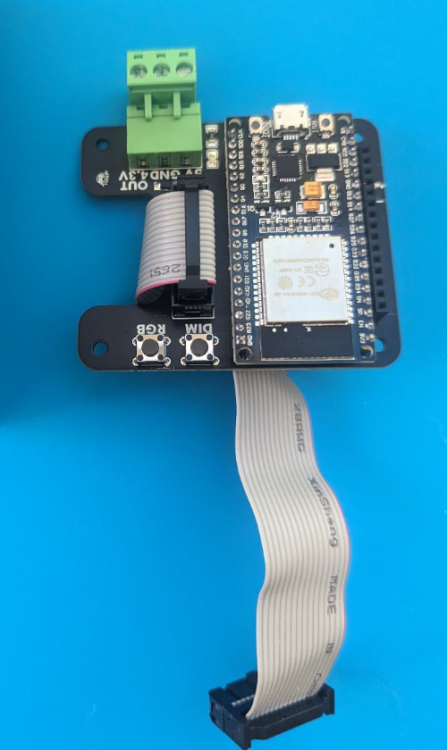
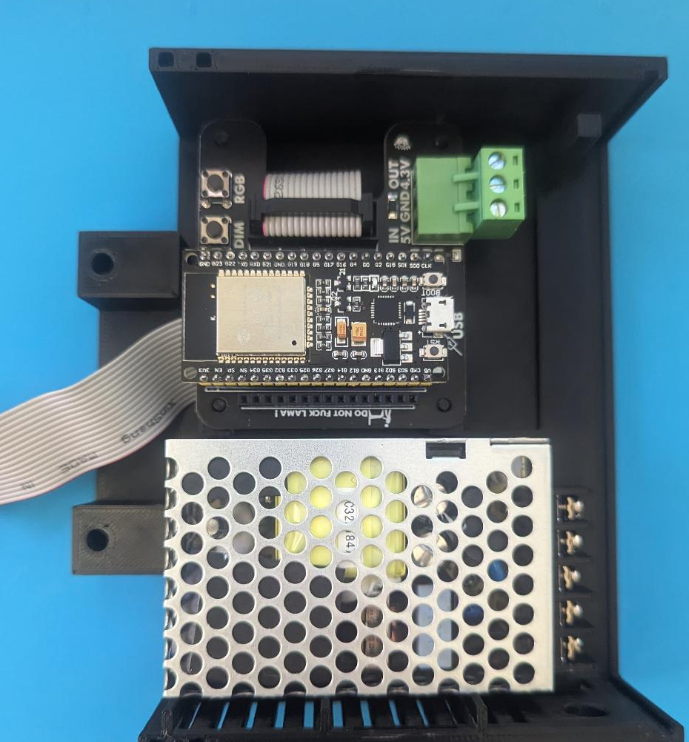
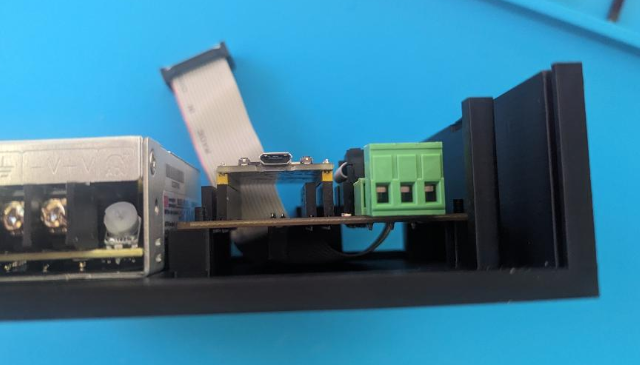
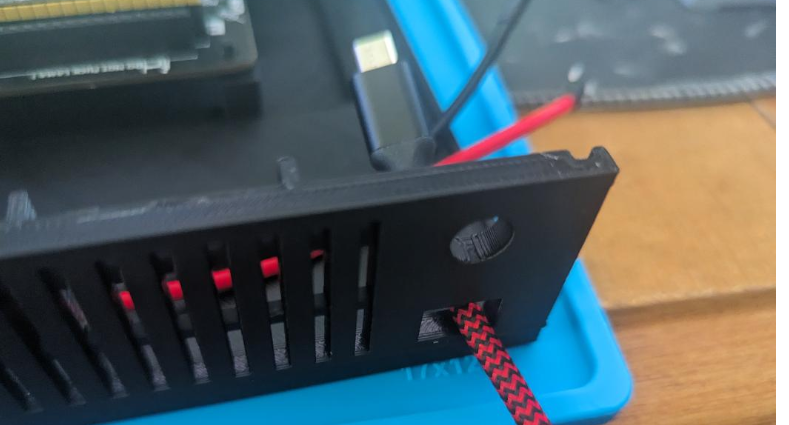
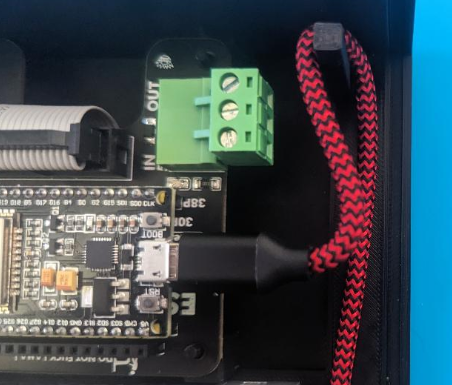
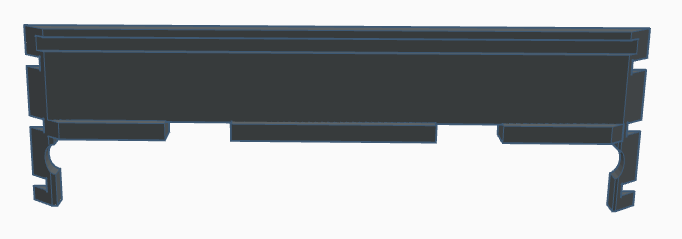
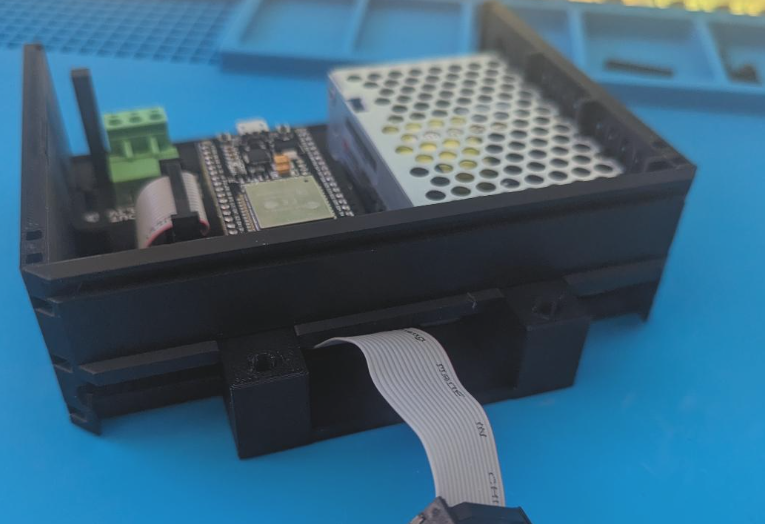
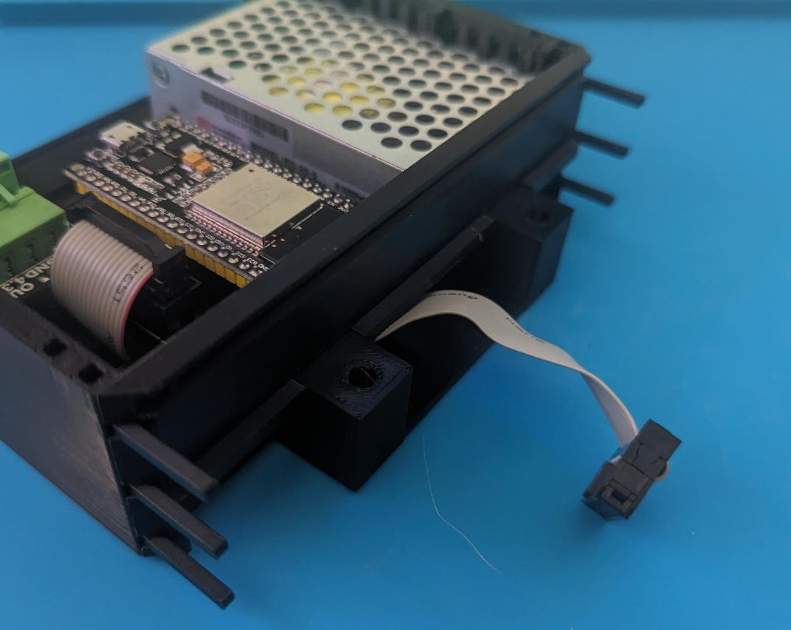
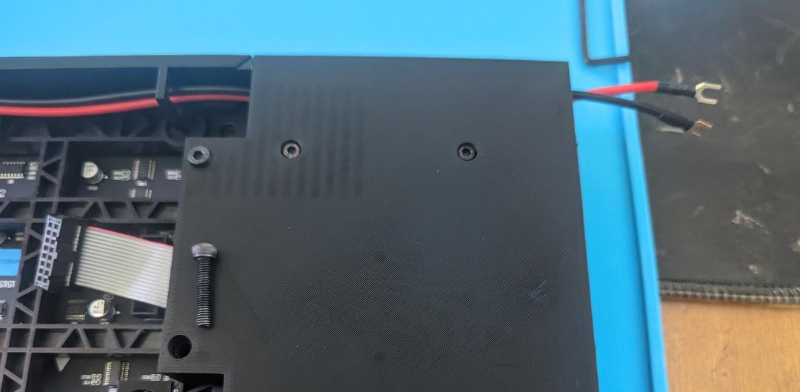
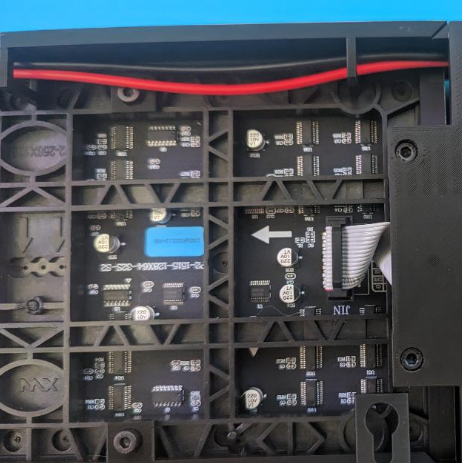
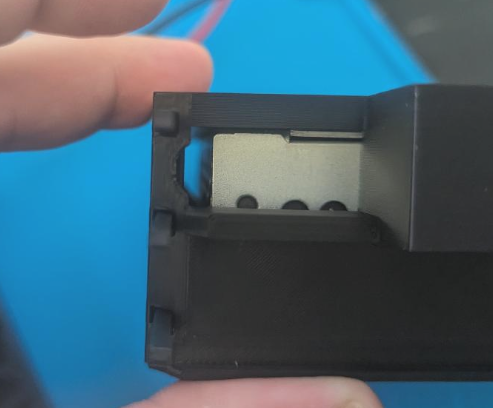
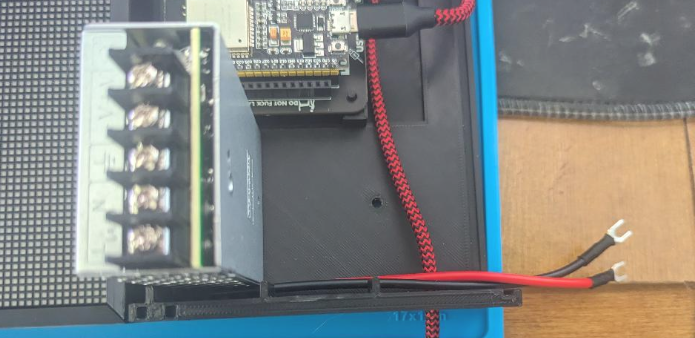
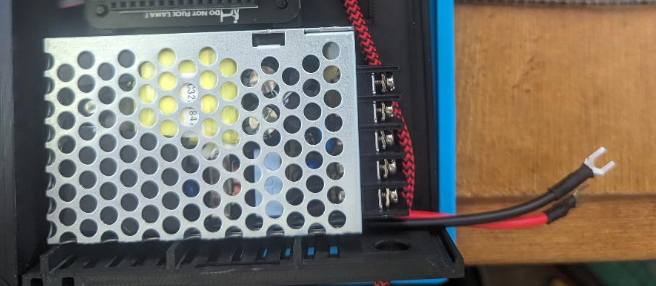
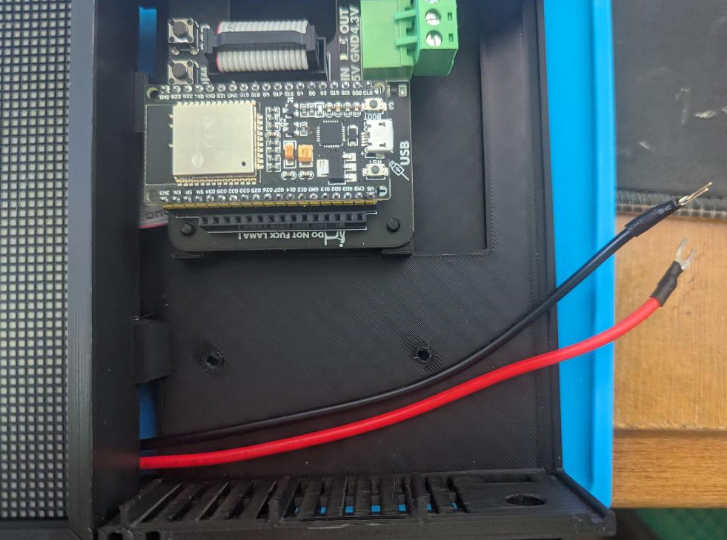
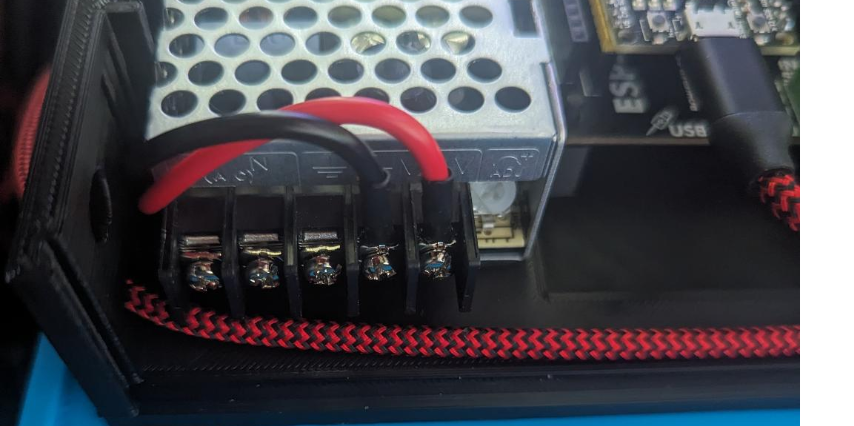
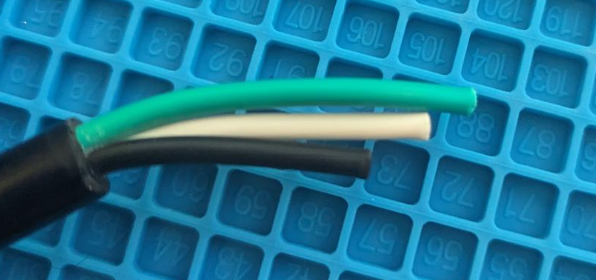
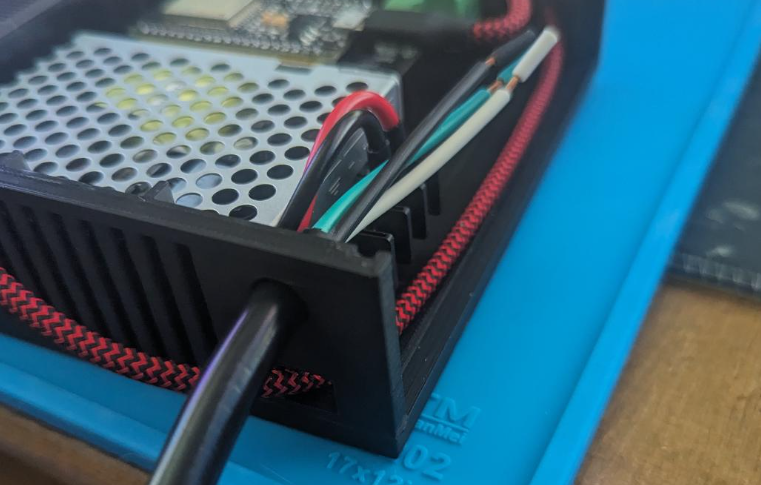
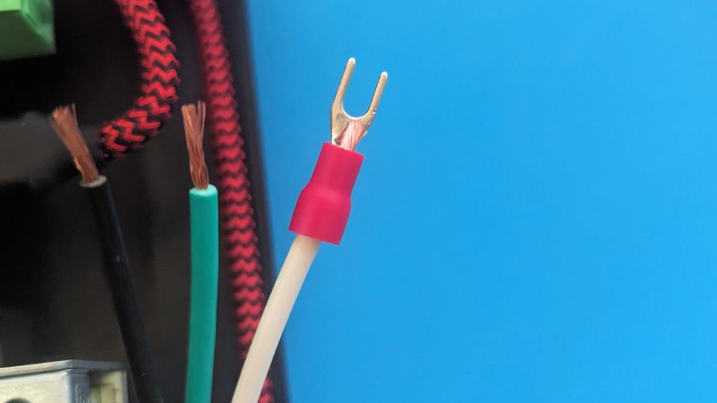
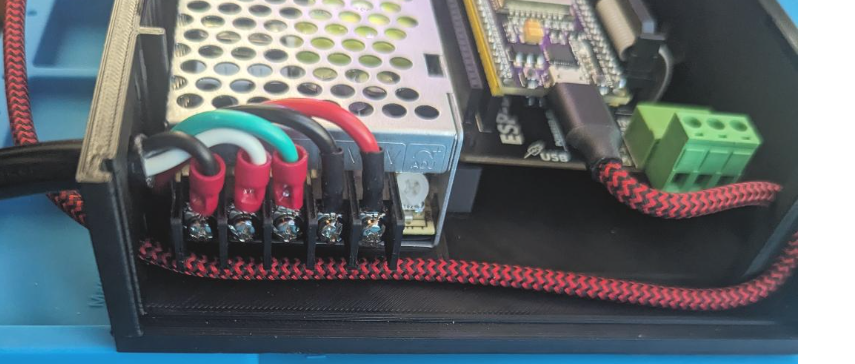
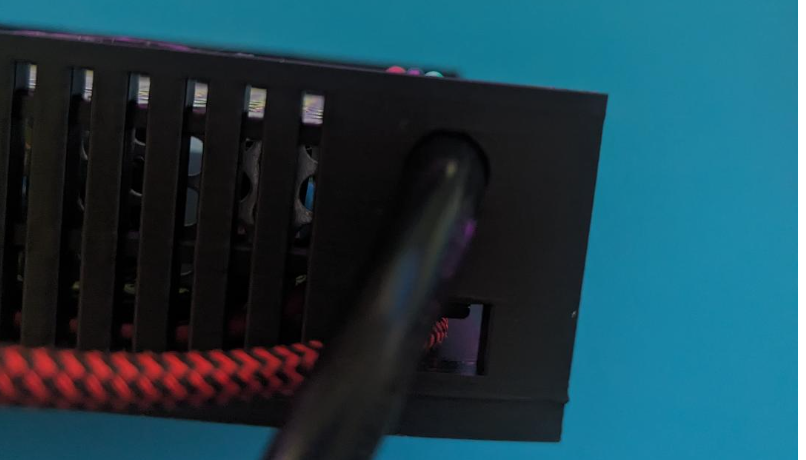
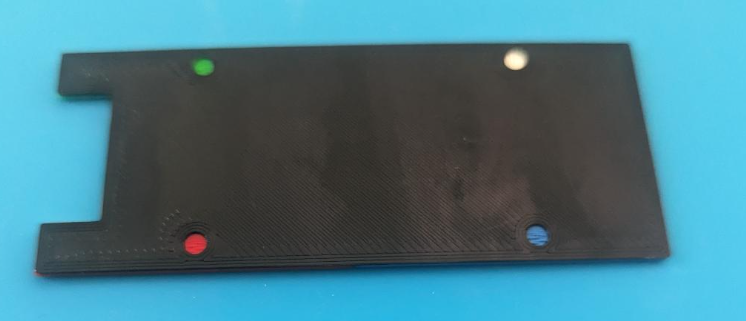
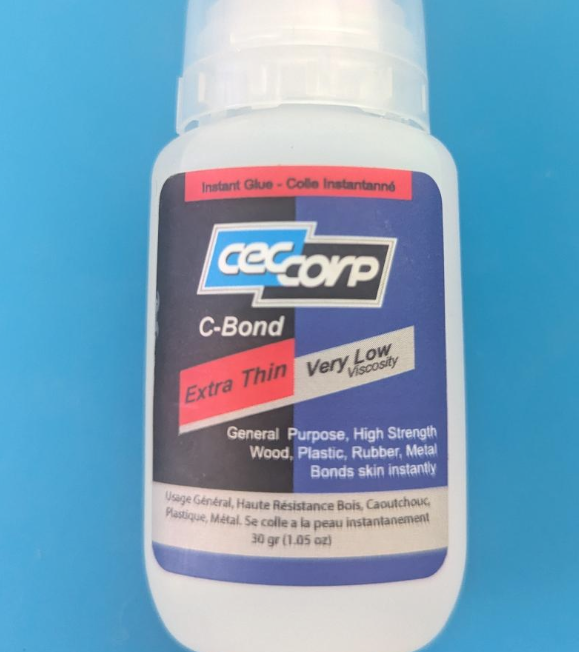
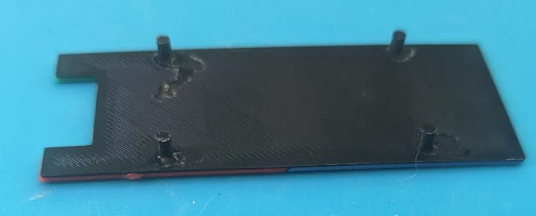
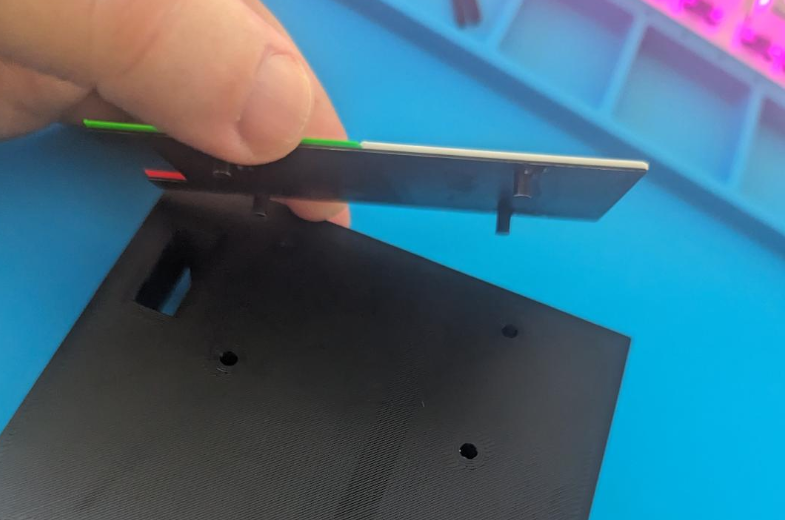
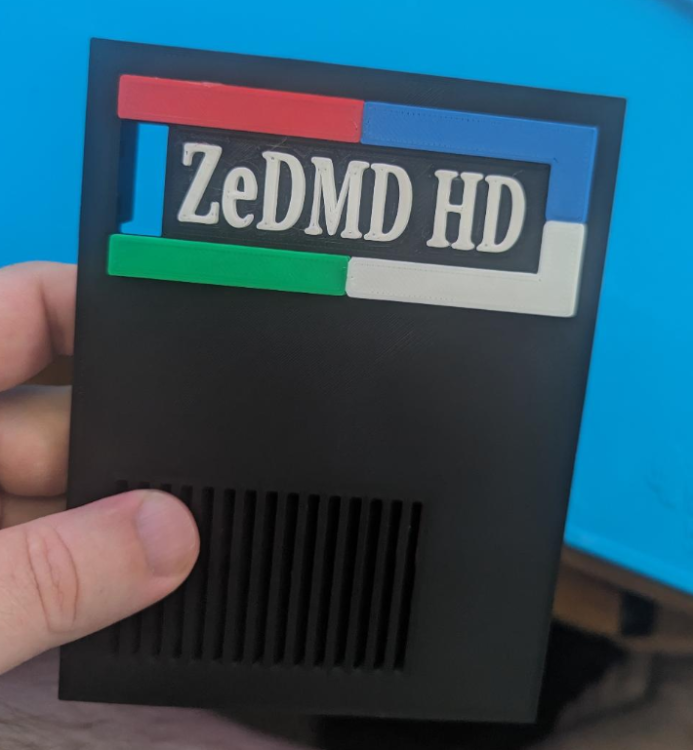
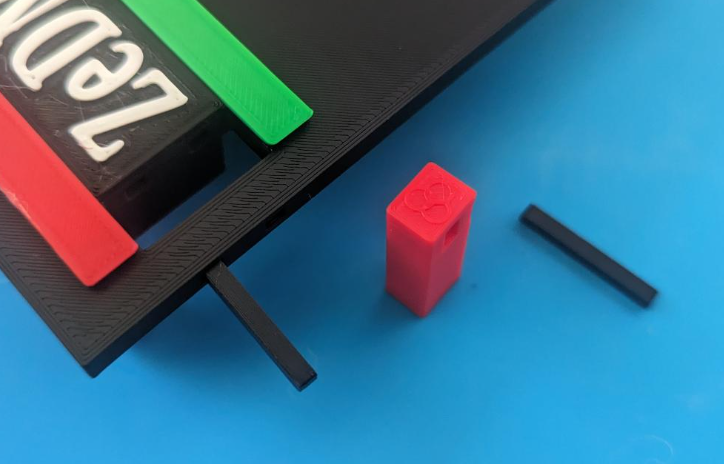
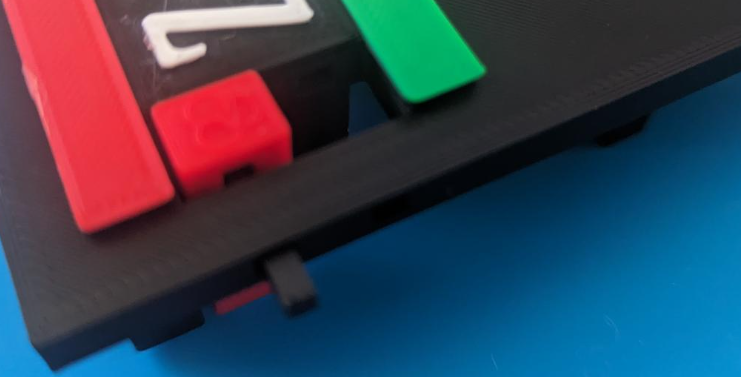
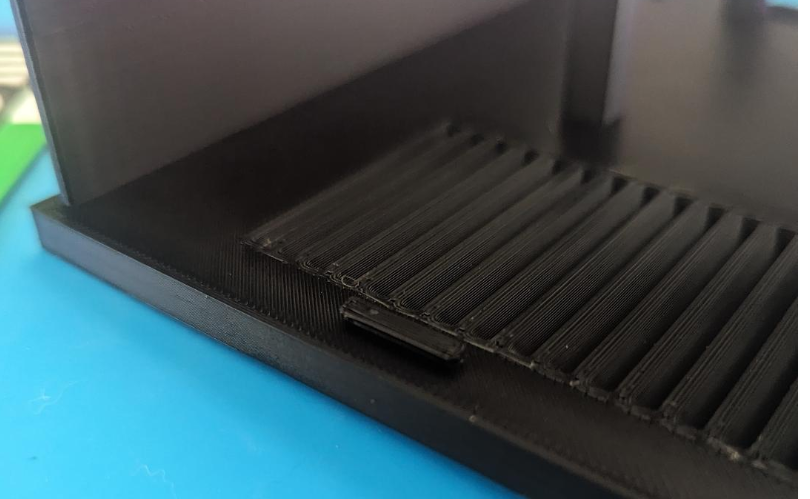
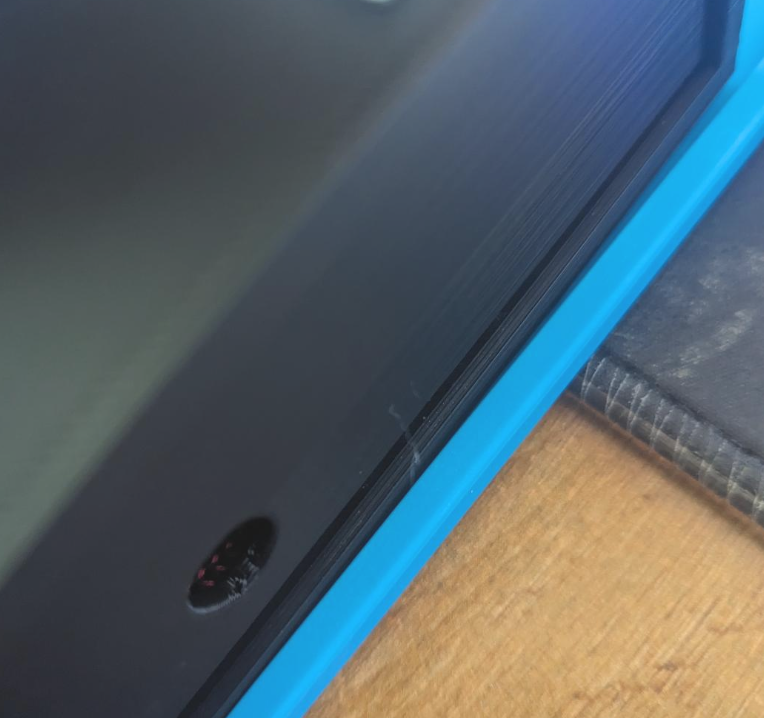
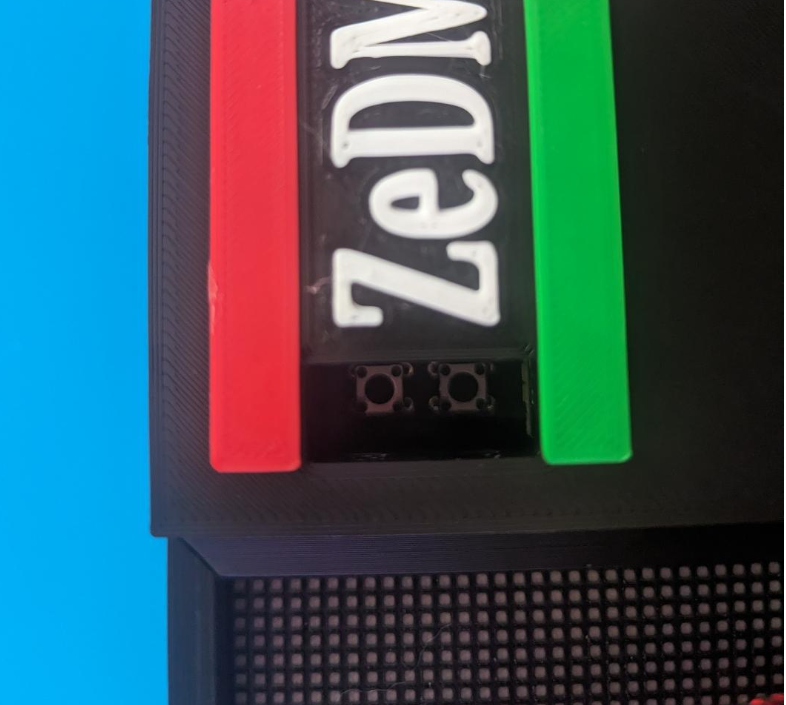
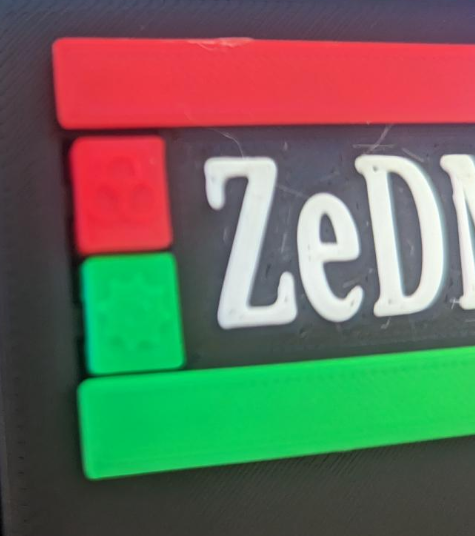
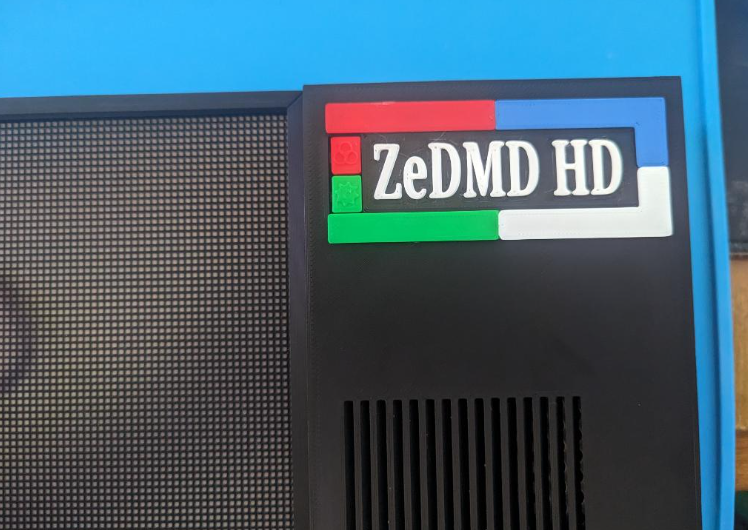
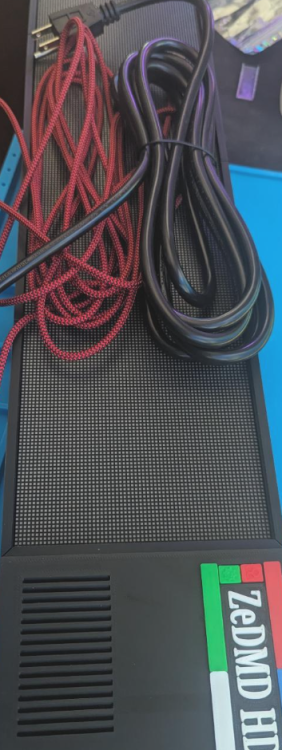
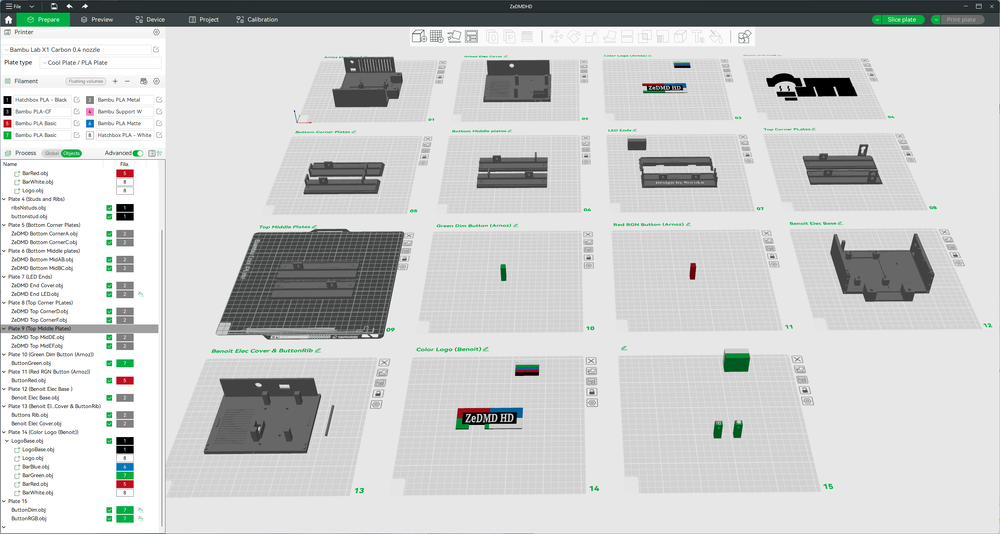
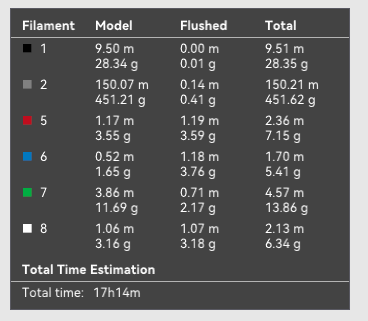
3d Printable ZeDMD HD Wall Mountable Frame for P2 Panels (256mm x 128mm) (128x64 pixel) First.. Thanks to the folks that created and support the Serum format and ZeDMD. It's a fun group to interact with and have made my experiences pleasant. I'll point to @zedrummer ZeDMD instructions page for ZeDMD https://www.pincabpassion.net/t14796-zedmd-installation-english I wanted a wall mounted DMD to keep buddies from lurching over my shoulder when we are playing.. I personally can't stand being crowded when I'm at the pinball helm ( especially when we are all drinking).. So.. Get that score up high where everybody can see it! Allow others to continue darts/billards/fooseball and see the player score without coming over and bumping into said player on the machine. In my colorization work of "Elvis" that I have been doing, I decided I wanted/needed to update from my Pixelcade (that I have currently wall mounted above my Pinball Cabinet) to a ZeDMD, since I have been implementing some of Serum features that the Pixelcade could not display. While all is good and well in the virtual DMD seeing the features, I really needed the LED to as well, to make sure things would look good displayed LED wise as well. (My older Pixelcade really lacks the ability to differ shades of white/grey/black and most of Elvis display him in White/Black jumpsuits). Color portions look fine/great on the Pixelcade, Elvis in his jumpsuits really was losing details I was putting in.. That being said, I decided to put my X1 Carbon to use and design/print a wall mount for the ZeDMD project. This is a compression fit type frame with screws to secure the hardware to the frame, so it is very much tailored to P2 panel(s) size 256x128mm panel (128x64 pixel).. I will likely do mount designs for P2.5 and P3 as well or can release OBJ files for others if they want to tackle the increase in size to fit the larger panels. My P2 ZeDMDHD "frame" design is 25 x 5.5 inches, The Pixelcade I have is 21 x 7 inches for size comparison It is designed to use a DMD shield [Arnoz's ZeDMD shield / Benoit's DMD shield] that can be purchased through their stores, and has through buttons in the frame to access the Dim/RGB buttons on said shield as well as access hole for the Mean Well power supply voltage adjuster.. Basically can adjust stuff without having to take it off the wall.. There are quite a few parts, as I designed around the thought of the average user's home 3d printer probably having a 200x200 or 250x250 print bed. So I kept the pieces small and assembly will be required. I've included and additional Left side Electronics Box in the files (this was actually the original design, but I found my ZeDMD was upside down), in case they are needed.. But you will want to print "Right" side control box more then likely. The daisy chaining of the Panels makes them directional. I'm printing on a Bambu X1 Carbon with (2) AMS and the Wall mount will utilize 5 colors/filaments: Black/White/Red/Blue/Green, but you can tailor how you print to your own liking. Print Time & filament usage below: **(That's on Carbon X1...slower printers will take longer.. My Ender3v2 would probably take about 40+ Hours to print)** You can expect/plan to use about half a spool likely ~500g.. Again, all comes down to how you print, multi-color, infill settings used..etc. 📂Files: ZeDMD HD wall mount as Bambu Studio 3MF - ZeDMDHD.3mf ZeDMD HD wall mount as OBJ(s) - ZeDMDHD_OBJ.zip ZeDMD HD wall mount as STL - ZeDMDHD.stl The Bambu Studio 3mf is laid out in 15 plates.. Plates 1-3 are Arnoz Plates 10-11 are Arnoz Plates 12-15 Benoit Plates 4-9 Common If people are unable to print their own, I MAY be willing to create some "kits" (3d printed parts and the screws used to hold the panels to the frame), but I will not source other items.. You would still need to obtain those.. My purchase list below. If kits are wanted.. I would probably sell them for $20/25 PLA, $25/30 ABS/PTEG $40 Carbon Fiber (these are rough guesstimates right now as I haven't been looking at current filament prices).. Basically I will charge cost of filament used + $10 for printer usage time (~15hours to print). 🛒Parts list: This wall mount is designed to use @arnoz ZeDMD shield so that you can access the DIM/RGB buttons through the frame itself. I also purchased the ESP32 through the same site since ESP32 come with various pin arrangements, I wanted to make sure what I was getting would be compatible with the shield. -A ZeDMD shield -ESP 32 ******Arnoz ZeDMD shield: https://shop.arnoz.com/en/dmd/87-esp-dmd-shield.html ******Arnoz ESP32: https://shop.arnoz.com/en/dmd/86-esp32-wroom32.html ******Benoit ZeDMD shield/ESP32: http://benfactory.fr/produit/zedmd-shield/ -[Qty 2] Panel P2(Important) at 256x128mm (128x64mm pixel): https://www.aliexpress.us/item/3256801645705137.html?spm=a2g0o.order_detail.order_detail_item.3.2591f19cCKSwPm&gatewayAdapt=glo2usa -[Qty 14] M4*10 screw: https://www.amazon.com/gp/product/B07KRTK7SP/ref=ox_sc_act_title_1?smid=A1MDC9YLETZE7Z&psc=1 -[Qty 2] M4*20 screw: https://www.amazon.com/gp/product/B07KRFQJK1/ref=ox_sc_act_title_2?smid=A1MDC9YLETZE7Z&psc=1 -[Qty 2] M3*4 screw: https://www.amazon.com/gp/product/B089KP9PZG/ref=ox_sc_act_title_3?smid=A1ZRRCZIF57JQ9&psc=1 -MeanWell 323282 RS-25-5 Power Supply: https://www.amazon.com/dp/B00DECXUD0?psc=1&ref=ppx_yo2ov_dt_b_product_details -#4 M3 fork terminals: https://www.amazon.com/dp/B08B5WG71Q?psc=1&ref=ppx_yo2ov_dt_b_product_details -Micro USB cable ( I did 15 ft as its hanging on the wall and all.. adjust accordingly for your setup of course): https://www.amazon.com/gp/product/B07DJ3XC4S/ref=ppx_yo_dt_b_search_asin_title?ie=UTF8&psc=1 -CA Glue (Or any glue for that matter) it's used for the logo Studs and very little will be needed, I used: https://www.amazon.com/dp/B08PHQG24V?psc=1&ref=ppx_yo2ov_dt_b_product_details *Either* (Power cable of course should be adjusted for your country Electrical standards) -6 ft Power Cable Pigtail 3 Prong 18AWG NEMA 5-15P Male Plug https://www.amazon.com/dp/B0829Q8DL9?psc=1&ref=ppx_yo2ov_dt_b_product_details -12ft https://www.amazon.com/dp/B0829QG69V?psc=1&ref=ppx_yo2ov_dt_b_product_details OPTIONAL part(s): I've included a recess in my design to allow protection and/or light diffusion to be placed into the frame.. It is not necessary and optional. -Smoked Acrylic Plexiglass 6x24: https://www.amazon.com/dp/B0859KDVZW?psc=1&ref=ppx_yo2ov_dt_b_product_details -Clear Acrlyic Plexiglass 6x24: https://www.amazon.com/dp/B084VVNG55?psc=1&ref=ppx_yo2ov_dt_b_product_details (what I installed for protection of the LEDs) -Plexiglass cutter (we will be trimming above to the correct size of 518/520mm x 132mm)https://www.amazon.com/dp/B08Y7RZ1WD?psc=1&ref=ppx_yo2ov_dt_b_product_details -There are various methods to cutting plexiglass.. but with thin 3mm plexiglass I find scoring simple enough... can google "scoring plexiglass" to learn how using above tool. 🛠️Assembly Instructions: Sorry for poor quality pictures.. using phone camera and the Prototype 3d print quality for speed of printing not quality of print.. 1)Print Parts 2) You will want to assemble the Top and Bottom edges by connecting the letters (A matching A) basically and using 3 medium (of the 18) alignment ribs between each section. The Bottom will consist of 4 parts - A, AB, BC, C and 9 "ribs" The Top will consist of 4 parts - D,DE,EF,F and 9 "ribs" 🚨Take note of the recessed slot (for plexiglass (optional)) they should all be aligned You should end up with: (yea, I see it, I have a C backwards in my design..grrrr LOL, I will fix that) Repeat the process for the TOP D,DE,EF,F 2) Using 8 x M4*10 secure the frames to the panels (Note the panel JIN/JOUT direction) 🚨Plexiglass recession in frame should be on the side of the LED, not the back of the panels, the panels should end up sitting on a shelf/lip, ** I wouldn't completely tighten/snug and screw quite yet , start them and tighten them so panels are secure, but wait till assembly is complete to snug all screws** 3) connect ribbon cable from Panel1 to Panel 2 using the middle JIN/JOUT terminals in the middle of the DMD 4) Secure the ribbon cable and 2 panels together with the U shaped bracket and 4 x M4*10 screws 5) Plug in Power cable for the 2 panels and feed the end through the cable management loops to the right 6) You can add the LED end piece to the left side of the frame now.. It has six ribs built into it with the "Design by Boroka" (*Design mark is not visible when hanging on the wall*) and secure with last 2 x M4*10 screws (if your adding PLexiglass to the frame, you may want to do this as a last step). Again take note of the recessed portion and make sure it lines up with the TOP/BOTTOM recessed section for the Plexiglass. 7) Connect ESP32 and Ribbon cable to ZeDMD shield 😎 Lay ZeDMD shield onto the Electics Box base 4 mounts with the DIM/RGB buttons facing the Box mount holes (Do not force it to fit.. It is compression fitted and will be snug, but you should be able to work the shield down onto the posts (the power supply is shown in picture to show how things will be laid out) Side view showing the DMD shield all the way down on the support posts 9) Feed USB cable through access hole (rectangular) on bottom of control box and up around the cable tension post and into micro USB slot 10) Place the End Cover piece on the Control Box and Secure with the 6 Long Alignment/Support Ribs. 11) Attach control Box to Led Frame aligning the ribs and using the 2 x M4*20 Screws (Again make sure the plexiglass recess aligns with the others) At this point you may want to shift/adjust and make sure everything is aligning correctly and tighten all M4 screws SNUG.. Do not over tighten. 12) Secure Ribbon cable in JIN on the Panel 13) Now we will mount the Mean Well Power Supply, we have left a channel in which we will run the power cables through between the power supply and the control box frame Flip the DMD over so LEDs are facing upward and your Panel power cables are coming into the Electronics Box I found it easiest to put the Power supply on its end work the cables to the bottom as you lay the power supply down Then pinching the power supply in place, rotate the DMD on its end and secure the power supply with the 2 M3*4 Screws 🚨Make sure the cables are not pinched between the frame and the Power supply.. you should be able to slide the cables in and out! 14) connect cables to the V+/V- terminals (Don't assume my pictures are correct, always check to make sure you connected to the correct terminals) Red-Positive / Black-Negative 15) Next we will run the power for the Power supply. Again check the terminals to verify which is Live/Neutral/Ground (Don't assume my pictures are correct) 🚨With the limited space we are working with, you may want to trim the cables staggered to better fit Feed power cable through Bottom 8mm hole.. It should be a snug fit Attach terminal ends to the 3 wires ( crimp/soldier/heat shrink).. Your house.. make them good. I found it easiest to remove the terminal screws and the screw them back in after placing the wire/terminal in correct location, but when all said and done should have something like And all wires should not be above the edge of the Control Box, you might need to finesse it a little, but they all should be below the edge of the frame and secured snugly. the wires themselves should not be pinched. 16) Now we need to glue the logo studs to the logo 17) After the glue has dried you should be able to snap the Logo onto the control Box ** Yes the pictures show my control box detached from the frame, It is so I can get better side view pictures for Step 20.. Yours should be attached to the frame) 18) Place control top cover on control base.. Make sure the USB cable is tucked inside.. I usually do the Top (by the ESP3s) snap before I do the Bottom (snap) The cover should slide down the channel and again slight pressure to secure the "snap"- Don't force it 19) Verify you can see access to the ZeDMD shield buttons through the button hole and everything is secured, not forced or broken or anything 20) Insert buttons into the "Button hole" and secure with the 2 short Ribs. (1 per button) You should be able to press the button and feel the retraction and pop-back from the DMD shield buttons freely moving.. 21) (Optional Step) Cut/Add plexiglass into the recessed slot covering the LEDs and attach the LED end ("Designed by Boroka") if your adding plexiglass to frame. **Note to self - capture scoring/cutting plexiglass for frame** Frame is complete I'll hang it again shortly and add a video of it in action for those that may want to "see it in action" on the wall as an example. -B

.thumb.jpg.684f0f0a14876f972eb4d05adf1a2c9e.jpg)
.thumb.jpg.240cb3751b9eb2e573794289c8814d57.jpg)
.thumb.jpg.b39e7f74e42f20d4149ea1265a43f662.jpg)


-
Version 1.06
2813 downloads
“Welcome to the fabulous Las Vegas, Nevada…” I’m happy to share this serum colorization of Stern’s World Poker Tour (2006) to the community. I originally began this colorization to assist @mk47 and the serum-to-real pinball project team, then @RobbyKingPin wanted to dust off and redo a VPX World Poker Tour table that was long overdue for an overhaul and we’ve been collaborating since that time to release. What an awesome community we have! Special thanks to @PastorLUL as he provided the service menu frames as well as all the other Serum authors and @zedrummer that make up this wonderful community – it is all of you that keep me motivated. Thank you. Uses the wpt_140a rom Some highlights: - This is a Serumv2 and requires Freezy/DMDExt 2.3 or higher - City destination frames have been replaced with imported HD drone footage, along with an enhanced fireworks display when you win a City - Most backgrounds have an HD component to them and look nice when properly set in your dmddevice.ini configuration: [wpt_140a] scalermode = doubler - There are 2 versions available to download and choose from – one with all the HD/SD backgrounds and another without There are several tables out there that use this rom, but I HIGHLY recommend @RobbyKingPin WPT table HERE – he has worked his magic talents (again) with modern techniques and attention to detail. You will want to add this one to your favorites. Now go play some Texas Hold’em… in Color! -

Version 1.01
10257 downloads
Please note: This Serum colorization was developed and tested on both virtual and real tables to ensure accurate color depth and optimal performance. However, for real tables, this applies exclusively to ZeDMD <> PPUC/DMD displays. Use with any other hardware solution is strongly discouraged. Videos and user reports have shown reduced frame rates and poor color output specifically on PIN2DMD. Please be aware that these issues are not caused by Serum itself, but by the hardware/software limitations of PIN2DMD. This is my very first colorization, around 400-500 hours went into this one. Feel free to leave a comment or a review, it really does help motivate me to create/update content! If I release any updates you will be the first to hear in the Serum discord. IMPORTANT: Ensure that the correct rom 'acd_170h' from Stern's official website is being used! The color patch version 'acd_170hc' will not work due to frame differences. Don't have the official rom? Go to Stern's AC/DC download section and click on DOWNLOAD FILE where it says 'AC/DC 1.70 LE GAME CODE'. Now that you have 'ACD170LE.bin' downloaded, simply zip the .bin file and rename the zipped version to 'acd_170h'. Lastly, add it to your roms folder. If you feel the need to donate you could do so here❤️ Thanks to the Serum team for making amazing colorizations like this possible, you know who you are! 🔝 -
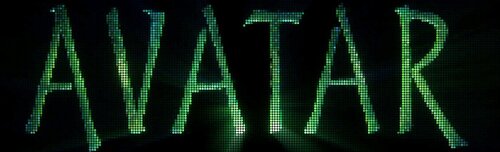
Version 1.0.1
4283 downloads
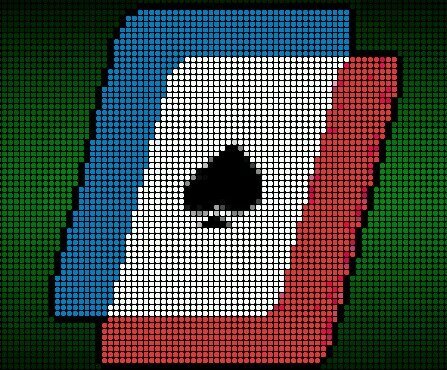
“JAKE!!! EYWA HAS HEARD YOU!!!” I’m pleased to offer you this serum colorization of Avatar from Stern’s 2010 pinball rom. This is my 2nd serum colorization. My goal with this one was to keep some primary colors throughout but flex/ adjust as the game modes change (e.g. ampsuit multiball is army brown/green/yellow, eywa seed collection uses purple/white/blue) and blend it all together with the imported video footage as a cohesive experience as you play the game. Notable Highlights: · Serum v2 release requiring DMDExt 2.3.0 or higher · Over 30+ individual clips of movie footage - you might lose a ball or two watching instead of playing · Add scalermode = doubler in your dmddevice.ini to show off the HD frames Uses avr_200 rom A very special callout of thanks to the other serum authors that have coached, provided feedback, tested and always available to help and of course @zedrummerthe creator of Serum In addition, special thanks to @Pinballuser for sending me his dump files to help save me time dumping and finding frames I hope you enjoy ! Now go ride a Banshee... in color!


.jpg.e6dc19afc3cfd0a77a56733ddf91143b.jpg)
.jpg.4fc7be5070baef52554b2a610f80d83a.jpg)
.jpg.b3632de43400d997a48925ead99e0da0.jpg)