-
SYSTEM SEARCH
System Scanners Online:
Username: Guest
>> System Scan?
>> The Universe >
Incoming Message:
Due to system limitations searching with words of 3 or less characters will not return results. For instance; Doctor Who. This will not return results as the system is trying to search for both Doctor AND Who in which Who will not be found as it's a 3 character word. To find Doctor Who; you'd search for either Doctor or "Doctor Who".
Search Tips:
For specific searches; enclose your search with quotes. Example: "Doctor Who" or "Addams Family".
Search the Community
Showing results for tags 'DMD'.
-

Version 1.0.3b
924 downloads
Salut a tous, Avis aux amateurs de métal et de cambouis ! Je viens de terminer une série de logos constructeurs pour DMD LCD avec une grosse retouche style industriel par IA. Fini les logos plats, on est sur du visuel qui claque pour vos menus Pinup Popper. J'ai regroupé les marques les plus présentes pour donner un look cohérent et "indus" à votre machine : - Bally - Bell - Capcom - Chicago Coin - Data East - Gameplan - Geiger - Gottlieb - Hankin - Inder - JJP - Juegos Populares - LTD do Brazil - Maresa - Midway - Original - Pinball Brothers - Playmatic - Premier - Sega - Sonic - Spooky - Stern - Taito - Williams - Zaccaria - Pinup Popper -------------------- Hi everyone! Calling all metal and grease monkeys! I’ve just finished a series of manufacturer logos for DMD LCDs with a heavy industrial-style makeover. No more flat logos—we’re talking high-impact visuals for your Pinup Popper menus. I’ve rounded up the most popular brands (Bally, Capcom, Data East, Gottlieb, JJP, Sega, Spooky, Stern, Taito, Williams, and Original) to give your machine a consistent, "gritty industrial" look.- 11 comments
- 1 review
-
- 16
-

-
- dmd
- manufacturer
- (and 16 more)
-

Version 1.0.0
149 downloads
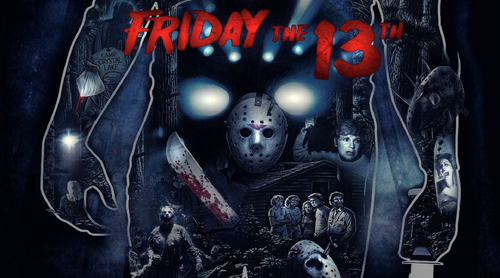
Here's a backglass that can be used with the Friday the 13th mod /pup by Bigonia1/JPSalas- 1 comment
- 2 reviews
-
- 9
-
-
- friday the 13th
- friday
- (and 3 more)
-
Version 20220331.01
4985 downloads
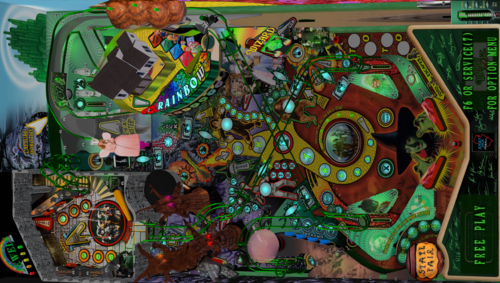
This table is being released in response to the requests received and to give back to a community that has provided hundreds of fun tables that my family has enjoyed. This is a modified version of what was uploaded to VPinball. All the changes and hopefully most of the credits are detailed in the table script prolog. One obvious change is a playfield screen option menu (F6) offering changes to the game rules to help less experienced players reach the more difficult modes (e.g. Somewhere Over the Rainbow). Installation Note Included in this release package are: vpx table, backglass, ultraDMD directory, and a PUPpack. There are also DOF Configtool entries for this table. The backglass file is large and loading may require applying the 4G patch to the backglass server. The backglass provides information on game progress. Removing the backglass is not recommended even when the PUPpack is installed. There is an option in the table script under GAME OPTIONS to turn off the PUPpack triggers if you don't install the PUPpack. Images, animations and sound files will replace the PUPpack videos. However, the PUPpack videos significantly enhance the gameplay experience. Whether the PUPpack is installed or not, the backglass should still be left in the table directory. This table is available to be modified without permission. However, as detailed in the table script, this table is for private use only. Its use for any commercial purposes is NOT in anyway sanctioned or supported. Thank you. -
Version 1.0.0
202 downloads
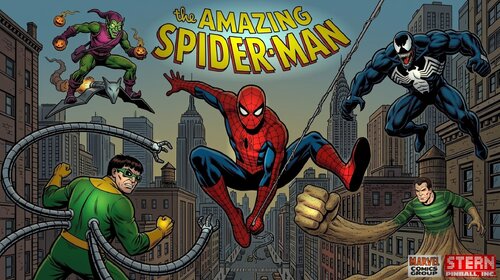
Here's an alternate B2S with FullDMD for Spider-Man Classic by VPW/Siggy. No one's gonna stop you from putting on the regular VE, if you like it Also included a Spider-Man DMD if you prefer it over Electro, just replace with the one in previews! ----- Come join us for weekly competitions and VPin chat on the WoVP Discord: https://discord.gg/75AjDuPch9 ******NOTICE AND DISCLAIMER********** This backglass is a non-commercial, fan-made tribute created strictly for private, educational, and home-entertainment use. It is provided "as-is" and free of charge. Ownership: All trademarks, logos, characters, and copyrighted materials related to Spider-Man , Marvel, and Disney are the sole property of their respective owners. No claim of ownership is made to these assets. No Profit: This project is not affiliated with, endorsed by, or sponsored by the copyright holders. The creator(s) of this table have received no financial compensation for its development or distribution. Distribution: This file may not be sold, bundled with commercial hardware, or used for any commercial purpose.- 3 reviews
-
- 23
-
-
- spider-man
- b2s
- (and 2 more)
-
.thumb.png.95d0789d9cff9cef5d6be97e2e2c8ba2.png)
Version 1.8
5632 downloads
Virtual Pinball Media Files Folders on MEGA: VPX Attract Backglass-Over 250 for mostly original Visual Pinball X tables. A good substitute for the normal b2s backglass video file in your front end. Launch Audio is included in the folder for each table. Includes special Holiday tables. Future Pinball Attract Backglass-Actual Backglass image with added animations or video. Add a little flair to your Future Pinball collection. Future Pinball Playfield Videos-.mp4 video of playfield for use in your front end. Pinball FX3 Animated Backglass-All 99 2 screen versions with DMD/Speakergrille. 69 3 screen versions with and without FX3 logo. Best used with Pin Up Popper but they can be used with Pinball X/Y. Add these as your backglass file in Media Manager. Info here for keeping FX3 animated backglass playing when you load the table:https://www.nailbuster.com/wikipinup/doku.php?id=managing_games Full DMD-Over 800 Full DMD .mp4's. Lots of Full DMD's for Originals, EM tables and Future Pinball. Star Wars Popper Theme-My personal Star Wars Popper theme. I use this on my Star Wars themed cabinet. Phenom VPX 2 Screen Backglass-Video backglass for 2 screen users of Phenom's Kid tables. These allow your backglass video not to be blocked by your DMD for the table. Resize your DMD into the cutout. Table Wheel-Table Audio-Wheels and table audio Loading Videos-I made these for some of the Pup Packs I have in my lineup NFL Tables (Xenonph)-Full DMD for all tables. Popper playlist media for NFL tables. Instruction Cards for all 32 teams. Toppers-Topper Videos I have made Instruction Cards-Over 1300 Instruction Cards for use in your front end. Mostly EM and Original Tables. A big thank you to Inkochnito for his EM database (https://www.pinballrebel.com/pinball/cards/). Be sure to check out other instruction cards made by authors like @cheese3075@buffdriver @Kongedam @eddiemonsta @Frank_Enstein @CarnyPriest and others visit https://vpuniverse.com/files/category/91-instruction-cards/ or https://vpuniverse.com/files/category/9-hyperpin-media-packs/ (Authors - if you see anything in my MEGA belonging to you just drop me a PM and I will remove. I think I got them all out 😊) See the video from The Way of the Wrench (who inspired me to do this on my cabinet) for a tutorial on how to add to Popper https://youtu.be/RZTwHQNNqDc?si=l4nS24MQaMU9WAKP Pinball Flyers-Over 1900 pinball flyers for use in your front end. I created hundreds for tables that do not exist in real life and many that there were no pinball flyers available. I will continue to add to this as new tables are released. Add these to your front end just like the instruction cards. There is a sub folder called Popper - No Stretch will has non standard size flyers so they will not be stretched when shown in your Popper front end. A big thank you to the original table authors, artists, and others who allowed me to use their artwork. Big thank you to vogliadicane, IvanTBA, HiRez00, Cocothetrain, hauntfreaks, godisnothere, scutters, STAT, Rajo Joey, and Nick D for their work.- 15 comments
- 4 reviews
-
- 84
-
-
- future pinball
- animated backglass
- (and 28 more)
-
Version 2.0.4
3026 downloads
2.0 table credits: - Burger & Schlabber34 - Thanks to Burger for bringing this table back to life. He asked me if he could update the physics and all the table creators know how this usually ends. Then we needed a nice F12 menu, then Burger mentioned VR, the ramps were prerendered so i had to make VR optimized ramps but the meshes were shitty so i cleaned them up and then you need new renders for VR refraction and the prerandered ramps. After a ton of bugs that we killed we finally had V2.0! @burgerIt was a pleasure! Thanks my friend! - UnclePaulie - A ton of help on bug fixing and sticking his head deep into the VR table. - DGrimmreaper - VR cabinet primitives, VR animations and lights including VR flipper cabinet button/start button/plunger, ported DMD and b2s to VR, VR scripting, VR hallway - Studleygoorite – Identified missing details and provided solutions to several tricky issues - Hauntfreaks - B2S backglass update that brings the table together visually - masonm- cabinet textures for VR cabinet - DaRdog- UV maps in VR that made texturing possible - Thalamus - Careful playtesting and valuable feedback throughout development - Robby King Pin – physics support - Tombg - playtesting Original table credits: -Herweh: Script allmost from scratch - Dark: We all know what he did! Frank is just jawdropping!! - Dids666: For starting all of this and his awesome meshes. Thanks for letting us finish this!! - Sheltemke: For stitching together the PF image and playtesting - Mlager8: For PS help on the sling plastics - RothbauerW: For his awesome physics' guide at vpinball.com and some more help on the physics - Mark70, Bord, Thalamus: For beta testing and some good hints - Batch: For the DT background image (Sorry for making it a bit darker! Batch's original is in the image manager for those who like more pop)- 40 comments
- 23 reviews
-
- 214
-
-
- sega
- frankenstein
- (and 4 more)
-

Version 1.0.0
343 downloads
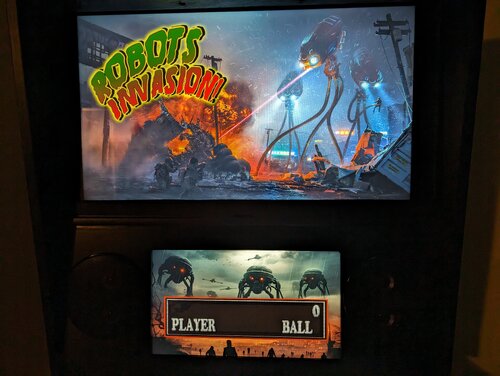
I created this animated B2S to go with the very cool Robots Invasion table that was converted from Future Pinball for VPX by Unclewilly at VPForums. You can get the table at VPForums.org here: https://www.vpforums.org/index.php?app=downloads&showfile=18390 This animated backglass and DMD combo supports 2-screen and 3-screen scenarios, plus I included two versions for DMD frame and without, depending upon your preference. The table has a DMD on the playfield, so some people will choose not to have another FlexDMD image on the DMD. Enjoy! -
Version 1.0.0
295 downloads
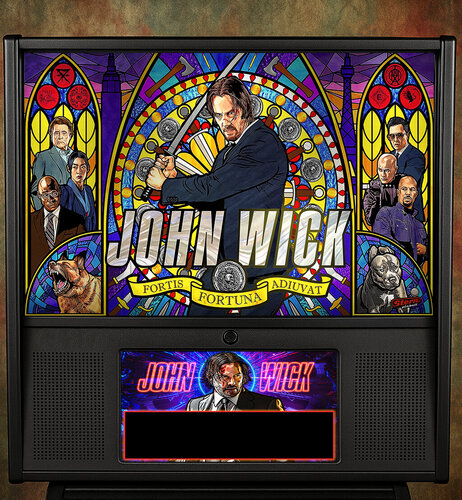
I really liked this backglass on the real pinball machine in the LE version, and since I wanted something different from what was offered here, I took my time trying to make something beautiful. I hope you'll like it 😃 Our dear @balutito's table: https://vpuniverse.com/files/file/16522-john-wick-babayaga-pinball-edition/- 6 comments
- 2 reviews
-
- 26
-
-
- john wick
- backglasss
- (and 3 more)
-
Version 1.0.0
83 downloads
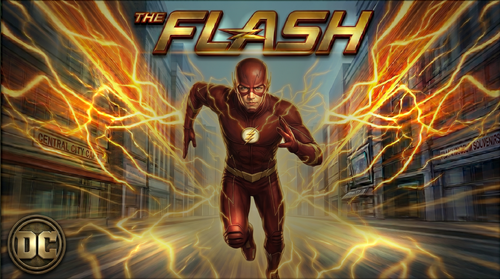
B2S for The Flash by OneVox or The Flash - Comic Version by Icepinball 2 DMD options to choose from, just download (big) from preview if you prefer it. -
StaticDMD.thumb.png.3551335901f7b450fa5e0b7416f5ebce.png)
Version 1.0.0
31 downloads
Replacement DMD screen for backglass of Fast Times by THEPOSTMAN81 -
Version 1.79
653 downloads
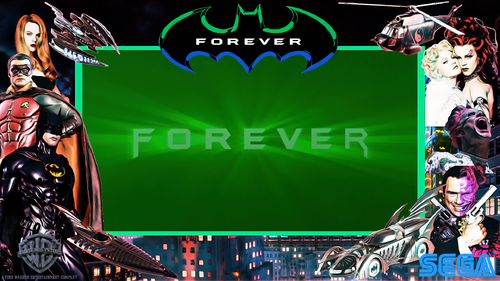
Peace Y'all, "I'm going to need that hand back." Unzip and place the batmanf folder in your pup folder and take the B2s out of the batmanf folder and put it in your table folder. This Pup works off the batmanf rom. Any table using this rom should work. I used the @drakkon table in making this pup pack. This pup is setup for 1, 2, and 3 screens. Bat files have been added so just pick the bat that fits your system. This pup works with Flex-DMD, so you'll need it to move the score around. My own custom DMD video, FullDMD and 16x9 B2s (no stretching) are included. Three screen cabs can go with the DMD or a B2s and the FullDMD. There is a Batman Forever Pup Pack out in the wild. It's hard to find and I don't believe it's being supported. I got it a while ago. It no longer works on my setup so I decided to make a new one with my own stink all over it. This pup pack comes with a Custom B2s (16x9), DMD and FullDMD. Everything was built from scratch. I really like this table. I downloaded @capnclaw sideblades and modded them to fit the color scheme of my pup pack. I like the look. The table is busy, the pup pack is busy and the custom b2s is busy. Plenty here to keep your eyes moving if you find the table is too easy. Making this pup pack was a lot of fun and I added a good bit of my own creativity. This pup pack is loaded. All the triggers that mattered to me are in this. As with several of my other pup packs, my scores got better after playing with the pup pack installed. This moves the whole presentation into my Top Ten Rotation. This is my holiday gift to the community. I love it and I hope you like it also. I will make upgrades to all my Pup Packs when necessary and as my understanding of this craft increases. Otherwise....... Enjoy! Precise All Logos, Copyrights and Trademarks are property of their respective owners. PROVIDED STRICTLY FOR PERSONAL / HOME USE AND NOT FOR COMMERCIAL SALE / RE-SALE OR DISTRIBUTION! VIRTUAL PINBALL ALWAYS HAS AND ALWAYS WILL BE FREE TO ANYONE!!!!- 47 comments
- 7 reviews
-
- 36
-
-
- batman forever
- pipallah
- (and 3 more)
-
DMDSS.thumb.jpg.77331db5a90dffa9c97e9643ea61062e.jpg)
Version 1.0.0
48 downloads
static DMD screen using logo and cab art to go along with Tropic Isle by JPSalas -
hi, here's a beginner's question: i'm setting up my cab with a fullDMD (1920x1080) screen. Now i followed nailbusters tutorial at https://www.nailbuster.com/wikipinup/doku.php?id=popper_fx3 My result is: now i have a tiny dmd at the size 512x136 in the top left corner of my dmd-screen. Because i have no mouse in FX3 while playing a table, i can't move and resize the dmd so it fits into the backround-frame. According to nailbuster, the popper line "start /min "" "PUPDMDControl.exe" FX3 PINUP\[GAMENAME]" should do the rest. Can somone help me to understand this call? looks like this PupDMDControl can run with table-specific parameters, but where the heck can i find/set this PINUP\[GAMENAME] setting? Well, i'd even be happy having the same frame for every fx3-table and just the dmd fit.
-
Version 1.0.1
492 downloads
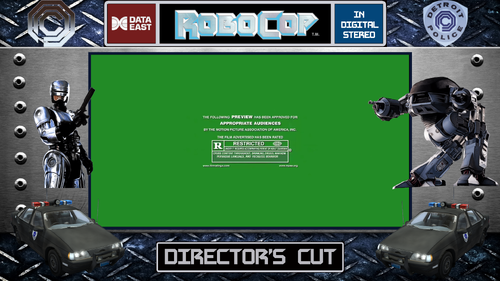
Peace Y'all, Pup Pack rated R for violence & profanity. This is not for the babies. "They'll fix you, they fix everything." Unzip and place the robo_a34 folder in your pup folder and take the B2s out of the robo_a34 folder and put it in your table folder. This Pup works off the robo_a34 rom. Any table using this rom should work. I used the drakkon and Bigus1 tables. If using the Bigus1 3.0 table, disable the flexDMD in the table script. This pup is setup for 1, 2, and 3 screens. Bat files have been added so just pick the bat that fits your system. This pup works with Flex-DMD, so you'll need it to move the score around. My own custom DMD video and 16x9 B2s are included. Three screen cabs can go with the DMD or a B2s and the FullDMD. There is already a Robocop pup pack available. This one is for people who want the uncensored DC (Director's Cut) of the movie. This preserves all the over-the-top violence and profanity. I do not recommend this for pinballers under 18. My vision for this pup pack was to make sure the gore, violence, and profanity is intact, along with all the callouts. I like this table and wanted to add my stink to it's accessories. I didn't play it in college because they didn't have one on my campus. Otherwise this pup pack would be a part of my college series. As with several of my other pup packs, my scores got better after playing with the pup pack installed. I love it and I hope you like it also. I will make upgrades to all my Pup Packs when necessary and as my understanding of this craft increases. Otherwise....... Enjoy! Precise All Logos, Copyrights and Trademarks are property of their respective owners. PROVIDED STRICTLY FOR PERSONAL / HOME USE AND NOT FOR COMMERCIAL SALE / RE-SALE OR DISTRIBUTION! VIRTUAL PINBALL ALWAYS HAS AND ALWAYS WILL BE FREE TO ANYONE!!!! PROVIDED STRICTLY FOR PERSONAL / HOME USE AND NOT FOR COMMERCIAL SALE / RE-SALE OR DISTRIBUTION! VIRTUAL PINBALL ALWAYS HAS AND ALWAYS WILL BE FREE TO ANYONE!!!! -
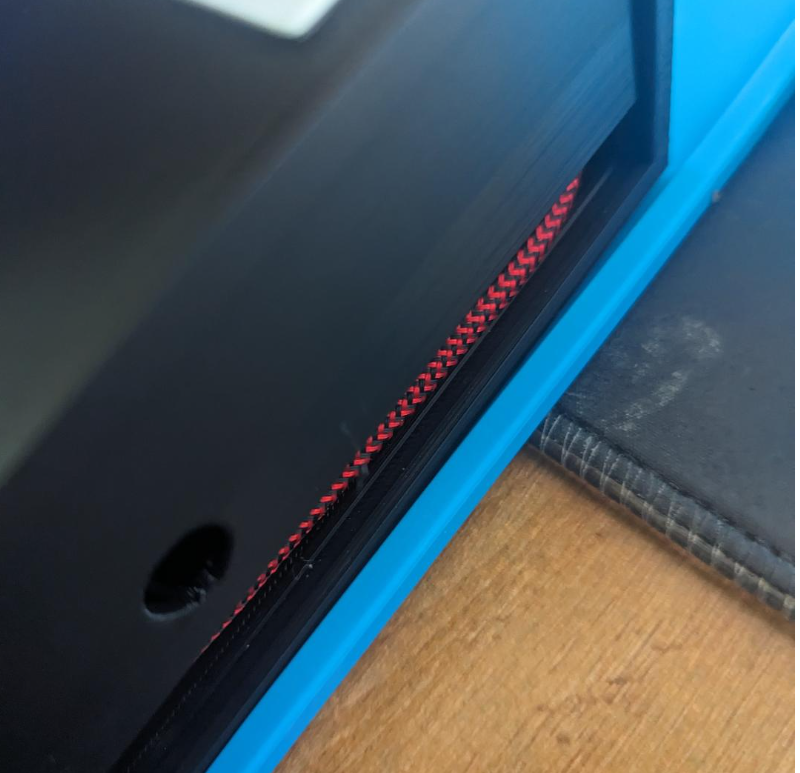
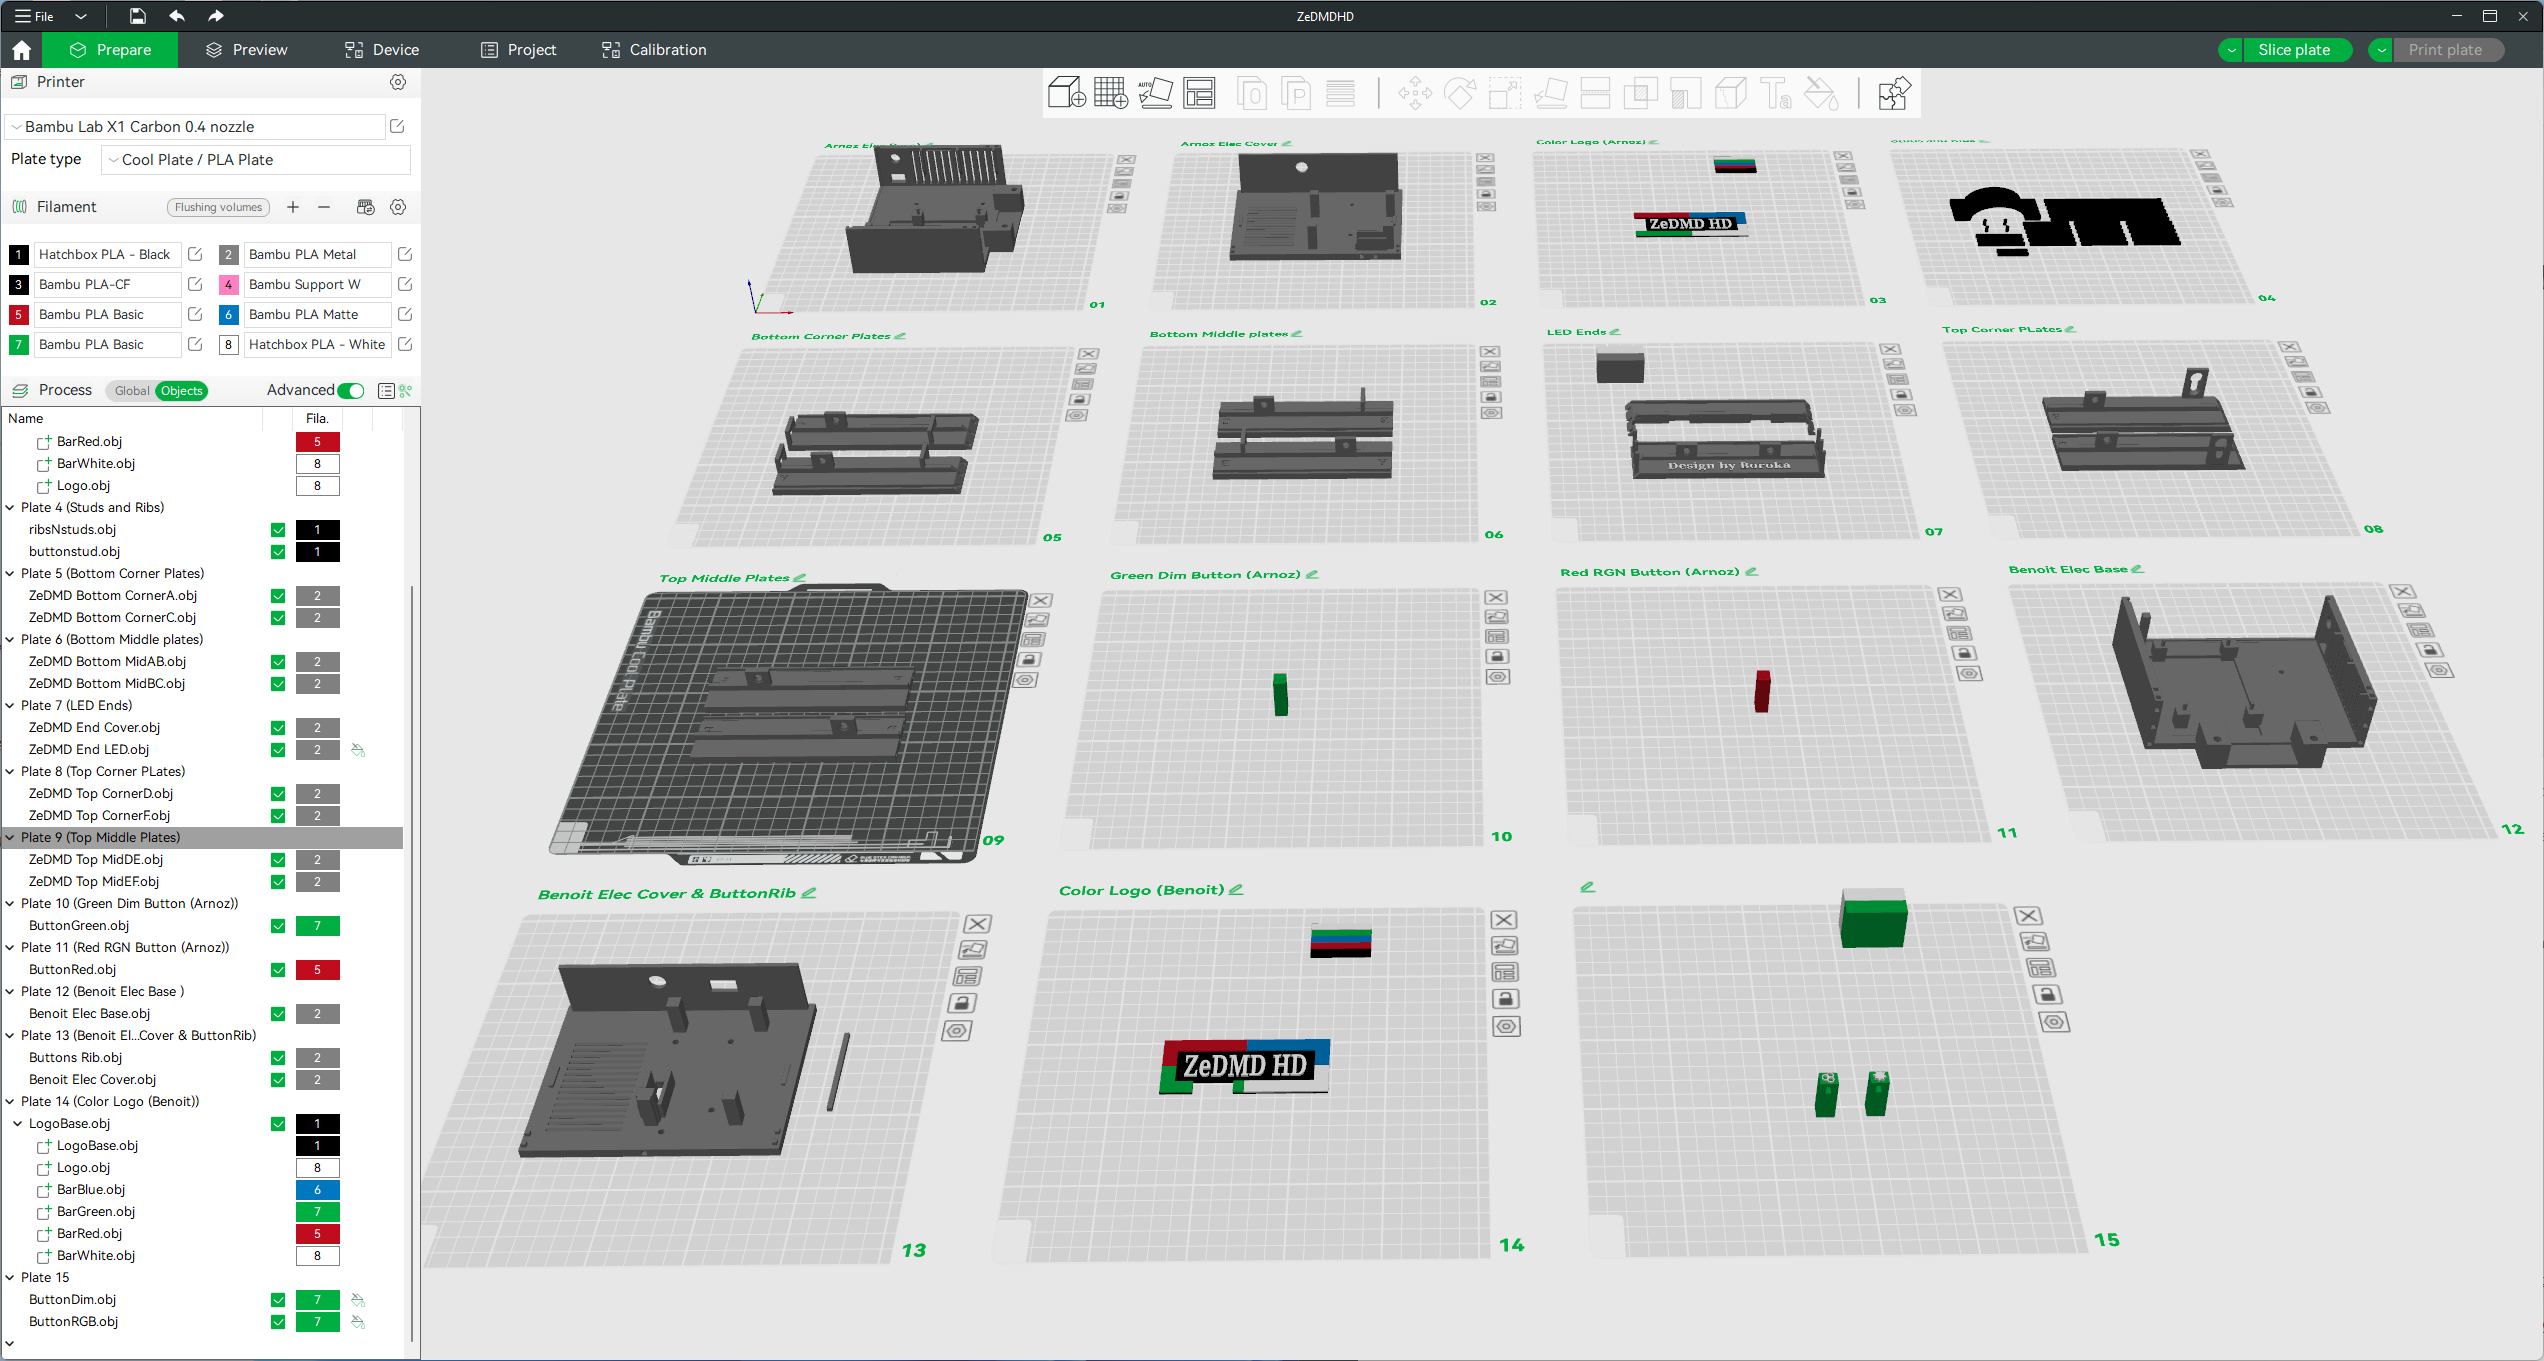
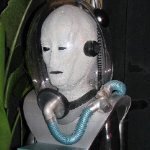
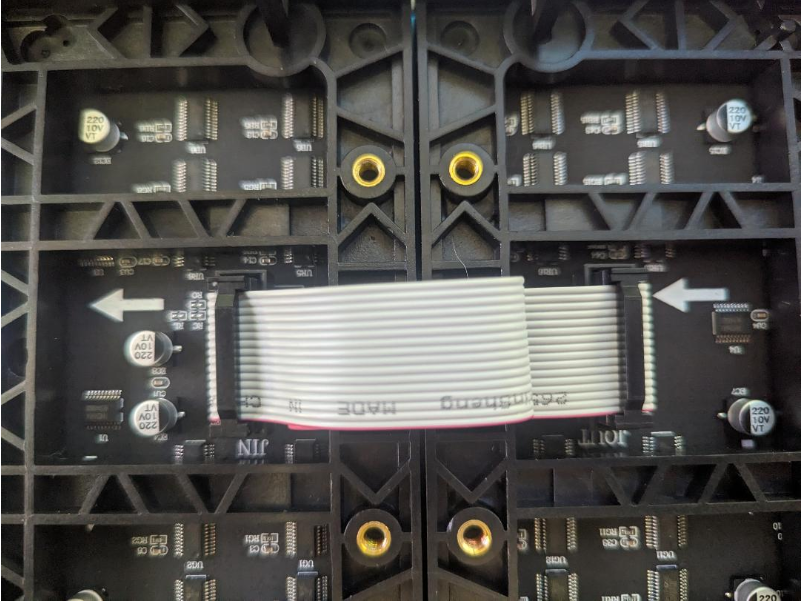
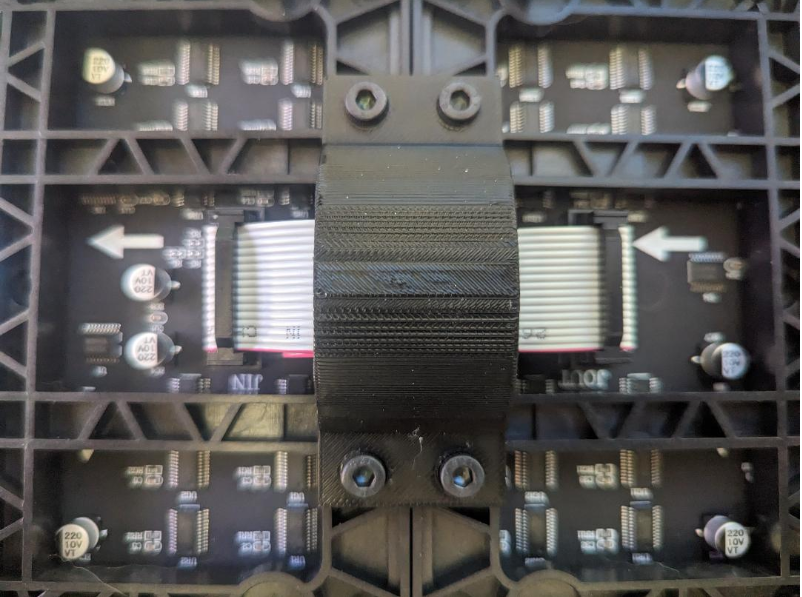
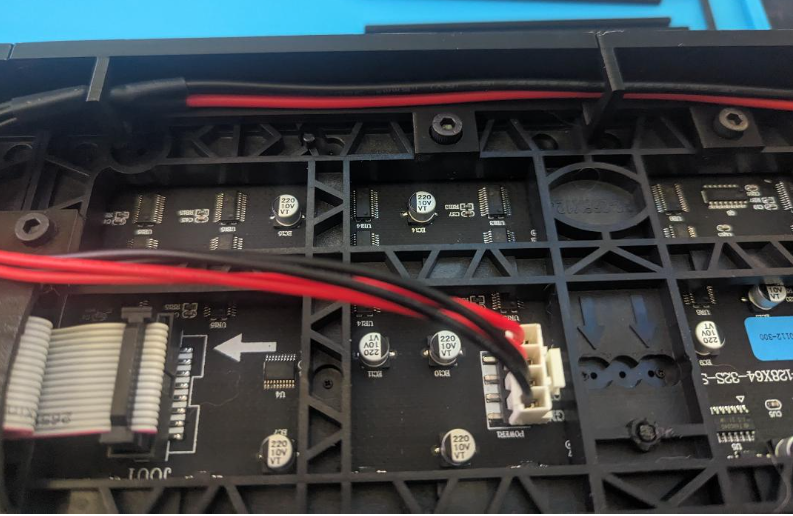
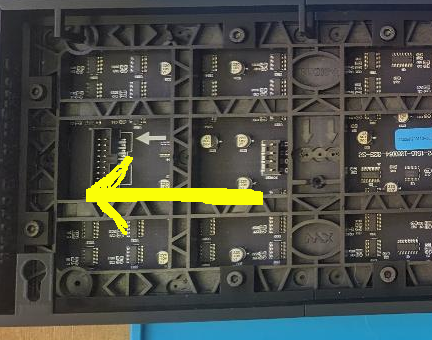
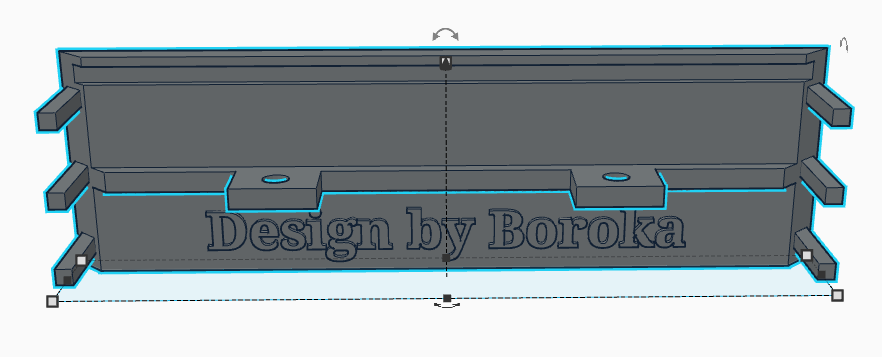
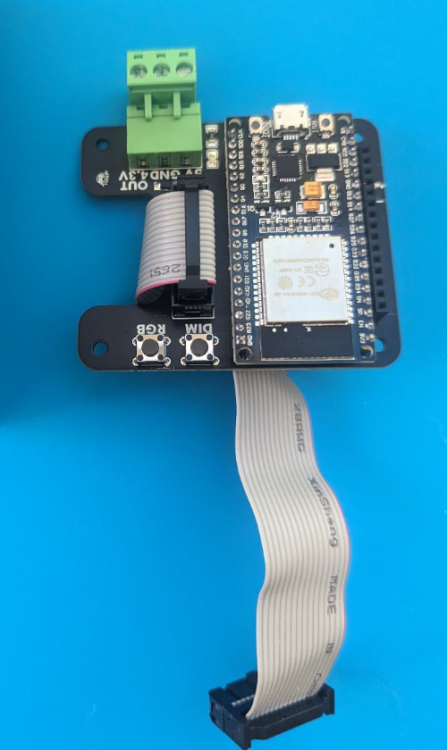
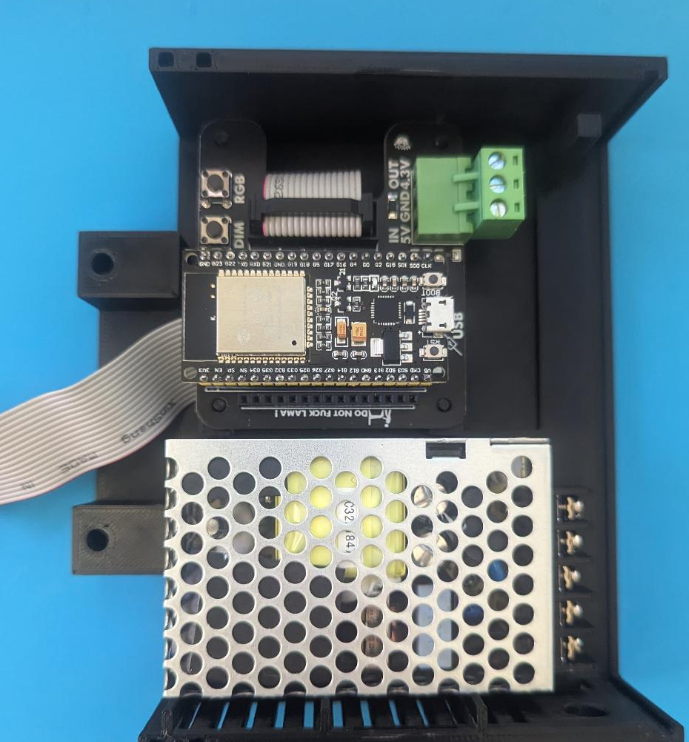
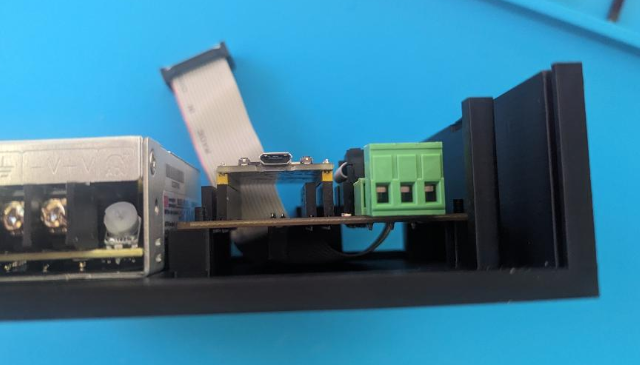
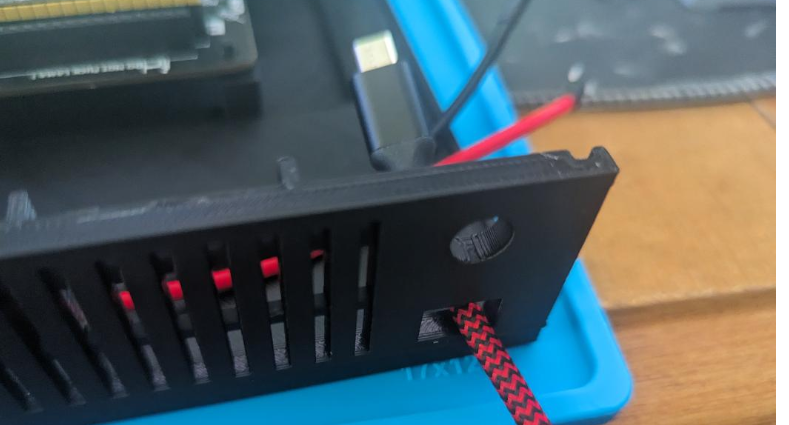
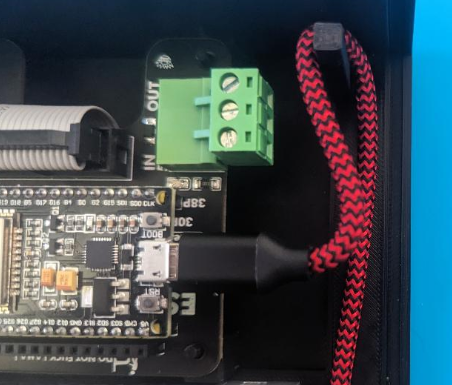
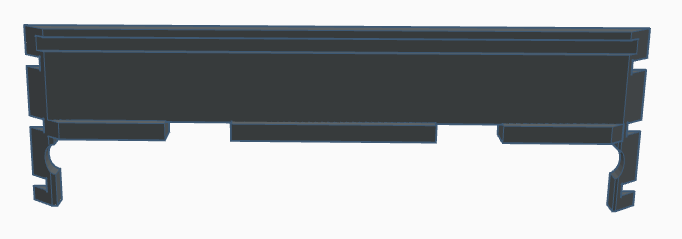
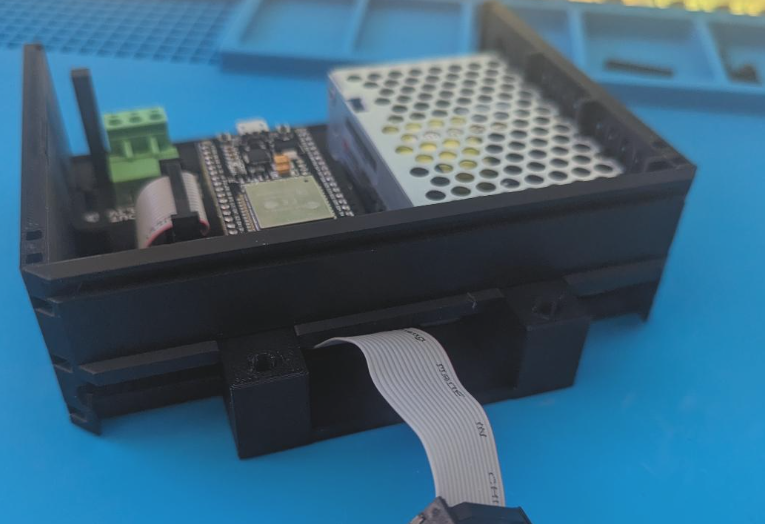
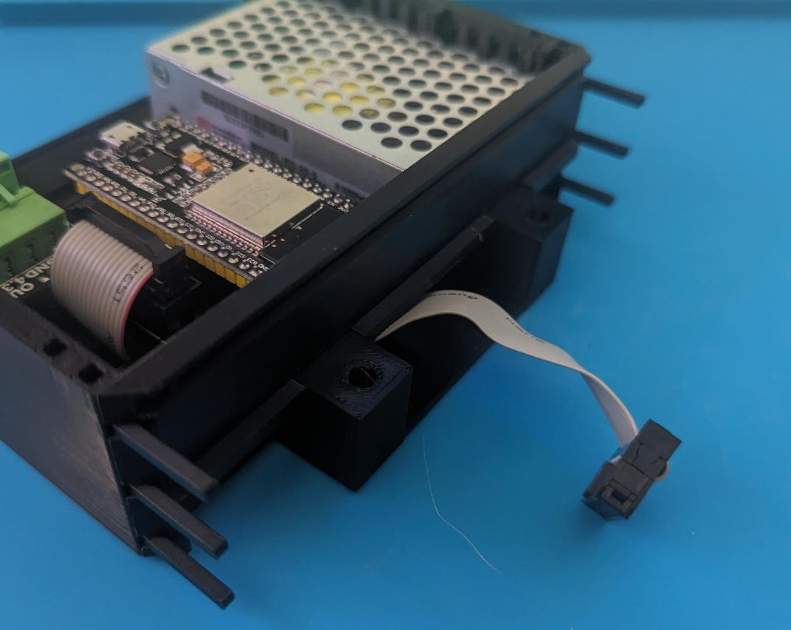
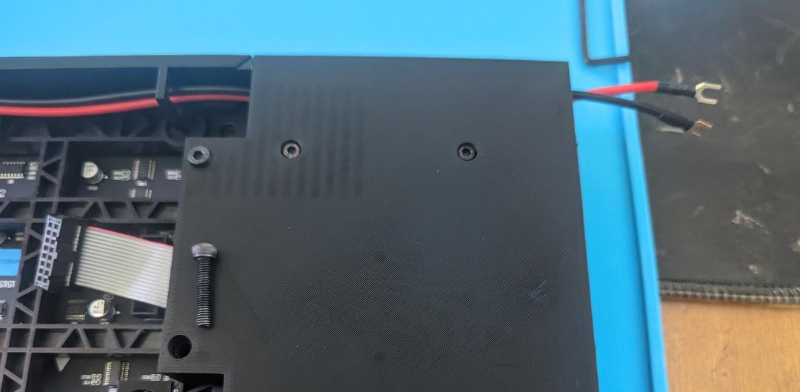
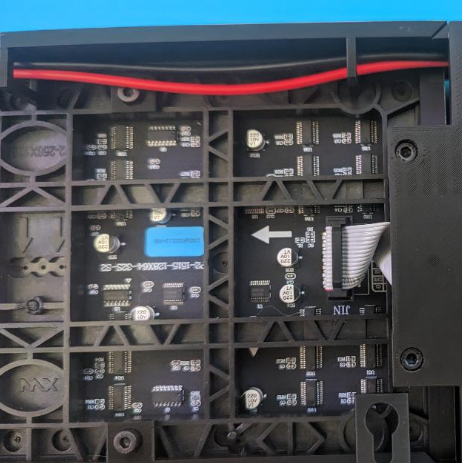
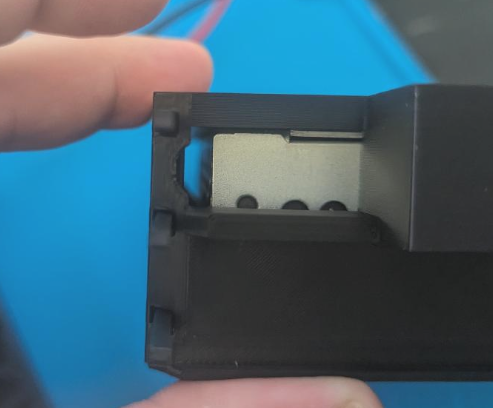
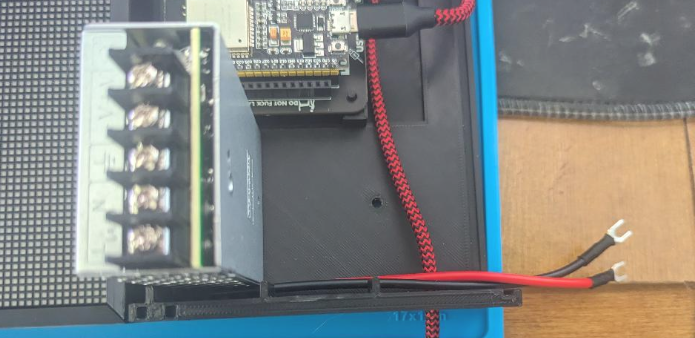
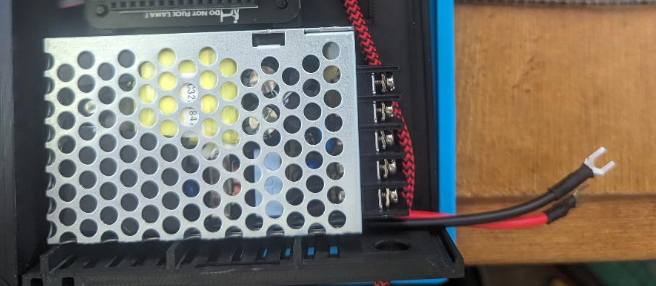
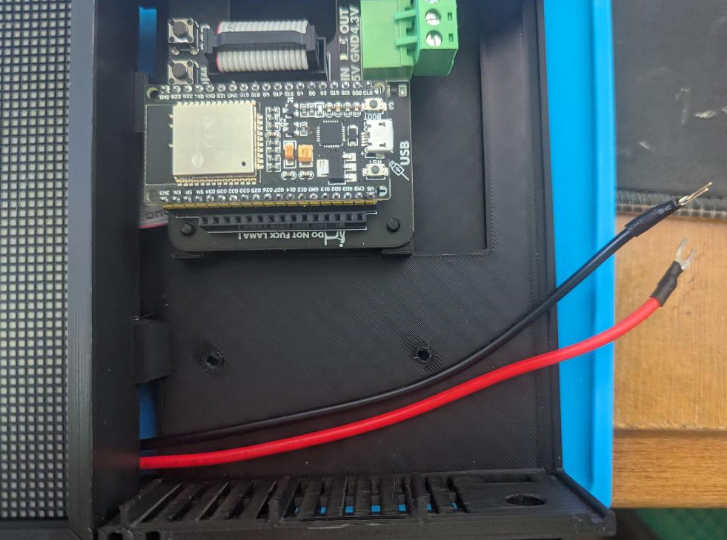
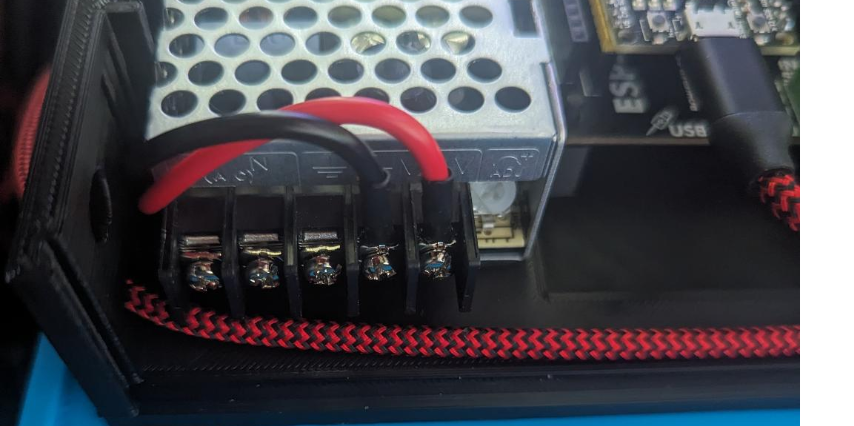
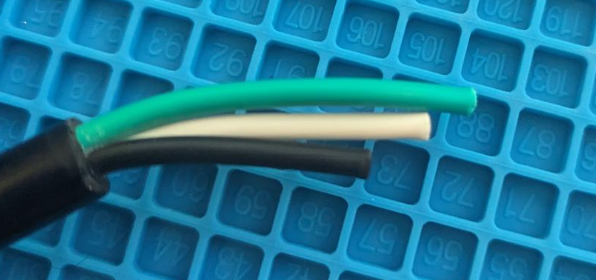
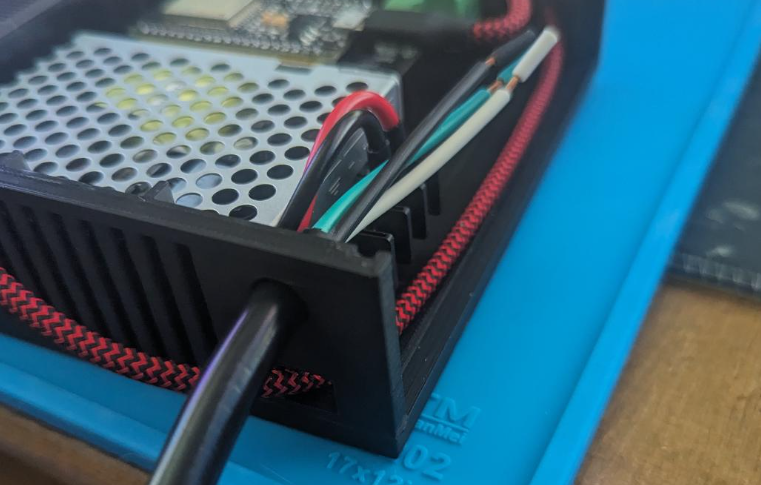
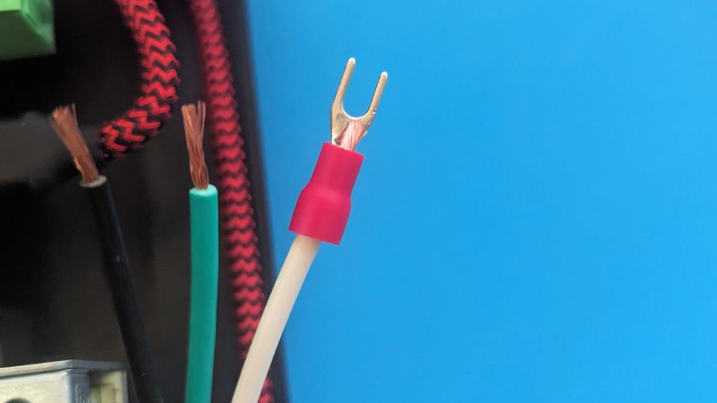
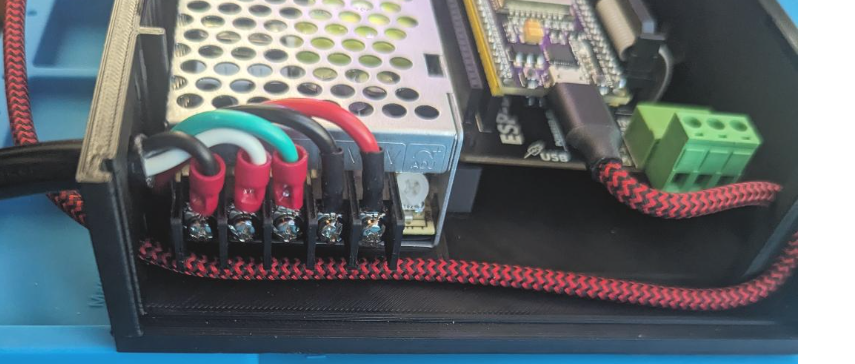
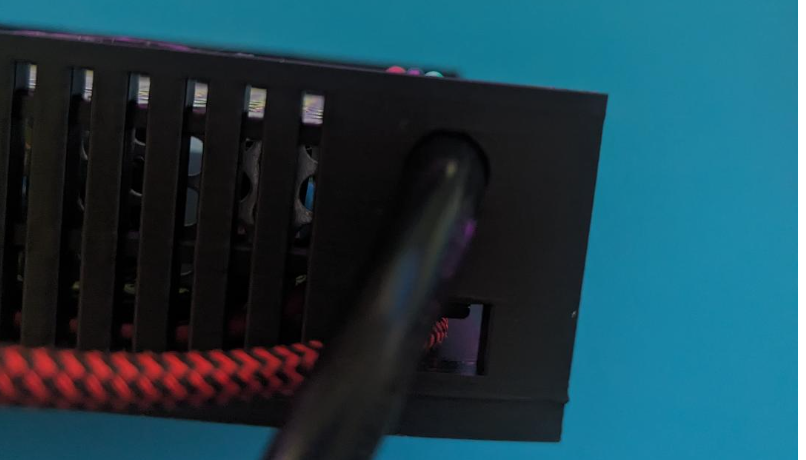
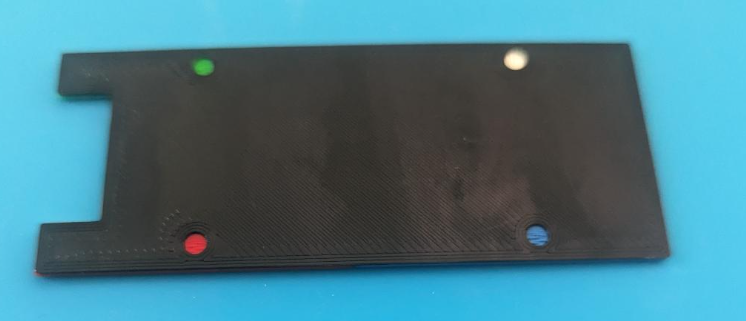
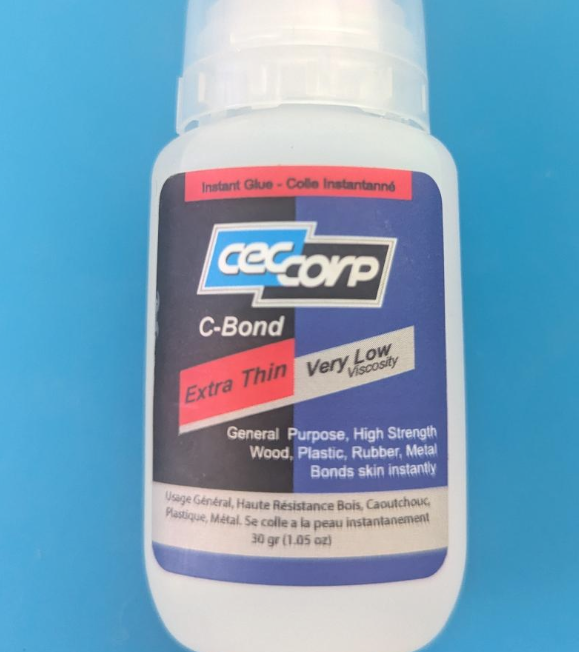
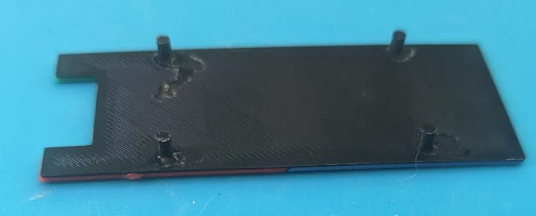
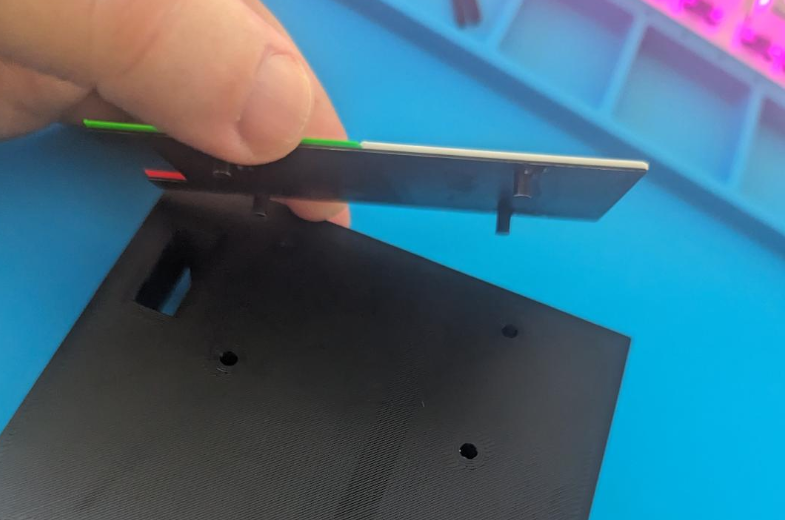
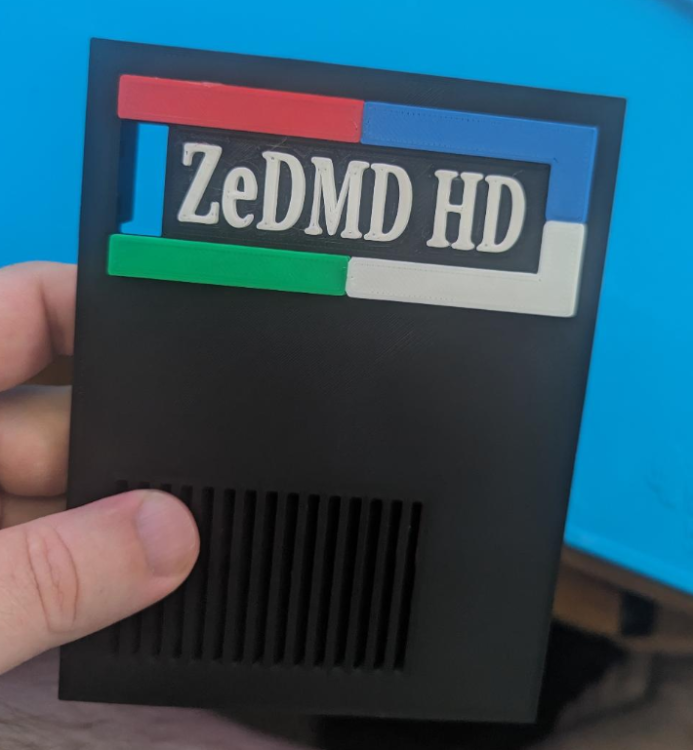
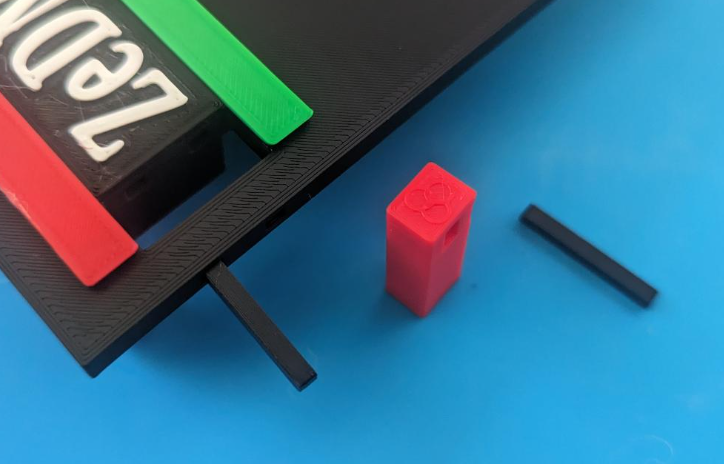
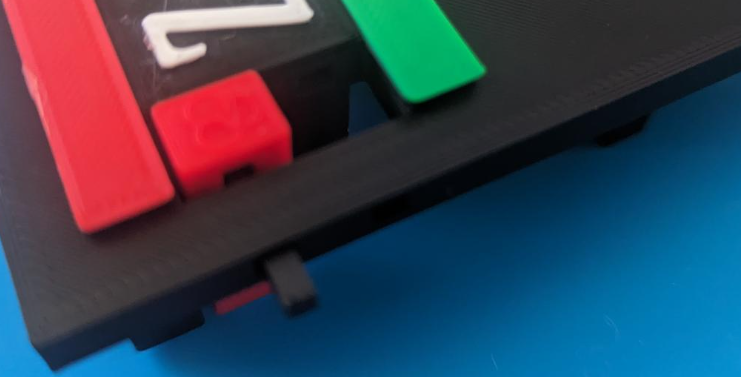
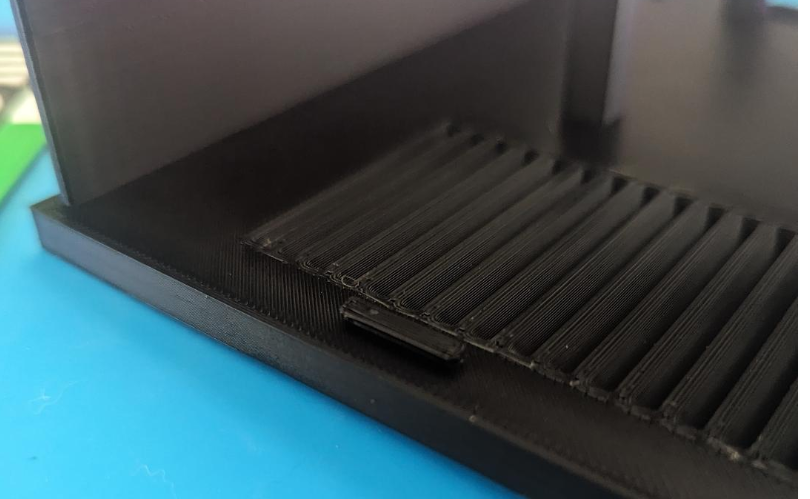
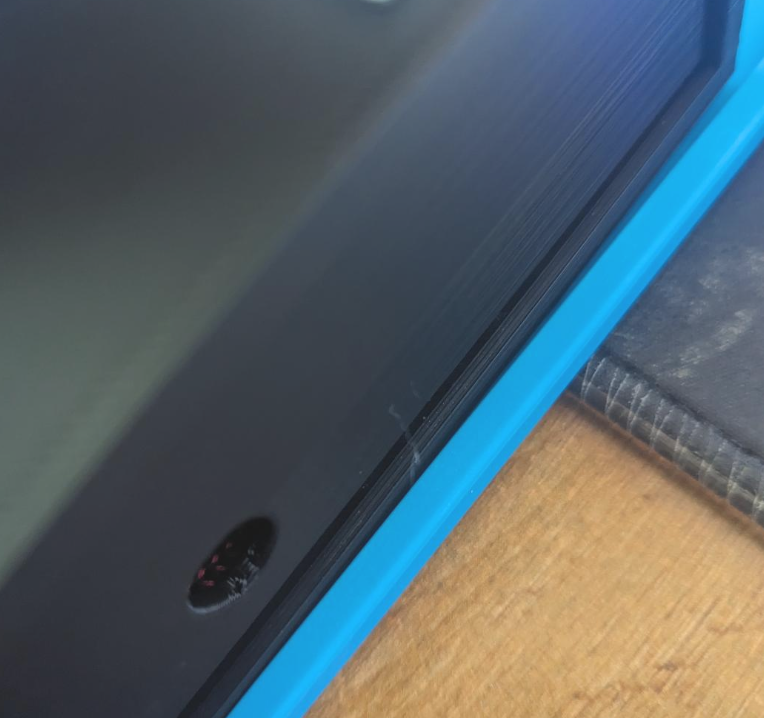
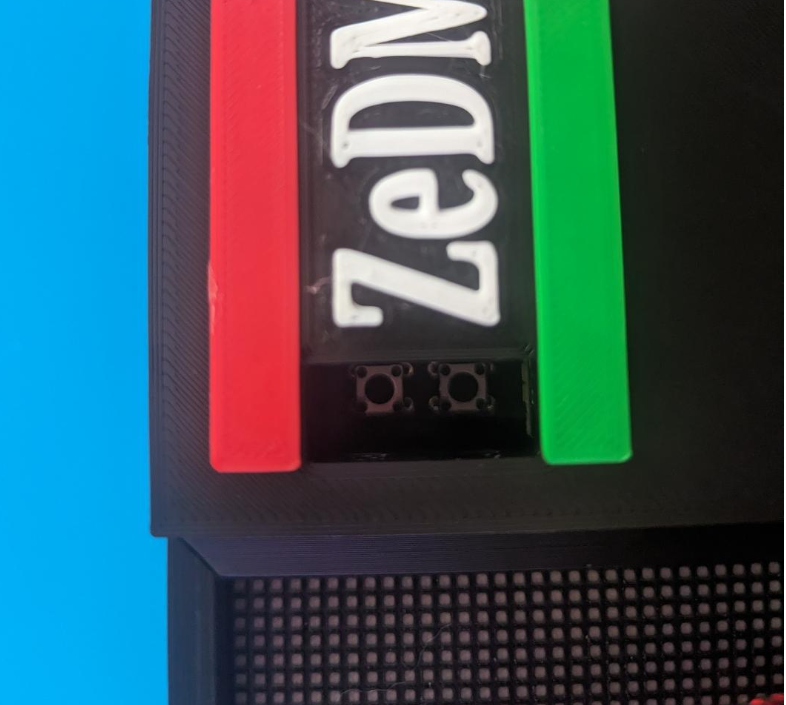
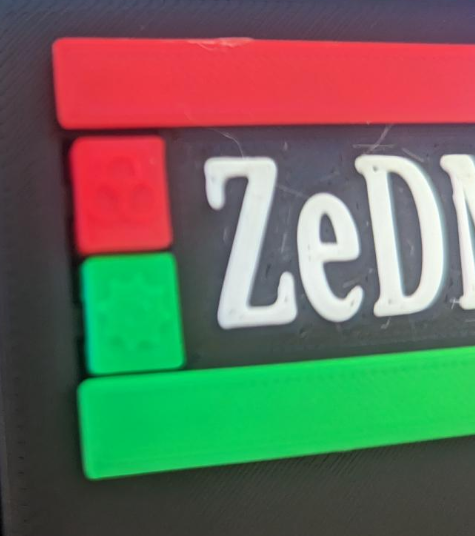
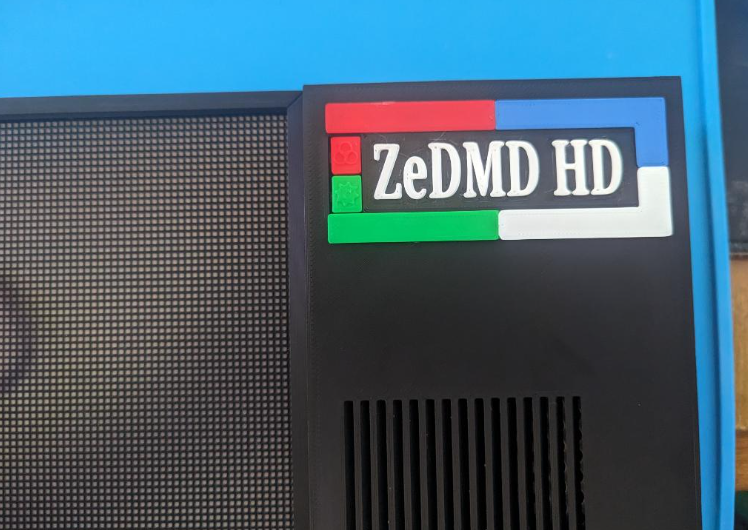
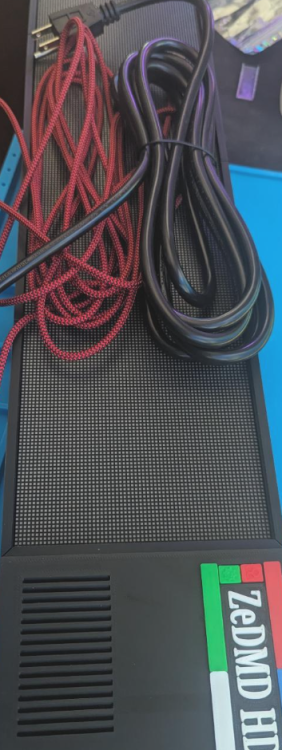
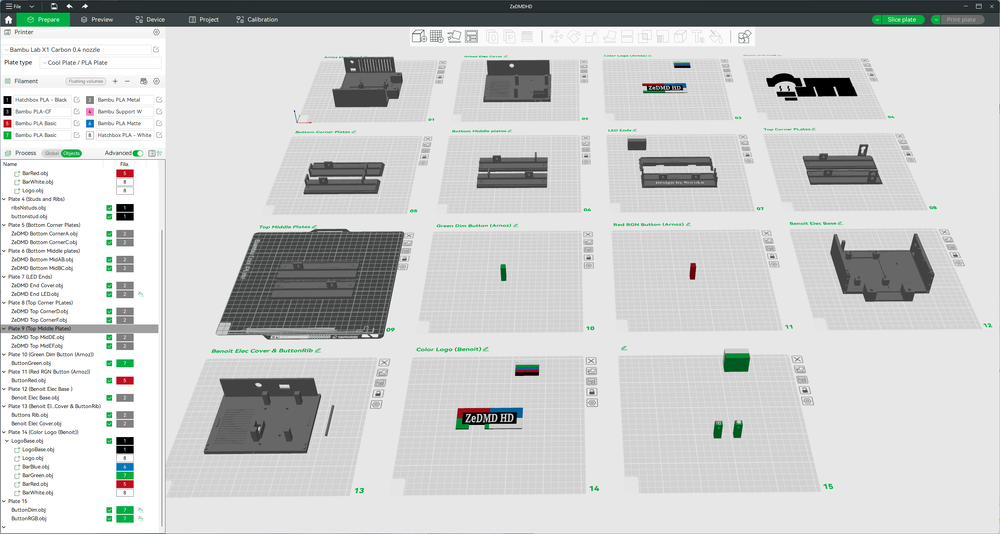
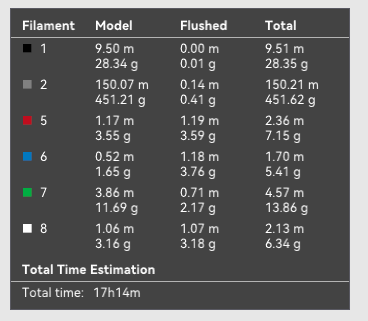
3d Printable ZeDMD HD Wall Mountable Frame for P2 Panels (256mm x 128mm) (128x64 pixel) First.. Thanks to the folks that created and support the Serum format and ZeDMD. It's a fun group to interact with and have made my experiences pleasant. I'll point to @zedrummer ZeDMD instructions page for ZeDMD https://www.pincabpassion.net/t14796-zedmd-installation-english I wanted a wall mounted DMD to keep buddies from lurching over my shoulder when we are playing.. I personally can't stand being crowded when I'm at the pinball helm ( especially when we are all drinking).. So.. Get that score up high where everybody can see it! Allow others to continue darts/billards/fooseball and see the player score without coming over and bumping into said player on the machine. In my colorization work of "Elvis" that I have been doing, I decided I wanted/needed to update from my Pixelcade (that I have currently wall mounted above my Pinball Cabinet) to a ZeDMD, since I have been implementing some of Serum features that the Pixelcade could not display. While all is good and well in the virtual DMD seeing the features, I really needed the LED to as well, to make sure things would look good displayed LED wise as well. (My older Pixelcade really lacks the ability to differ shades of white/grey/black and most of Elvis display him in White/Black jumpsuits). Color portions look fine/great on the Pixelcade, Elvis in his jumpsuits really was losing details I was putting in.. That being said, I decided to put my X1 Carbon to use and design/print a wall mount for the ZeDMD project. This is a compression fit type frame with screws to secure the hardware to the frame, so it is very much tailored to P2 panel(s) size 256x128mm panel (128x64 pixel).. I will likely do mount designs for P2.5 and P3 as well or can release OBJ files for others if they want to tackle the increase in size to fit the larger panels. My P2 ZeDMDHD "frame" design is 25 x 5.5 inches, The Pixelcade I have is 21 x 7 inches for size comparison It is designed to use a DMD shield [Arnoz's ZeDMD shield / Benoit's DMD shield] that can be purchased through their stores, and has through buttons in the frame to access the Dim/RGB buttons on said shield as well as access hole for the Mean Well power supply voltage adjuster.. Basically can adjust stuff without having to take it off the wall.. There are quite a few parts, as I designed around the thought of the average user's home 3d printer probably having a 200x200 or 250x250 print bed. So I kept the pieces small and assembly will be required. I've included and additional Left side Electronics Box in the files (this was actually the original design, but I found my ZeDMD was upside down), in case they are needed.. But you will want to print "Right" side control box more then likely. The daisy chaining of the Panels makes them directional. I'm printing on a Bambu X1 Carbon with (2) AMS and the Wall mount will utilize 5 colors/filaments: Black/White/Red/Blue/Green, but you can tailor how you print to your own liking. Print Time & filament usage below: **(That's on Carbon X1...slower printers will take longer.. My Ender3v2 would probably take about 40+ Hours to print)** You can expect/plan to use about half a spool likely ~500g.. Again, all comes down to how you print, multi-color, infill settings used..etc. 📂Files: ZeDMD HD wall mount as Bambu Studio 3MF - ZeDMDHD.3mf ZeDMD HD wall mount as OBJ(s) - ZeDMDHD_OBJ.zip ZeDMD HD wall mount as STL - ZeDMDHD.stl The Bambu Studio 3mf is laid out in 15 plates.. Plates 1-3 are Arnoz Plates 10-11 are Arnoz Plates 12-15 Benoit Plates 4-9 Common If people are unable to print their own, I MAY be willing to create some "kits" (3d printed parts and the screws used to hold the panels to the frame), but I will not source other items.. You would still need to obtain those.. My purchase list below. If kits are wanted.. I would probably sell them for $20/25 PLA, $25/30 ABS/PTEG $40 Carbon Fiber (these are rough guesstimates right now as I haven't been looking at current filament prices).. Basically I will charge cost of filament used + $10 for printer usage time (~15hours to print). 🛒Parts list: This wall mount is designed to use @arnoz ZeDMD shield so that you can access the DIM/RGB buttons through the frame itself. I also purchased the ESP32 through the same site since ESP32 come with various pin arrangements, I wanted to make sure what I was getting would be compatible with the shield. -A ZeDMD shield -ESP 32 ******Arnoz ZeDMD shield: https://shop.arnoz.com/en/dmd/87-esp-dmd-shield.html ******Arnoz ESP32: https://shop.arnoz.com/en/dmd/86-esp32-wroom32.html ******Benoit ZeDMD shield/ESP32: http://benfactory.fr/produit/zedmd-shield/ -[Qty 2] Panel P2(Important) at 256x128mm (128x64mm pixel): https://www.aliexpress.us/item/3256801645705137.html?spm=a2g0o.order_detail.order_detail_item.3.2591f19cCKSwPm&gatewayAdapt=glo2usa -[Qty 14] M4*10 screw: https://www.amazon.com/gp/product/B07KRTK7SP/ref=ox_sc_act_title_1?smid=A1MDC9YLETZE7Z&psc=1 -[Qty 2] M4*20 screw: https://www.amazon.com/gp/product/B07KRFQJK1/ref=ox_sc_act_title_2?smid=A1MDC9YLETZE7Z&psc=1 -[Qty 2] M3*4 screw: https://www.amazon.com/gp/product/B089KP9PZG/ref=ox_sc_act_title_3?smid=A1ZRRCZIF57JQ9&psc=1 -MeanWell 323282 RS-25-5 Power Supply: https://www.amazon.com/dp/B00DECXUD0?psc=1&ref=ppx_yo2ov_dt_b_product_details -#4 M3 fork terminals: https://www.amazon.com/dp/B08B5WG71Q?psc=1&ref=ppx_yo2ov_dt_b_product_details -Micro USB cable ( I did 15 ft as its hanging on the wall and all.. adjust accordingly for your setup of course): https://www.amazon.com/gp/product/B07DJ3XC4S/ref=ppx_yo_dt_b_search_asin_title?ie=UTF8&psc=1 -CA Glue (Or any glue for that matter) it's used for the logo Studs and very little will be needed, I used: https://www.amazon.com/dp/B08PHQG24V?psc=1&ref=ppx_yo2ov_dt_b_product_details *Either* (Power cable of course should be adjusted for your country Electrical standards) -6 ft Power Cable Pigtail 3 Prong 18AWG NEMA 5-15P Male Plug https://www.amazon.com/dp/B0829Q8DL9?psc=1&ref=ppx_yo2ov_dt_b_product_details -12ft https://www.amazon.com/dp/B0829QG69V?psc=1&ref=ppx_yo2ov_dt_b_product_details OPTIONAL part(s): I've included a recess in my design to allow protection and/or light diffusion to be placed into the frame.. It is not necessary and optional. -Smoked Acrylic Plexiglass 6x24: https://www.amazon.com/dp/B0859KDVZW?psc=1&ref=ppx_yo2ov_dt_b_product_details -Clear Acrlyic Plexiglass 6x24: https://www.amazon.com/dp/B084VVNG55?psc=1&ref=ppx_yo2ov_dt_b_product_details (what I installed for protection of the LEDs) -Plexiglass cutter (we will be trimming above to the correct size of 518/520mm x 132mm)https://www.amazon.com/dp/B08Y7RZ1WD?psc=1&ref=ppx_yo2ov_dt_b_product_details -There are various methods to cutting plexiglass.. but with thin 3mm plexiglass I find scoring simple enough... can google "scoring plexiglass" to learn how using above tool. 🛠️Assembly Instructions: Sorry for poor quality pictures.. using phone camera and the Prototype 3d print quality for speed of printing not quality of print.. 1)Print Parts 2) You will want to assemble the Top and Bottom edges by connecting the letters (A matching A) basically and using 3 medium (of the 18) alignment ribs between each section. The Bottom will consist of 4 parts - A, AB, BC, C and 9 "ribs" The Top will consist of 4 parts - D,DE,EF,F and 9 "ribs" 🚨Take note of the recessed slot (for plexiglass (optional)) they should all be aligned You should end up with: (yea, I see it, I have a C backwards in my design..grrrr LOL, I will fix that) Repeat the process for the TOP D,DE,EF,F 2) Using 8 x M4*10 secure the frames to the panels (Note the panel JIN/JOUT direction) 🚨Plexiglass recession in frame should be on the side of the LED, not the back of the panels, the panels should end up sitting on a shelf/lip, ** I wouldn't completely tighten/snug and screw quite yet , start them and tighten them so panels are secure, but wait till assembly is complete to snug all screws** 3) connect ribbon cable from Panel1 to Panel 2 using the middle JIN/JOUT terminals in the middle of the DMD 4) Secure the ribbon cable and 2 panels together with the U shaped bracket and 4 x M4*10 screws 5) Plug in Power cable for the 2 panels and feed the end through the cable management loops to the right 6) You can add the LED end piece to the left side of the frame now.. It has six ribs built into it with the "Design by Boroka" (*Design mark is not visible when hanging on the wall*) and secure with last 2 x M4*10 screws (if your adding PLexiglass to the frame, you may want to do this as a last step). Again take note of the recessed portion and make sure it lines up with the TOP/BOTTOM recessed section for the Plexiglass. 7) Connect ESP32 and Ribbon cable to ZeDMD shield 😎 Lay ZeDMD shield onto the Electics Box base 4 mounts with the DIM/RGB buttons facing the Box mount holes (Do not force it to fit.. It is compression fitted and will be snug, but you should be able to work the shield down onto the posts (the power supply is shown in picture to show how things will be laid out) Side view showing the DMD shield all the way down on the support posts 9) Feed USB cable through access hole (rectangular) on bottom of control box and up around the cable tension post and into micro USB slot 10) Place the End Cover piece on the Control Box and Secure with the 6 Long Alignment/Support Ribs. 11) Attach control Box to Led Frame aligning the ribs and using the 2 x M4*20 Screws (Again make sure the plexiglass recess aligns with the others) At this point you may want to shift/adjust and make sure everything is aligning correctly and tighten all M4 screws SNUG.. Do not over tighten. 12) Secure Ribbon cable in JIN on the Panel 13) Now we will mount the Mean Well Power Supply, we have left a channel in which we will run the power cables through between the power supply and the control box frame Flip the DMD over so LEDs are facing upward and your Panel power cables are coming into the Electronics Box I found it easiest to put the Power supply on its end work the cables to the bottom as you lay the power supply down Then pinching the power supply in place, rotate the DMD on its end and secure the power supply with the 2 M3*4 Screws 🚨Make sure the cables are not pinched between the frame and the Power supply.. you should be able to slide the cables in and out! 14) connect cables to the V+/V- terminals (Don't assume my pictures are correct, always check to make sure you connected to the correct terminals) Red-Positive / Black-Negative 15) Next we will run the power for the Power supply. Again check the terminals to verify which is Live/Neutral/Ground (Don't assume my pictures are correct) 🚨With the limited space we are working with, you may want to trim the cables staggered to better fit Feed power cable through Bottom 8mm hole.. It should be a snug fit Attach terminal ends to the 3 wires ( crimp/soldier/heat shrink).. Your house.. make them good. I found it easiest to remove the terminal screws and the screw them back in after placing the wire/terminal in correct location, but when all said and done should have something like And all wires should not be above the edge of the Control Box, you might need to finesse it a little, but they all should be below the edge of the frame and secured snugly. the wires themselves should not be pinched. 16) Now we need to glue the logo studs to the logo 17) After the glue has dried you should be able to snap the Logo onto the control Box ** Yes the pictures show my control box detached from the frame, It is so I can get better side view pictures for Step 20.. Yours should be attached to the frame) 18) Place control top cover on control base.. Make sure the USB cable is tucked inside.. I usually do the Top (by the ESP3s) snap before I do the Bottom (snap) The cover should slide down the channel and again slight pressure to secure the "snap"- Don't force it 19) Verify you can see access to the ZeDMD shield buttons through the button hole and everything is secured, not forced or broken or anything 20) Insert buttons into the "Button hole" and secure with the 2 short Ribs. (1 per button) You should be able to press the button and feel the retraction and pop-back from the DMD shield buttons freely moving.. 21) (Optional Step) Cut/Add plexiglass into the recessed slot covering the LEDs and attach the LED end ("Designed by Boroka") if your adding plexiglass to frame. **Note to self - capture scoring/cutting plexiglass for frame** Frame is complete I'll hang it again shortly and add a video of it in action for those that may want to "see it in action" on the wall as an example. -B

.thumb.jpg.684f0f0a14876f972eb4d05adf1a2c9e.jpg)
.thumb.jpg.240cb3751b9eb2e573794289c8814d57.jpg)
.thumb.jpg.b39e7f74e42f20d4149ea1265a43f662.jpg)


-

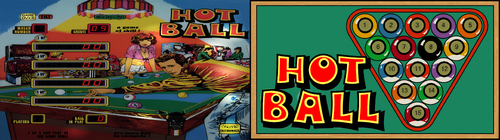
Version 1.0.0
100 downloads
Took the work @Clot83 did on Rack 'Em Up and Eight Ball and added a DMD to Hot Ball. Not sure if the original B2S came from @editoyor @Wildman or not. -

Version 1.0.0
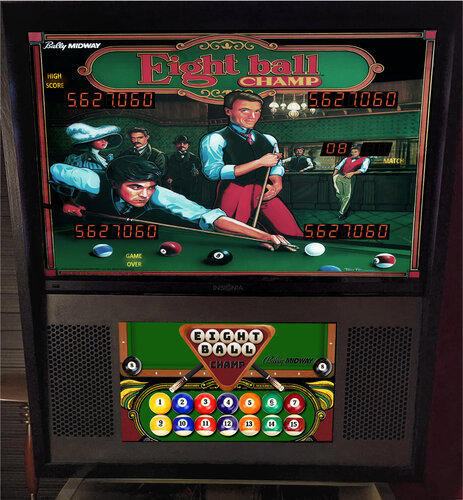
594 downloads
Ground up totally revamped Backglass & Full Screen DMD (B2S). Lights on Full DMD follow the lights on the table for balls completed, and targets hit. Original Bally artwork for backglass D/L'd from the internet (artwork by Tony Ramunni). Since this table predates any kind of DMD I was looking for something nice to fill the void. Hope you enjoy!!!! If you like this creation, please leave a review for others who follow! Thanks. for help with full dmd issues download "Full DMD Read Me.txt" (thanks to HauntFreaks for the info file) -

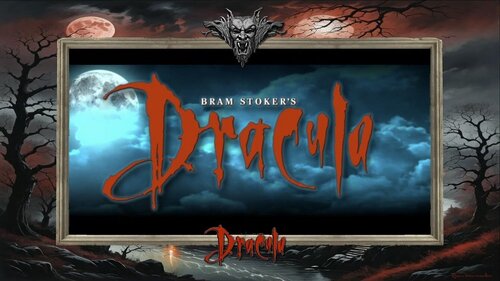
Version 1.0.0
733 downloads
I decided to make some new visuals for the popper media and the really nice PuP Pack that already exists (link below). The Pup Pack Add-On Mod is plug-n-play and will not change any existing files. The PuP add-on is designed for a 3 or 4 screen setup (you will need to enable the separate Topper in the .pup file if you want it on - it off right now) instructions... Download and install the base PuP Pack here (link below) Copy the Add-ON's 'drac_l1' folder to PUPVideos folder -- no original PuP files will be overwritte, only new files added open the 'drac_l1' folder, run the BAT file -
 View File Batman Forever (Sega) Pup Pack, DMD and 1080p 16x9 B2s Peace Y'all, "I'm going to need that hand back." Unzip and place the batmanf folder in your pup folder and take the B2s out of the batmanf folder and put it in your table folder. This Pup works off the batmanf rom. Any table using this rom should work. I used the @drakkon table in making this pup pack. This pup is setup for 1, 2, and 3 screens. Bat files have been added so just pick the bat that fits your system. This pup works with Flex-DMD, so you'll need it to move the score around. My own custom DMD video, FullDMD and 16x9 B2s (no stretching) are included. Three screen cabs can go with the DMD or a B2s and the FullDMD. There is a Batman Forever Pup Pack out in the wild. It's hard to find and I don't believe it's being supported. I got it a while ago. It no longer works on my setup so I decided to make a new one with my own stink all over it. This pup pack comes with a Custom B2s (16x9), DMD and FullDMD. Everything was built from scratch. I really like this table. I downloaded @capnclaw sideblades and modded them to fit the color scheme of my pup pack. I like the look. The table is busy, the pup pack is busy and the custom b2s is busy. Plenty here to keep your eyes moving if you find the table is too easy. Making this pup pack was a lot of fun and I added a good bit of my own creativity. This pup pack is loaded. All the triggers that mattered to me are in this. As with several of my other pup packs, my scores got better after playing with the pup pack installed. This moves the whole presentation into my Top Ten Rotation. This is my holiday gift to the community. I love it and I hope you like it also. I will make upgrades to all my Pup Packs when necessary and as my understanding of this craft increases. Otherwise....... Enjoy! Precise All Logos, Copyrights and Trademarks are property of their respective owners. PROVIDED STRICTLY FOR PERSONAL / HOME USE AND NOT FOR COMMERCIAL SALE / RE-SALE OR DISTRIBUTION! VIRTUAL PINBALL ALWAYS HAS AND ALWAYS WILL BE FREE TO ANYONE!!!! Submitter PIPAllah Submitted 12/24/25 Category PuP Packs
-
- 1
-
-
- batman forever
- pipallah
- (and 3 more)
-
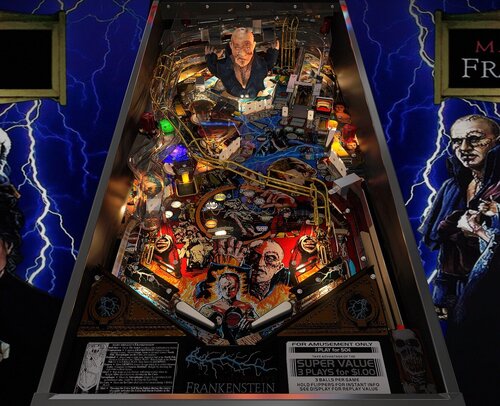
 View File Mary Shelley's Frankenstein (Sega 1995) 2.0 table credits: - Burger & Schlabber34 - Thanks to Burger for bringing this table back to life. He asked me if he could update the physics and all the table creators know how this usually ends. Then we needed a nice F12 menu, then Burger mentioned VR, the ramps were prerendered so i had to make VR optimized ramps but the meshes were shitty so i cleaned them up and then you need new renders for VR refraction and the prerandered ramps. After a ton of bugs that we killed we finally had V2.0! @burgerIt was a pleasure! Thanks my friend! - UnclePaulie - A ton of help on bug fixing and sticking his head deep into the VR table. - DGrimmreaper - VR cabinet primitives, VR animations and lights including VR flipper cabinet butting/start buttn/plunger, port DMD and b2s to VR, and VR scripting, the VR hallway - Studleygoorite – Identified missing details and provided solutions to several tricky issues - Hauntfreaks - B2S backglass update that brings the table together visually - masonm- cabinet textures for VR cabinet - DaRdog- UV maps in VR that made texturing possible - Thalamus - Careful playtesting and valuable feedback throughout development - Tombg - playtesting Original table credits: -Herweh: Script allmost from scratch - Dark: We all know what he did! Frank is just jawdropping!! - Dids666: For starting all of this and his awesome meshes. Thanks for letting us finish this!! - Sheltemke: For stitching together the PF image and playtesting - Mlager8: For PS help on the sling plastics - RothbauerW: For his awesome physics' guide at vpinball.com and some more help on the physics - Mark70, Bord, Thalamus: For beta testing and some good hints - Batch: For the DT background image (Sorry for making it a bit darker! Batch's original is in the image manager for those who like more pop) Submitter Schlabber34 Submitted 12/22/25 Category VPX - Pinball Tables VPX Standalone No
- 2 replies
-
- 1
-
-
- sega
- frankenstein
- (and 4 more)
-

Version 1.3.0
9936 downloads
Last Action Hero ROM v1.12 / v1.13 Language : english, basic support for French ROM Donations are appreciated : https://paypal.me/pools/c/8svZ533BA4 64 colors version (file v1.3) --- PIN2DMD v4.16+ required for v1.3 ----- --- Virtual DMD please use Freezy DMD v1.10 (not the previous versions !) 16 colors version (file v1.1) --- PIN2DMD v3.x, or previous versions of Freezy DMD, please use file v1.1 ---- Thanks to all contributors for testing :- 39 comments
- 17 reviews
-
- 265
-
-
- lah
- last action hero
- (and 6 more)
-
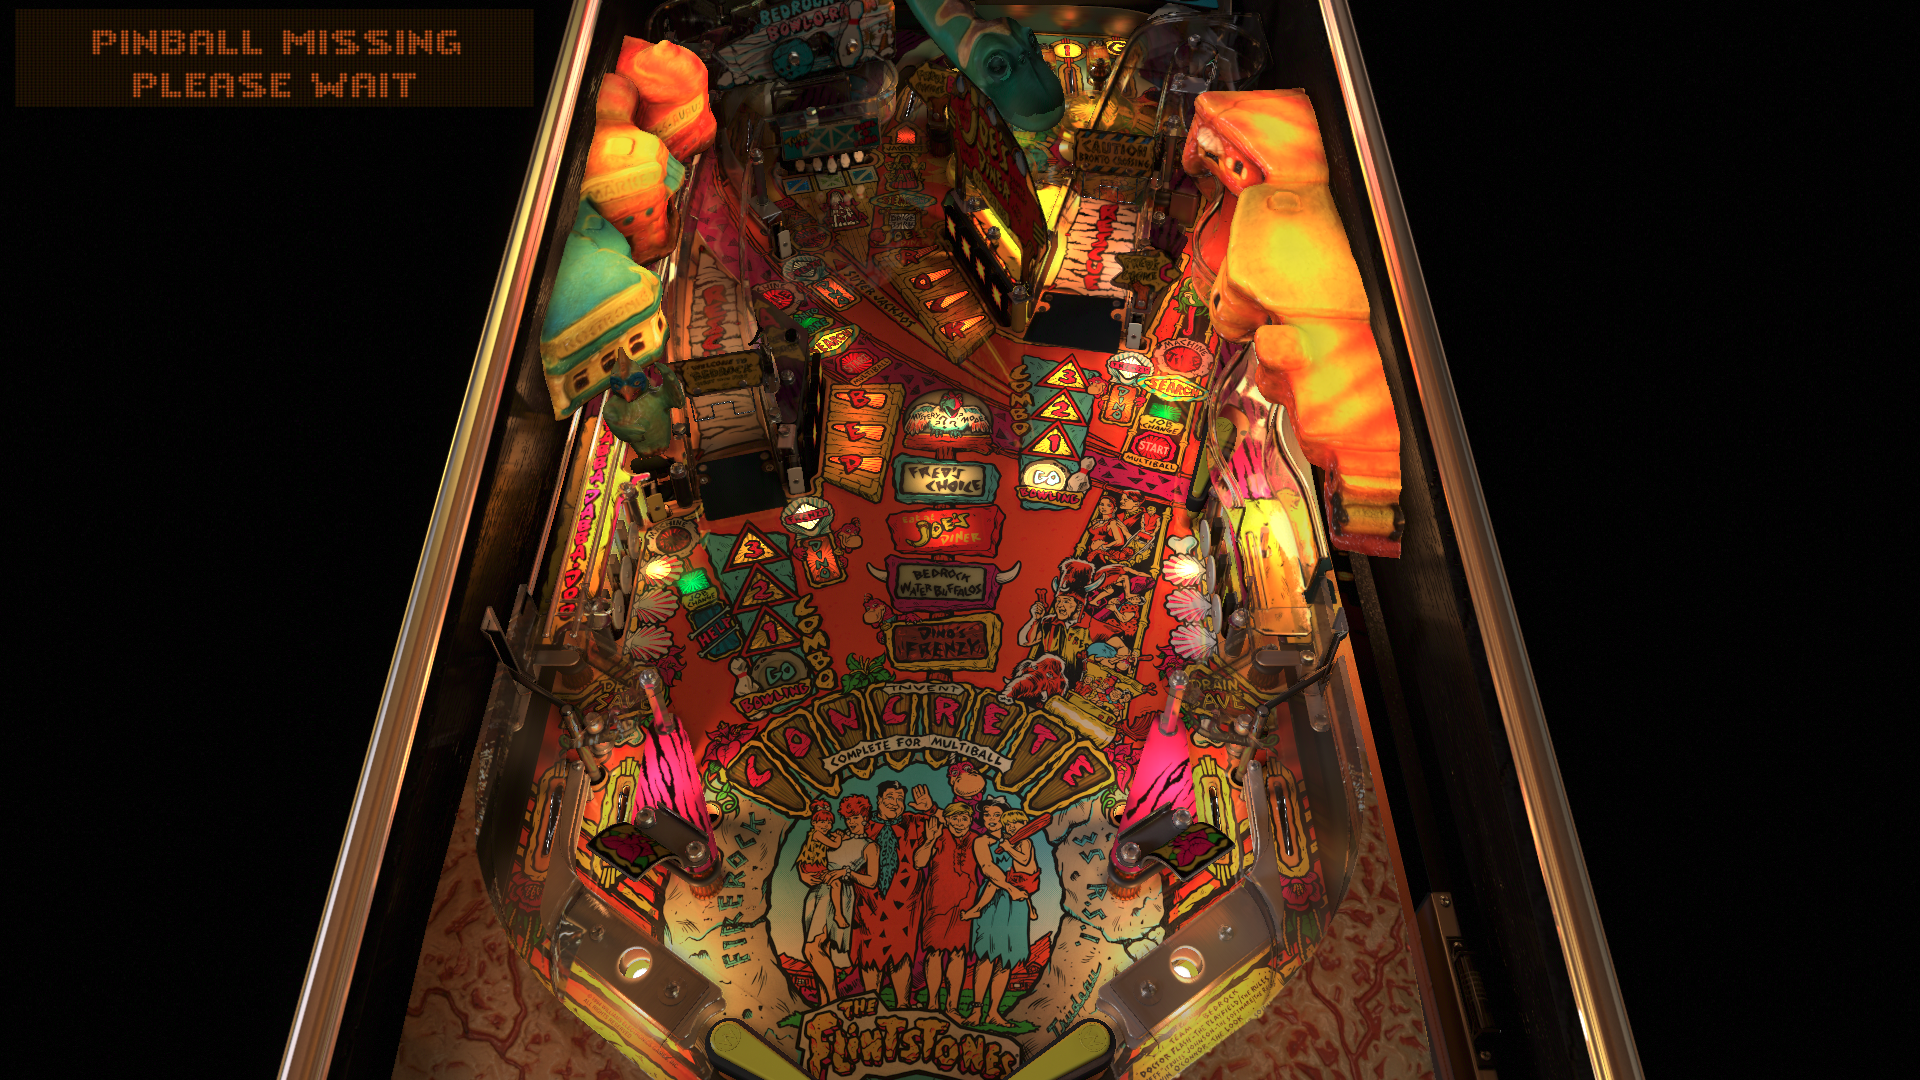
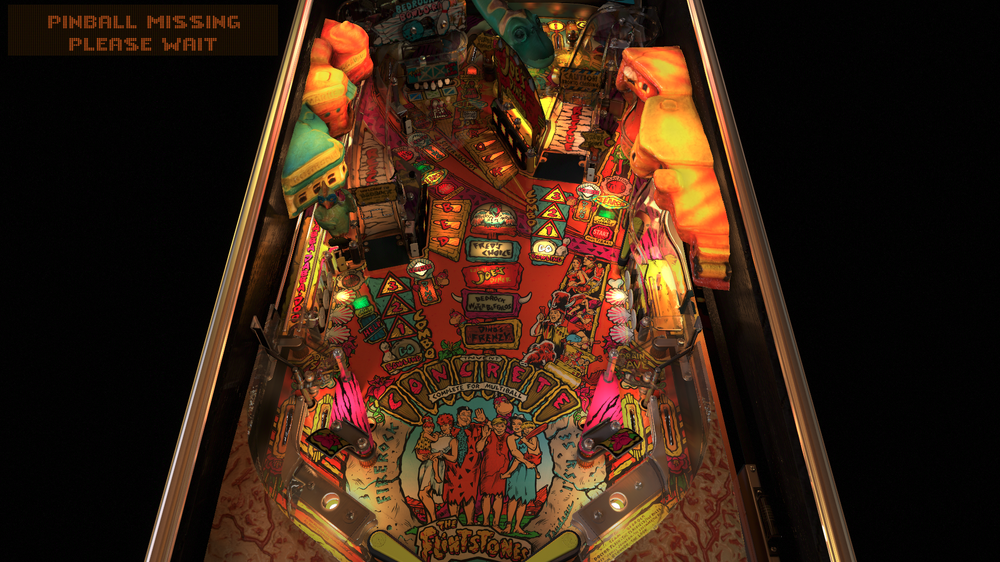
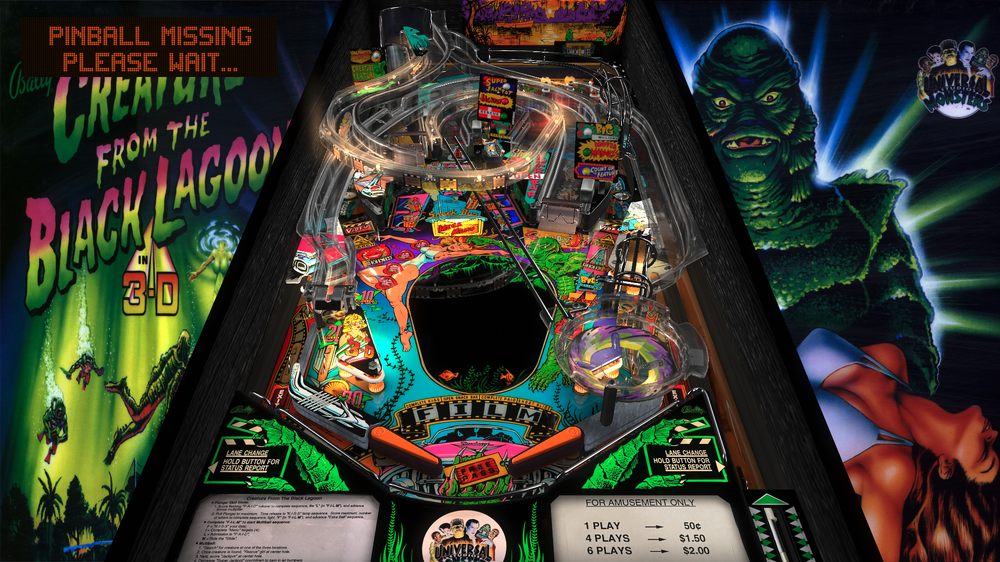
Hello, i hope someone could help me! After compiling VPinballX_GL for MacOS arm64, a lot of tables launch fine, i can insert coins, but i have the DMD displaying: "Missing Pinballs" or in others "Locating Pinballs" or "Missing 3 balls" and it won't let me start the game. F3 won't help. I've Also read somewhere to press B, but that does nothing. I can't access F6 because the standalone don't support it. Replacing Roms won't help. I believe i've tried everything i could, and there's no info online besides to press the B key. Is there any file i could manually modify? or should i check inside the DMD settings within the game? Thanks in advance!

-
_screenshot_backglass_Light.thumb.png.80c1cd100169844b3c4216889b35832d.png)
Version 1.0.0
336 downloads
Hi, this is my first back glass. I hope it will be useful to someone. Improved AI graphics. Removed display fields from the backglass. Reproduction of graphics based on images from the Internet. High resolution. DMD with three-color LED displays. -
Version 1.0.0
59 downloads
FullDMD image for hairy-SINGERS (Rally 1966) made from the cabinet side art. Options for a lights, dark, and standard version to download.- 1 comment
- 1 review
-
- 3
-
-
- hairy-singers
- hairy
- (and 4 more)
-
View File Robocop DC Pup Pack, DMD and 16x9 B2s Peace Y'all, Pup Pack rated R for violence & profanity. This is not for the babies. "They'll fix you, they fix everything." Unzip and place the robo_a34 folder in your pup folder and take the B2s out of the robo_a34 folder and put it in your table folder. This Pup works off the robo_a34 rom. Any table using this rom should work. I used the drakkon and Bigus1 tables. If using the Bigus1 3.0 table, disable the flexDMD in the table script. This pup is setup for 1, 2, and 3 screens. Bat files have been added so just pick the bat that fits your system. This pup works with Flex-DMD, so you'll need it to move the score around. My own custom DMD video and 16x9 B2s are included. Three screen cabs can go with the DMD or a B2s and the FullDMD. There is already a Robocop pup pack available. This one is for people who want the uncensored DC (Director's Cut) of the movie. This preserves all the over-the-top violence and profanity. I do not recommend this for pinballers under 18. My vision for this pup pack was to make sure the gore, violence, and profanity is intact, along with all the callouts. I like this table and wanted to add my stink to it's accessories. I didn't play it in college because they didn't have one on my campus. Otherwise this pup pack would be a part of my college series. As with several of my other pup packs, my scores got better after playing with the pup pack installed. I love it and I hope you like it also. I will make upgrades to all my Pup Packs when necessary and as my understanding of this craft increases. Otherwise....... Enjoy! Precise All Logos, Copyrights and Trademarks are property of their respective owners. PROVIDED STRICTLY FOR PERSONAL / HOME USE AND NOT FOR COMMERCIAL SALE / RE-SALE OR DISTRIBUTION! VIRTUAL PINBALL ALWAYS HAS AND ALWAYS WILL BE FREE TO ANYONE!!!! PROVIDED STRICTLY FOR PERSONAL / HOME USE AND NOT FOR COMMERCIAL SALE / RE-SALE OR DISTRIBUTION! VIRTUAL PINBALL ALWAYS HAS AND ALWAYS WILL BE FREE TO ANYONE!!!! Submitter PIPAllah Submitted 10/12/25 Category PuP Packs


.jpg.e6dc19afc3cfd0a77a56733ddf91143b.jpg)
.jpg.4fc7be5070baef52554b2a610f80d83a.jpg)
.jpg.b3632de43400d997a48925ead99e0da0.jpg)