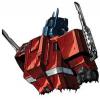
ViriiGuy Posted January 6, 2013 Posted January 6, 2013 Since we don't have any builds int his forum yet, I thought I would update my progress here as well! I am in the process of building a Pinball 2000 style 3 screen Cab. So far I have the computer built for the Cabinet. It will be running Server 2003 Enterprise Edition 32 bit. As far as I know, no one has used this OS yet, although I can't understand why. IT is basically XP Pro, once you strip away the server components.. But with a slightly newer and faster Kernel. And it can support 16 GB of RAM. The hardware I am using for the computer is... CPU - Intel I5 3570K Overclocked to 4.08 Ghz Video - 2 x EVGA Geforce GTX 460 SuperClocked 768 MB Video cards. MB - Gigabyte GA-Z77X-UD3H RAM - Crucial - Ballistix Sport 4GB DDR3 SDRAM HDD - Monster Digital - Daytona 120 GB Internal Solid State Drive Power supply - Thermaltake - 650-Watt ATX Power Supply Monitors PF - 39" Westinghouse LED BG - 24" Acer LED DMD - 22" Samsung LCD Feedback Dual H-Bridge 5 x Heatsinks for RGB LEDs 5 x RGB LEDs 2 x 44 LED Strobes 24 Volt 10 Amp Power Supply 8 x Seimens Contactors MS Sidewinder Freestyle Pro Controller Cabinet Parts 4 x Coin Door Bolts 4 x Coin Door Nuts Stern Start Button 2 x Clear Flipper Buttons 2 x Nylon Flipper Button Nuts 2 x Plastic Glass Channels 5 x Clear Light Domes RFM Ball Launch Button Williams/Bally Extra Ball Button William/Bally Replay Knocker 4 x Virtuapin Leaf Springs Legs, Lockdown Bar, Stern Rails and Import coin door supplied by Local Pinhead from Pin With help from the good folks on here, The software is up and working and I am slowly adding tables to the mix. I am currently focusing on the B2S tables and will move on from there. Mameman is doing the cutting of the cabinet for me on his CNC machine. This will be his very first Flatpack and I am VERY excited to get my hands on it! For the artwork, I have decided to go with a Generation 1 Transformers look, but with a battle worn look ala IDW style. For this I have hired Comic Book artist Javier Reyes. He and I have spent much time brainstorming to come up with a layout. I provided him with some ideas and he has returned a pure masterpiece thus far. This is the artwork we have so far for the cabinet's head... Mameman has been hard at work on my cabinet and sent me this update yesterday... v I will keep you posted as progress continues. Thanks for looking!
Darkfall Posted January 12, 2013 Posted January 12, 2013 The graphics for the cabinet look really good. I bet it looks great once it's all assembled.
ViriiGuy Posted January 12, 2013 Author Posted January 12, 2013 Thanks! Javier is working on the Cabinet side graphics this weekend and next week. He will likely have the first rough draft for me by next weekend. And Mameman is going to be cutting out the rest of the cabinet this weekend I think. Meanwhile, I have just been ordering parts and cleaning out the garage to work on it.
ViriiGuy Posted January 17, 2013 Author Posted January 17, 2013 I got my rough draft for the art plan for the sides today from Javier.. and approved it. On the autobots side from Left to Right: Ironhide, Jazz, Optimus Prime, Bumblebee and Prowl. On the Decepticons side From L to R there's: Laserbeak, Ravage, Soundwave, Megatron, Starscream and Shockwave. Also, I now have everything ordered for the build, with the exception of a shaker motor and wiper motor. Those two items I will do last, after I have everything else working. So once I get my cabinet from Mameman, it should be a fairly quick build.
Content Provider DeeGor Posted January 17, 2013 Content Provider Posted January 17, 2013 Nice. Looking forward to seeing the completed art.
ViriiGuy Posted January 17, 2013 Author Posted January 17, 2013 Yea so am I The rest of my cabinet stuff made it here today. So now I am just waiting on my Cabinet! Well, that and the Amp. It is coming from Canada.. Delivery estimate says sometime between Feb. 4th and March 15th.... WTF?!?!?!?
Content Provider DeeGor Posted January 17, 2013 Content Provider Posted January 17, 2013 Sounds like it's getting shipped from China.
ViriiGuy Posted January 17, 2013 Author Posted January 17, 2013 It does indeed. Sucks. If I had known it was coming from Canada, I would have waited the week for Parts Express to get it back in stock.
zebulon Posted January 18, 2013 Posted January 18, 2013 Damn Canadians probably took the deposit and bought beer and snowshoes with it....
Content Provider DeeGor Posted January 18, 2013 Content Provider Posted January 18, 2013 Can't trust those Canadians with their igloos, fake bacon and mounties.
zebulon Posted January 19, 2013 Posted January 19, 2013 Actually it's fake igloos and mounted bacon..... Nice looking build.
ViriiGuy Posted January 19, 2013 Author Posted January 19, 2013 LOL! I spent 10 years living in Canada. I hated the cold, loved the people.. But man do I miss the beer!!! Thanks! Mameman is almost finished with my cab. He says he just has to make the Speaker grill, then it will be shipped to me for assembly, paint etc etc etc. So hopefully I will be actually starting the build SOON!!! I have pretty much all my parts now. I got my fuse holders and resistors in yesterday. I just need to go pick up some wire. I was hoping one of my Electrician buddies would come thru for me on the wire... but no such luck.
ViriiGuy Posted January 24, 2013 Author Posted January 24, 2013 I decided not to use a modded Computer power supply, so today I ordered a 12 volt power supply similar to the 24 volt one I had already ordered. I also ordered a mix matched set of Cabinet protectors for the legs... 2 Red and 2 that are Dark Blue.
ViriiGuy Posted January 24, 2013 Author Posted January 24, 2013 I got another art update. These are the planets Cybertron and Unicron that will be on the sides.
Content Provider DeeGor Posted January 24, 2013 Content Provider Posted January 24, 2013 The planets look awesome. Lots of detail in there.
ViriiGuy Posted January 24, 2013 Author Posted January 24, 2013 Yea!! It sure beats the mostly round circles and squigly lines I drew as an example!!
Content Provider DeeGor Posted January 24, 2013 Content Provider Posted January 24, 2013 I hear ya. I have problems drawing stick figures.
ViriiGuy Posted January 24, 2013 Author Posted January 24, 2013 I can't wait to see them inked. And as an added bonus, after the entire job is finished, he is autographing the original inks and mailing them all to me.
evileye Posted January 24, 2013 Posted January 24, 2013 That's fantastic art right there! Can't wait to see the final result.
ViriiGuy Posted January 25, 2013 Author Posted January 25, 2013 Well, I got the LED Resistor board all soldered up. I may add more LEDs later. If I do, they will go on the other side of the LEDWiz, as these 5 will eat up almost this entire side. Iw ill likely have one more, on the otherside for the RGB Flippers. That would give me 5 RGBs along the back and the 2 RGB Flipper buttons.
Content Provider Itchigo Posted January 27, 2013 Content Provider Posted January 27, 2013 Looks great!!
ViriiGuy Posted January 27, 2013 Author Posted January 27, 2013 Thanks guys I am so bloody anxious to get started on the meat and potatoes part of the build!!! I am running out of stuff I can do without the Cab. I have my legs and lockdown bar painted.. I am painting the coin door today. But I wish it wasn't an Import door. Swedish none the less. I am working on custom graphics/text for the three buttons.. I have tweaked the software to about as good as I think I can get it. I guess I will have to take a break for a few days and play with some of the tables. I have a few more parts coming in the mail also, a lockdown bar receiver, Lightmite RGB Flipper setup, RGB LED Strip and a crossover because the one built into the Amp does not work. WooHoo Cabinet will be here Wednesday!
ViriiGuy Posted February 1, 2013 Author Posted February 1, 2013 Today, I got a present in the mail!!! Which I wasted no time unboxing and spent the day assembling! Greg does PERFECT work!!! This is my Backglass LCD in it's wood trim. Too bad I do not supply perfect measurments... That, is my DMD LCD screen. I was off a little bit somehow. But it is no big deal. This will be up inside the Cabinet head and you can't see it. I will center the screen and fill in the gaps with Black cardstock. Tomorrow, I hope to start painting and sanding.


Recommended Posts
Archived
This topic is now archived and is closed to further replies.