


About This File
And now for a very special edition of
Let's Put Things On Cabinets That Were Never Meant To Be On Cabinets!
Today it's time for a true classic: Ask any retro gamer to compile a list of influential pinball video games, and chances are that 1993's Sonic the Hedgehog: Spinball will pop up somewhere in their top ten. The game was developed in a relatively short amount of time by an American team after it became clear that the Japanese team working on Sonic the Hedgehog 3 wouldn't have the game ready in time to take advantage of the 1993 Christmas shopping season.
The ball physics are pretty bad, the control mechanism - a mixture of flipping, jumping and moving - is pretty clunky, but the Sonic factor still makes the game fun to play and it has a special place in many people's hearts.
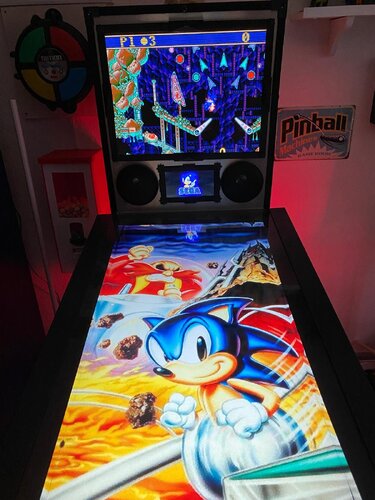
The included AutoHotKey script launches the Megadrive/Genesis version of the game via RetroArch, covers the backglass and DMD screen with filler images and maps your cabinet's buttons to the game's keys.
A word about the controls:
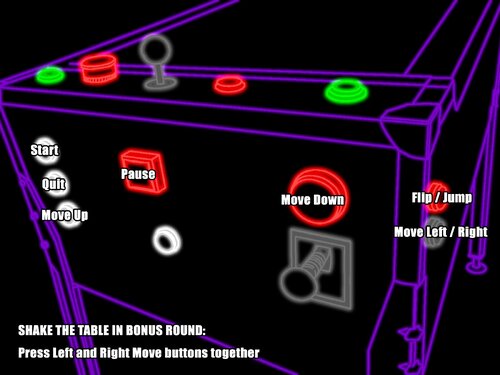
- Since most cabinets don't have a joystick on them, I needed to map the game's left/right movement to the Magnasave buttons in order to keep the Flipper buttons free to do the actual flipping.
- The game's Down button is mapped to the cab's Launch button. It's used in combination with the flippers for Sonic's dash maneuver.
- The game's Up button is only used for looking up and not really necessary in the game. I mapped it to the Buy-in button, but if your cab doesn't have one, it's no big loss.
- There is a maneuver that can be performed during bonus rounds originally by pressing all three controller buttons on the SEGA controller simultaneously. Since it's very impractical to push three buttons on a cab at the same time, I mapped the two Magnasave buttons to trigger all three controller buttons when pressed at the same time. The only time you'll notice this is when you enter the bonus rounds and use it to tilt Sonic's pinball table.
Another word about the controls:
If you look at the script, you'll notice that I used a sort of "double mapping": First I mapped keys to buttons in RetroArch, and then I used AutoHotKey to map other keys (the cabinet buttons) to those RetroArch keys.
The reason is that I use RetroArch to emulate other systems as well, and the key for "left flipper" in one game isn't always the same in another. Rather than work with half a dozen control schemes in RetroArch, I find it easier to stick to one and adapt the controls for each particular game in AutoHotKey.
Included media:
- a backglass image (in 4:3 format)
- a company logo
- 2 DMD images, one for the frontend and a filler image used by the script
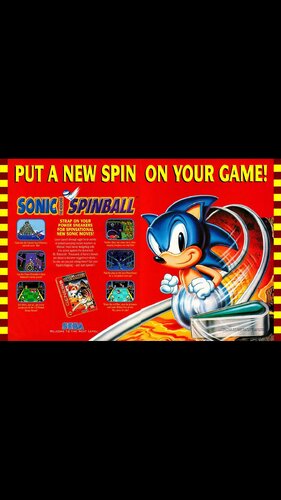
- 7 flyer images (courtesy of MobyGames)
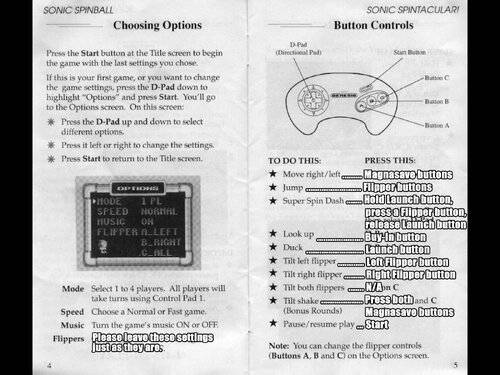
- 15 instruction cards (taken from the game's PDF manual)
- table audio (recorded from the game)
- a wheel image (courtesy of the LaunchBox Games Database)
As usual, the script needs to be adapted to your system, but no fear - it's extensively annotated. Please take a good long look through it before asking for help in the comments section.
I'll gladly try to help, but please do make an effort first.
Share and enjoy!
SOME MORE NOTES:
Where to get it:
Oohh no. Nope. Uh-uh. Not touching that one with a thirty-nine-and-a-half-foot pole. You're on your own here.
How to run it:
As stated above, the game requires RetroArch to run.
Setting up RetroArch is a bit of a science in and of itself, and is frankly beyond the scope of this post. Make sure you have the game up and running to your satisfaction before attempting to use the AutoHotKey script.
Some pointers though:
- My version uses the genesis_plus_gx_libretro core.
- Look at Settings -> Video -> Output -> Monitor Index to select the right monitor for your backglass screen (it was "2" in my case).
- Settings -> Input -> Port 1 Controls is where you map your keys. For my own setup, I had them set differently than the standard, because I re-use the same configuration files for RetroArch on some of my other (non-pinball) arcade cabinets and didn't want to revamp them completely for my pinball cabinet. You can map them to anything you like, just make sure you adjust the key mappings at the end of the script accordingly. My own mappings are listed in the script.
- It's also a good idea to set Settings -> On-Screen Display -> On-Screen Notifications to OFF (otherwise you'll get notifications like "ROM loaded" on screen) once you've set everything up the way you need it.
- Also make sure to set Settings -> Input -> Hotkeys -> Confirm Quit to OFF, or else RetroArch will make you press the Exit button twice before quitting.
- If you have extra cabinet buttons free, you can go to Settings -> Input -> Hotkeys and map them to "Load State" and "Save State" - very convenient and highly recommended.
AI use disclaimer:
- No AI was used in the creation of the artwork.
- ChatGPT was helpful in figuring out the "fire three virtual buttons at the same time when pressing two actual buttons simultaneously" part. It got the actual code wrong, but put my brain on the right track 😉

User Feedback
Create an account or sign in to leave a review
You need to be a member in order to leave a review
Create an account
Sign up for a new account in our community. It's easy!
Register a new accountSign in
Already have an account? Sign in here.
Sign In NowThere are no reviews to display.