
If this post doesn't fit into this category, please relocate it.
Vector draw tutorial
Ok, I’ll try to do a little tutorial about how to draw back glasses or playfields in vectors. For me this is one of my zillion hobbies, but this one is not depending on the weather. I’m not a native English speaker, so I'd like to apologize for my style of writing and possible mistakes.
Creating such a tutorial is pretty much work, so please let me know, if you’re interested.
I’m not a professional graphic designer at all (In fact I’m a mechanical engineer), but I had some advice from my girlfriend and my brother (both are graphic designers, real pro’s) but most times I don’t follow their advice and do it the way I think is best for me. As an engineer I never ever read manuals and don’t like to follow any recommendations from non-engineers… 😉
First, a definition of vector graphics. I don’t want to re-invent the wheel, so here is the link to the appropriate Wikipedia article:
https://en.wikipedia.org/wiki/Vector_graphics
- What do you need?
- A PC or a Mac
- A vector graphic software, like: Adobe Illustrator, Affinity Designer, Corel Draw or similar
- A good picture of the graphic you want to re-draw. More to that later (this might require additional software)
- Practice
- More practice
- Patience
- More patience
- Even more patience
I’m using Macs for many decades, so I can only report about this system, but I don’t think there will be big differences when using the same software on a different system. But I cannot say anything about software only available for PCs (like Corel Draw, Gimp or similar)
The most popular software for creating vector graphics is Adobe Illustrator, together with Adobe Photoshop and Indesign part of the Adobe Creative Suite. It’s pretty pricey and you cannot buy it, you need to have a subscription, so you need to pay regularly. There are different models, please see the Adobe website for details.
I’m using the Affinity Suite (with Affinity Designer, Affinity Photo and Affinity Publisher) These are all direct counterparts to the programs within the Adobe Suite, but it’s only a onetime payment required and there are also options for multi-platform licenses, including a version for the iPad. For me (!) a much better solution. But I was told that are still some advantages of the Adobe Suite, but for my purposes those don't matter. My recommendation is clearly Affinity Designer! It’s about 50 bucks for a license (one-time payment).
I do all my re-drawings in this software and I haven’t found any limitations so far (outside my own limitations of course). The following text and videos are based on this software, but I know that the base functions are there in the other tools, but they might need to be handled in a different way.
You can find a good overview about the capabilities of the different software packages here:
https://en.wikipedia.org/wiki/Comparison_of_vector_graphics_editors
I will do separate chapters for different topics, and I will not do this on a strict timing plan, I will write a new chapter whenever I feel motivated enough to do so. Your feedback is very important. Please let me know when something is unclear or missing.
I will use small videos to explain what I say. I tried it with simple screen shots first, but this didn’t work well. The videos don’t have sound, but they should be self-explaining. I also switched my Affinity Designer to "English" (yes English, not American, it's a British company), so you see how the different tools are called. Downside: You miss the names in German, which is such a beautifull, soft language....
Let's go!
Part 1 – Lines and simple straight forms
Start your vector software and open a new document (the document size doesn’t matter)
Please see video 1
You start with the Pen Tool. A line is created by two points. Whenever you make a left click with the Pen Tool active, you create a point. Another left click will create another point, but now we see a line between the 2 points we made so far. If you click for a third time, you will see, the line is continued. Each line segment between 2 point is straight. When you have done the first 3 points and hoover with the Pen Tool over the first point you created, you will see a small circle beside the pointer. When you now add another point (in principle your fourth point is on the exact same spot as your first point), the four straight lines will be connected, and you made a “form”. Now we change the tool to the “Node Tool” (this is the tool which looks like the spaceship in the great game “Asteroids”!), Move the tool to any of the 4 points you did before (to the points, NOT to the lines connecting them). When your pointer is on one the points, make a left click and hold the mouse button. Now move your mouse. You will see that this point is moving with your mouse, the connected lines are stretched or compressed, depending on your move, but the other three points keep their position. The “Stroke” menu allows you to change the sickness of the lines of your form. Leave it at about 0.2 for the time being. I usually set this to 0, but then your form will be invisible, when not active.
-
Please see video 2
Create a second form by repeating the whole process. Hint: when you start a new form with a new point, but it appears a line connected to a point on the other form, you did not close the other form correctly. Doesn’t matter now, simply press “escape” and continue with the second form. When you’re done with this, you can only see the points of the second form, this one is now active. All color changes or similar will only affect the “active” form! Use the “Node Tool” and click on the first form to make this one active again. Now we want to change the color of both forms. With one of our forms active, we use the “Move Tool” (the black arrow) or the "Node tool"and click on “Fill”. There are some tabs, one of them is called "colour" (this means "color" in American English. 🙂 Select any color you like and your form will be filled. Repeat for the other form.
-
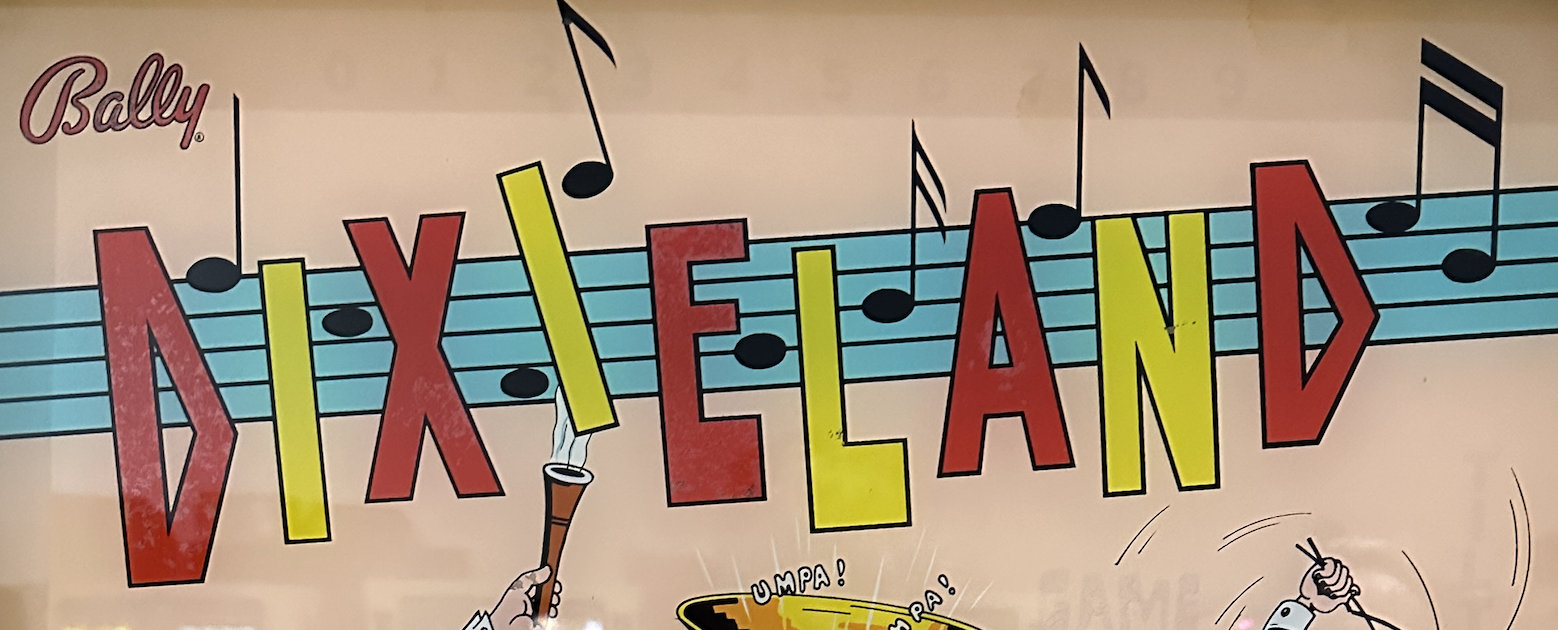
Let’s start with a simple example. We want to re-draw some letters. For this example, we use the back glass of “Dixieland” (picture attached), drawn by my favorite Artist Christian Marche, his designs are perfect for beginners!
Open the picture in your Vector software. In Affinity Designer you will see a small symbol of it in the “layers” section in the lower right part of the workspace. This “layer” menu is very important. All the elements (forms, lines etc.) you create, will show up here. And it will allow you to change the sequence of your elements. If you think about your drawing as a pile of paper, with each sheet of paper representing one of your elements, you can control which element is on top and overlaps other elements. You can also switch on or off each element by clicking on the grey dot right beside it. The picture of our Dixieland BG is our background, so it should always be on the lowest position of our drawing. When you click a little left of the grey dot, you will see a little lock, this means this layer is locked and cannot be changed. (Very important for the background picture!)
When you look at the name of the game, you will notice, that the letters are in 2 different colors (not important here), but one thing they have in common is a black borderline. If you create any kind of (closed) form as a vector, you can specify the color for filling and the color (and the thickness) for a border line. You can also define if the border line is within, on or outside the form you created.
Let’s start! Now we need to think about, how we continue. We can draw the letters with a border line, or we can do it in different layers (a black layer and another layer for the letter itself). We’ll do both! (I usually don’t work with boarder lines; I prefer the layer “way”. When you look at most of the EM back glasses, you will see that many parts are surrounded by black lines. Working with layers is much simpler and faster for that, even when it seems to be more work in the beginning)
You will also see a different way to select a color, the “Color Picker Tool”. With this tool you can simply select a color of your background picture just by clicking on the desired color. The form currently active will take that color.
Nearly all EM BGs and Playfields were made in Silkscreen technology. The number of different color is limited, usually it’s around 10 (+/-). In a later Chapter we will create a document specific color table with only these colors. Using such a table has a huge advantage, when you change one of the colors, all parts of your drawing using that color will change to the new setting immediately. Many colors of the old BGs are faded, so just picking a color from one area seem to be ok, but when you see the completed drawing later on, you might want to do some color corrections. But more to that in a later chapter.
Back to our example:
First, we do the Letter “I” with the border line method.
Please see Video 3
-
Second, we will do the “L” with 2 layers. A black background and the colored part of the letter.
Please see video 4
-
All for the first chapter. Now just play around and practice!
Next part will be about curves and rounded forms, if you like me to continue!
Jens