In my ongoing quest to champion VR in VPX I've updated my template tables to make it *even easier* to add a minimal impact VR cabinet and room to VPX tables.
Included are full tables, separate primitives, required materials and artwork templates.
Thanks to;
3rdaxis: Original detailed Addams Family pincab model
Flupper: Remodeled and simplified pincab from TOTAN
******************************************
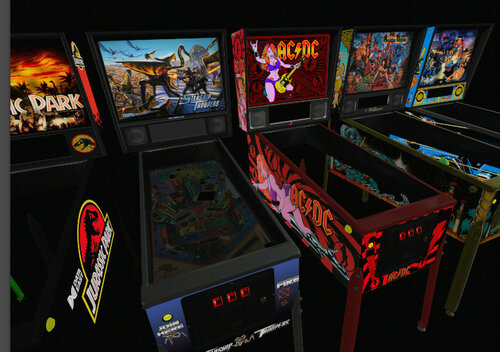
A set of plug and play PinCab templates and primitives for use in VR, currently for;
Bally Pre-WPC (Black Rose, Dr Dude etc. - Speakers on top of backbox)
Bally WPC95 (Cactus Canyon, AFM etc. - Bally logo, 3d speakers.)
Data East / Sega System 3 (Jurassic Park, Hook etc. - Simple DMD area, artwork speaker grills, 3d speakers)
Sega Showcase (Starship Troopers, SWT etc. - Showcase logo, 3d hard speakers, some artistic license as the real backbox has no sides)
Sega Large DMD (Batman Forever, Baywatch etc. - Large DMD with art, 2D speakers.)
Stern (All older DMD tables - Plan DMD, Square 3D Speakers, some artistic license)
Stern Spike (Guardians of the Galaxy etc. - Large DMD area, 3d speakers)
Williams WPC (Judge Dredd, No Fear - Artwork DMD area, 2d speakers.)
Williams WPC95 (TOTAN, Medieval Madness etc. - Williams logo, 3d speakers.)
***********
How to use
***********
Open the VPX table you want to add a VR Cab/Room
*Optional but recommended* - Clear Layer 11 on your VPX table for all your VR stuff.
Open the VR Template table of your choice *in the same VPX window* (i.e. DO NOT open another instance of VPX)
Select the VR Template window and drag select all items on the VR Template table and "Copy" it.
Select VPX table window and "Paste" it, hopefully everything should land on layer 10/11.
Either export the materials from the VR template or download the materials file and import them to the VPX table.
Export the images from the VPX table, then edit them with whatever artwork you are going to use and import them to the VPX table (or just import them to test and do the artwork later).
****************************
How to adjust to fit your table
****************************
All primitives (apart from Bally Pre-WPC) have the same origin / control point, so you should always adjust every primitive together (including the room, floors, walls etc.)
Drag select all the primitives on Layer 11
Adjust the X / Y base position to move the primitives so that the top edge is aligned with the back of the glass holder and the left side blade is flush with the left table edge. (These will not move when the below adjustments are made)
Making the ZSize higher will make the table longer (adjust so that the bottom of the apron is flush with the lockdown bar)
Making the XSize higher will make the table wider (adjust so the right blade is flush with the right side table edge)
Adjust the Z base position so that the cabinet and room are sitting at the right height.
If a pincab has Grills they *must not* be static so they can be seen through.
You should now be good to go!
***************************
How to use the artwork files
***************************
Open the Artwork templates in GIMP, Photoshop or your tool of choice (I use GIMP because it's free, great and I've used it forever).
The cabinet one is very straightforward, paste your artwork in and make sure the "Front" of the cabinet has the middle cut out so you can see the start button, so it's textured correctly. It does look better if you can photoshop out the original start button and the plunger, at least enough that it's hidden by the real plunger/button.
The backbox has numerous layers for different DMD's, it again is fairly straightforward.
However, if you are using the 3D speakers you need to make sure the original speakers are visible.
Try and use the highest res possible, a good resource for high quality pinball cabinet photographs is the pinside for sale pages. Take your time, learn your paint programme, or if you've found the artwork and struggle with the paint programme just contact me and send me the artwork and I'll do it (finding high quality artwork is the hard part!).
Save the art in jpg at max quality, its nearly always significantly smaller than a PNG, loads faster and there is no loss in image quality. (apart from the grills, which have to be PNG's as they're see through!)
*****************************
Explanation of the primitives
*****************************
Layer 10 is the DMD and Logo.
Layer 11 are all the primitives.
In "VR Room Xtras - Primitives.zip" there are a complete breakdown of primitives and lots of combinations, so you can colour your pincab and it's metals appropriately. Just make sure you only have one of each "thing" showing (i.e. don't use coindoor *and* coindoor_hinges, as you'll be doubling up on coindoor polys for no reason)
This is a just a small list of some of the combinations;
-
PinCab_Backbox_Plain
Totally flat and blank DMD area, used by Williams WPC (Dredd)
No 3D speaker effect, does not use speaker grills.
-
PinCab_Backbox_Stern
Rounded Square 3D Speaker, used by Stern (ACDC)
Must be used with;
PinCab_Speaker_Grills_Stern and stern backbox template.
-
PinCab_Backbox_WPC95
WPC95 3D Speaker shape, used by Williams & Bally WPC95, Sega Showtime & Data East
Must be used with;
PinCab_Speaker_Grills_WilliamsWPC95 and their correct backbox template.
-
PinCab_Backglass
The backglass translite **The image MUST be called "BackglassImage" if you want VPVR to be able to capture external backglasses and show them inside VR**
-
PinCab_Blades
Sides for inside of the cabinet.
-
PinCab_Bottom
A base for blocking the view of the carpet for playfield which have holes or transparencies, might need it's Z value dropping if the table has a lower playfield.
-
PinCab_Cabinet
Simple cabinet, start button, coinlogo, playfield glass holder
-
PinCab_Flipper_Buttons
A pair of buttons, optional as they're complicated objects, set colour with materials.
-
PinCab_Metals_Legs_Rails_Fittings
4x legs, rails, leg screws, doorlock, feet.
Metalwork for most normal pinball machines.
-
PinCab_Metals_CoinDoor
Coindoor
Used for most machines, use material "black_powdercoat" normally
-
PinCab_Metals_Legs_Rails
4x legs, rails.
Use for things like ACDC Luci & AFM SE where the rails and legs are powdercoated a specific colour.
-
PinCab_Metals_Fittings
Leg screws, doorlock, feet, use material "metal"
Use with PinCab_Metal_Legs_Rails above to have normal "metal" fixings.
- PinCab_Metals_Complete
Complete set of all metals, including coindoor, legs, rails, fittings
Used for TOTAN, use materials to colour, "metal" or "gold" etc.
User Feedback
Create an account or sign in to leave a review
You need to be a member in order to leave a review
Create an account
Sign up for a new account in our community. It's easy!
Register a new accountSign in
Already have an account? Sign in here.
Sign In Now